Introduction
Welcome back to our module on Biomechanics for Hypertrophy. In our last lesson, we established a crucial foundation: muscles don't just lift weights; they manage torque at joints. We saw that the torque an exercise demands is a product of the force (the weight) and its external moment arm. Critically, we observed how this moment arm—and thus the torque demand—changes throughout an exercise's range of motion.
Today, we build directly on that concept. The changing torque demand of an exercise is known as its resistance profile. This is the demand placed on the body. But what about the body's capacity to meet that demand? A muscle's ability to produce force also changes throughout its range of motion, a characteristic we call its strength curve.
The learning outcome for this lesson is to analyze the interaction between an exercise's resistance profile (e.g., free weights, cables) and a muscle's strength curve to optimize stimulus. By the end of this lesson, you will be able to dissect any exercise and determine how well its challenge is matched to the target muscle's strength, a skill that separates good coaches from great ones.
1. Resistance Profile: The Story of the Load
An exercise's resistance profile is a map of its difficulty across the range of motion. It tells you where the exercise is hard, where it's easy, and where the challenge is greatest. As we learned, for free-weight exercises, this is primarily dictated by the changing length of the external moment arm.
Let's start with a very practical, and perhaps controversial, look at a common exercise to see why this matters.
The video 'Torque, Force, Moment Arms' by Hypertrophy Coach Joe Bennett, whom we've heard from before, offers a powerful critique of the standard dumbbell lateral raise by analyzing its resistance profile.
Watch the segment from 07:40 to 18:30. As you watch, focus on these key points: The Question of Impressiveness (09:00 - 10:20): Why is lifting a 100lb dumbbell for 6 inches at the top of a lateral raise so much more impressive than at the bottom? Visualizing the Moment Arm (11:00 - 13:40): Pay close attention to how he draws the line of force (straight down from gravity) and the external moment arm (the perpendicular distance from the shoulder joint to that line). See how it grows from near-zero to its maximum length. The Inefficiency Problem (16:00 - 18:30): What is his core argument for why the dumbbell lateral raise is an 'inefficient' exercise for hypertrophy? What percentage of the range of motion does he argue is being 'wasted'?
The video makes a compelling case. The dumbbell lateral raise has a resistance profile that is extremely easy at the bottom (where the moment arm is tiny) and maximally difficult at the top (where the moment arm is longest). If your goal is to challenge the deltoid through its entire range of motion, this exercise leaves a significant portion of that range—the beginning—under-stimulated. The torque demand is simply too low to force an adaptation.
This introduces the central theme of today's lesson: the mismatch between what an exercise demands and what a muscle can do.
2. The Two Curves: Resistance Profile vs. Strength Curve
To analyze this mismatch systematically, we need to formally define the two interacting curves.
-
Resistance Profile (External): Describes the required torque at each point in an exercise's range of motion. This is a property of the exercise itself. It's determined by:
- External Moment Arm: How the leverage of the weight changes.
- Resistance Type: Whether you're using free weights, cables, bands, or machines.
-
Strength Curve (Internal): Describes the muscle's capacity to produce torque at each joint angle. This is a property of your body. It's determined by:
- Internal Moment Arm: How the muscle's own leverage on the joint changes.
- Length-Tension Relationship: The inherent ability of muscle fibers to produce force at different lengths, based on the overlap of actin and myosin filaments.
Let's get a more detailed breakdown of these concepts.
How can exercise strength curves affect hypertrophy?
The article 'How can exercise strength curves affect hypertrophy?' by Chris Beardsley from S&C Research provides a rigorous, scientific distinction between these two curves.
Read the first three sections of this article, from the beginning down to just before 'What are the different types of strength curves?'. Focus on how the author separates the concept into two distinct questions: 'What determines our capacity for producing a turning force...?' (This defines the muscle's strength curve). 'What determines the requirement for a turning force...?' (This defines the exercise's resistance profile).
This framework gives us the analytical tools we need. We are no longer just looking at an exercise; we are comparing two distinct functions—the demand function (resistance profile) and the capacity function (strength curve)—over the domain of the joint's range of motion.
The goal of intelligent exercise selection is to make these two functions align as effectively as possible.
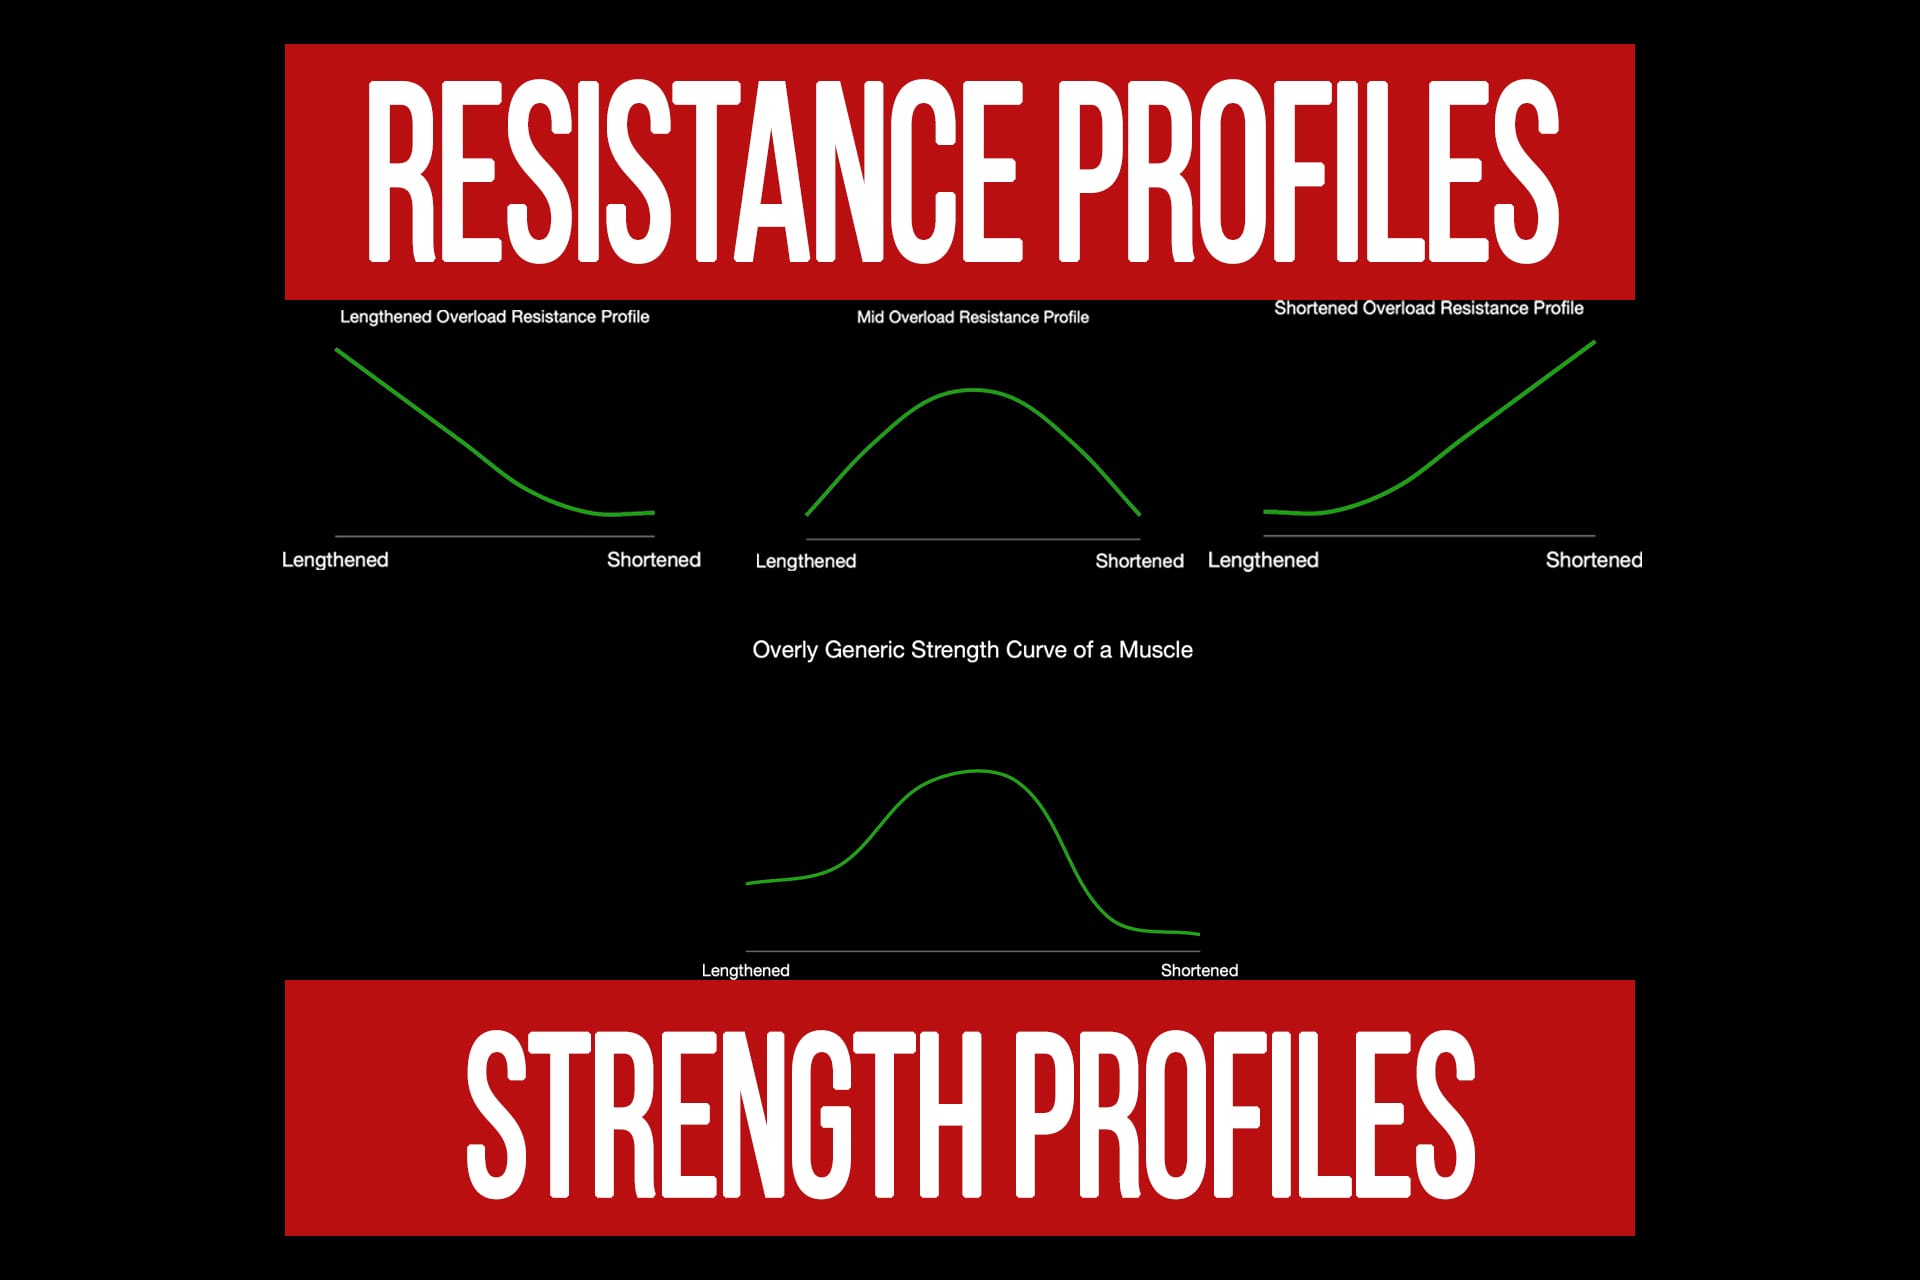
3. Categorizing Profiles and Finding the Match
Now, let's categorize the common profiles you'll encounter in the gym and analyze how they match up with a muscle's typical strength curve.
Min-Maxing Strength Curves for Hypertrophy
The article 'Min-Maxing Strength Curves for Hypertrophy' provides an excellent overview of different strength curve types and the equipment that creates them. Given your background, you'll likely appreciate its systematic approach.
Read the following sections from the article: 'The Four Strength Curves': Understand the four main categories: hardest at the start (linear ascending), hardest in the middle (bell-shaped), hardest at the end (linear descending), and flat. 'Factors That Affect A Strength Curve': Briefly review the concepts of external and internal moments. 'Do Exercise Machines Have Better Resistance Curves for Hypertrophy?' 'Do Cable Machines Have Better Resistance Curves for Hypertrophy?' 'Do Resistance Bands Have Better Resistance Curves for Hypertrophy?' 'Does Accommodating Resistance Increase Hypertrophy?' Focus on how each type of equipment (free weights, machines, cables, bands) characteristically alters the resistance profile.
Let's synthesize this information into a practical table.
| Resistance Type | Typical Profile Description | Common Examples | Hypertrophy Implication |
|---|---|---|---|
| Free Weights | Bell-Shaped: Hardest when limb is horizontal. Gravity-dependent. | Bicep Curl, Bench Press, Squat | Often a good match for muscles that are strongest in the mid-range. Can be very effective. |
| Cables | Variable/Constant: Profile depends on setup. Line of pull is not limited to vertical. | Cable Fly, Cable Lateral Raise, Triceps Pushdown | Highly versatile. Can be set up to create constant tension or to overload specific parts of the range, like the stretched or shortened positions. |
| Machines (Cam-based) | Engineered Profile: The shape of the cam determines the resistance profile. | Pec-Deck, Leg Extension, Leg Curl | Can be designed to perfectly match a muscle's strength curve. A well-designed machine is often superior to a free weight equivalent. |
| Bands / Chains | Ascending/Variable: Resistance increases as the implement is stretched/lifted. Easiest at start, hardest at end. | Banded Squats, Banded Bench Press | Generally poor for hypertrophy on its own. Can be useful as accommodating resistance with free weights to make the easy part of a lift harder (e.g., lockout). |
4. Practical Application: Optimizing Exercise Selection
Knowing the theory is one thing; applying it in the gym is another. The goal is to select exercises that challenge the muscle through a large and meaningful range of motion, ideally emphasizing the lengthened position to take advantage of stretch-mediated hypertrophy.
Let's watch a final video that puts this all together with practical examples.
Tension Curves for Hypertrophy Training | Implications for Exercise Selection
The video 'Tension Curves for Hypertrophy Training' from Flow High Performance clearly summarizes the practical implications for exercise selection.
Watch the final part of the video from 04:36 to the end (08:20). Notice how they apply the principles of tension curves to two common problems: Horizontal Rows: Why is a standard cable row potentially suboptimal, and how does a T-bar row or landmine row offer a better-matched resistance profile? Chest Flys: Why does a dumbbell fly lose tension at the top, and why is a cable fly or pec-deck a more effective choice for challenging the pecs through the full range?
These examples highlight a key coaching skill: if you identify a mismatch in a standard exercise, you can often find a variation or a different piece of equipment that solves the problem.
-
Problem: Dumbbell fly provides almost zero tension on the pecs at the top of the movement.
-
Solution: Use a cable fly or pec-deck machine, which pulls the arms horizontally and maintains tension in the fully shortened (contracted) position.
-
Problem: A barbell row is often limited by strength at the very end of the range of motion, meaning the stretched position at the bottom is underloaded.
-
Solution: Use a T-bar row or a machine with an engineered cam that makes the resistance heavier at the start and lighter at the end, better matching the strength curve of the back muscles.
Conclusion
Today, you have learned one of the most important principles in biomechanics for hypertrophy. You have moved beyond simply choosing exercises and into the realm of analyzing the interaction between the exercise and the athlete. This is the difference between following a program and designing one with intent.
Key Takeaways:
- Every exercise has a resistance profile (how its torque demand changes), and every muscle has a strength curve (how its torque capacity changes).
- The goal of intelligent exercise selection is to match the resistance profile to the strength curve, ensuring the muscle is challenged effectively through a large range of motion.
- Free weights often create bell-shaped curves, which can be effective but are limited by the vertical pull of gravity.
- Cables and machines offer superior versatility, allowing you to manipulate the resistance profile to create constant tension or overload specific parts of the movement (like the stretched position).
- By analyzing this interaction, you can identify "inefficient" exercises and substitute them with variations that provide a superior hypertrophic stimulus.
Preview for the Next Lesson
We've now analyzed movement at the level of a single joint, focusing on torque and matching resistance profiles. However, most important gym movements involve multiple joints working in concert. For this to happen efficiently and safely, the body must intelligently manage stability and mobility across the entire kinetic chain.
In our next lesson, we will zoom out to a system-level view and explain the concept of stability vs. mobility at different joints (e.g., stable knee vs. mobile hip) and its importance for force transfer and injury prevention.