Hello! Welcome to the fifth lesson in our course.
In the last lesson, we focused on cleaning and standardizing our raw data, transforming messy movie titles and country names into consistent, usable formats. We now have cleaner data, but it likely contains information spanning entire years. Our project goal, however, is to specifically analyze movie trends in the lead-up to Christmas.
This brings us to today's learning outcome: Filter datasets to isolate the pre-Christmas period (typically November-December). This is a crucial step to scope our analysis correctly. We'll be working with pandas, leveraging its powerful time series capabilities to slice our dataframes precisely.
We will cover:
- Converting date columns from text to specialized
datetimeobjects. - Techniques for filtering these
datetimeobjects to select rows within our desired November-December window.
1. The Prerequisite: Working with datetime Objects
Before we can filter by date, we must ensure our dates are stored in a format that Python and pandas understand chronologically. A simple string like "2022-11-25" is just text to the computer; it doesn't inherently know that it comes before "2022-12-01".
The first and most critical step is to convert any date-like columns into datetime objects. The pandas function pd.to_datetime() is the standard tool for this. It's smart enough to recognize most common date formats automatically, but can also be guided to parse more unusual formats, which connects to the pattern-matching concepts from our last lesson.
The video below provides an excellent demonstration of this process.
Python Pandas Tutorial (Part 10): Working with Dates and Time Series Data
The video 'Python Pandas Tutorial (Part 10)' by Corey Schafer is a comprehensive guide to time series data. We'll start by focusing on the initial, crucial step of converting data into the correct datetime format.
Please watch from 02:16 to 10:41. This segment explains why direct string operations on dates fail and demonstrates how to use pd.to_datetime() to convert a column. Pay attention to how the format argument can be used to parse non-standard date strings, as your scraped data might require this.
Once a column is converted, pandas unlocks a special .dt accessor. This accessor lets you easily extract properties like the year, month, day, or day of the week from each datetime object. For example:
# Assuming 'df' is your DataFrame and 'viewing_date' is a string column
df['viewing_date'] = pd.to_datetime(df['viewing_date'])

# Now you can access datetime properties
months = df['viewing_date'].dt.month # This returns a Series of integers (1-12)
years = df['viewing_date'].dt.year   # This returns a Series of years
This .dt accessor is the key that enables all subsequent filtering techniques.
2. Filtering by Date Range
With our date column properly formatted, we can now select the data from November and December. There are two primary and highly effective methods to achieve this.
Method 1: Boolean Masking
This is a flexible and intuitive approach that you've likely encountered in your work with pandas and NumPy. The idea is to create a "mask"—a boolean Series (True/False)—that identifies which rows meet our criteria. We can then use this mask to select the desired rows from the DataFrame.
To define our pre-Christmas period, we need to combine two conditions:
- The month is November (11) OR the month is December (12).
- (Optional but recommended) The year is the specific year we are analyzing.
The following video explains the syntax for combining multiple conditions in pandas.
How do I apply multiple filter criteria to a pandas DataFrame?
The video 'How do I apply multiple filter criteria to a pandas DataFrame?' from Data School clearly explains the logic of combining conditions. While the examples use different data, the principles are universal.
Please watch from 01:58 to 09:24. Focus on three key points: How to combine conditions using & (and) and | (or). The critical importance of wrapping each condition in parentheses (). The use of the .isin() method, which is a very clean and readable way to check if a column's value is in a list (e.g., if the month is in [11, 12]).
Applying these concepts, we can filter our data. Let's say we want data for Nov/Dec 2022.
# Assume 'df' has a datetime column 'viewing_date'

# Method A: Using the | (OR) operator
is_november = (df['viewing_date'].dt.month == 11)
is_december = (df['viewing_date'].dt.month == 12)
is_2022 = (df['viewing_date'].dt.year == 2022)

pre_christmas_df = df[(is_november | is_december) & is_2022]


# Method B: Using .isin() for a cleaner approach
months_of_interest = [11, 12]
is_pre_christmas_period = df['viewing_date'].dt.month.isin(months_of_interest)

pre_christmas_df = df[is_pre_christmas_period & is_2022]
A very powerful feature of datetime columns is that you can also compare them directly with date strings. This often leads to the most readable code. The following article and image illustrate this perfectly.
How to Filter Pandas DataFrames on Dates
This article, 'How to Filter Pandas DataFrames on Dates', provides a concise, code-focused guide on this exact topic.
Please read the section 'Filtering Pandas DataFrames on Date Ranges'. It shows the most direct way to filter between two dates once your column is in datetime format.
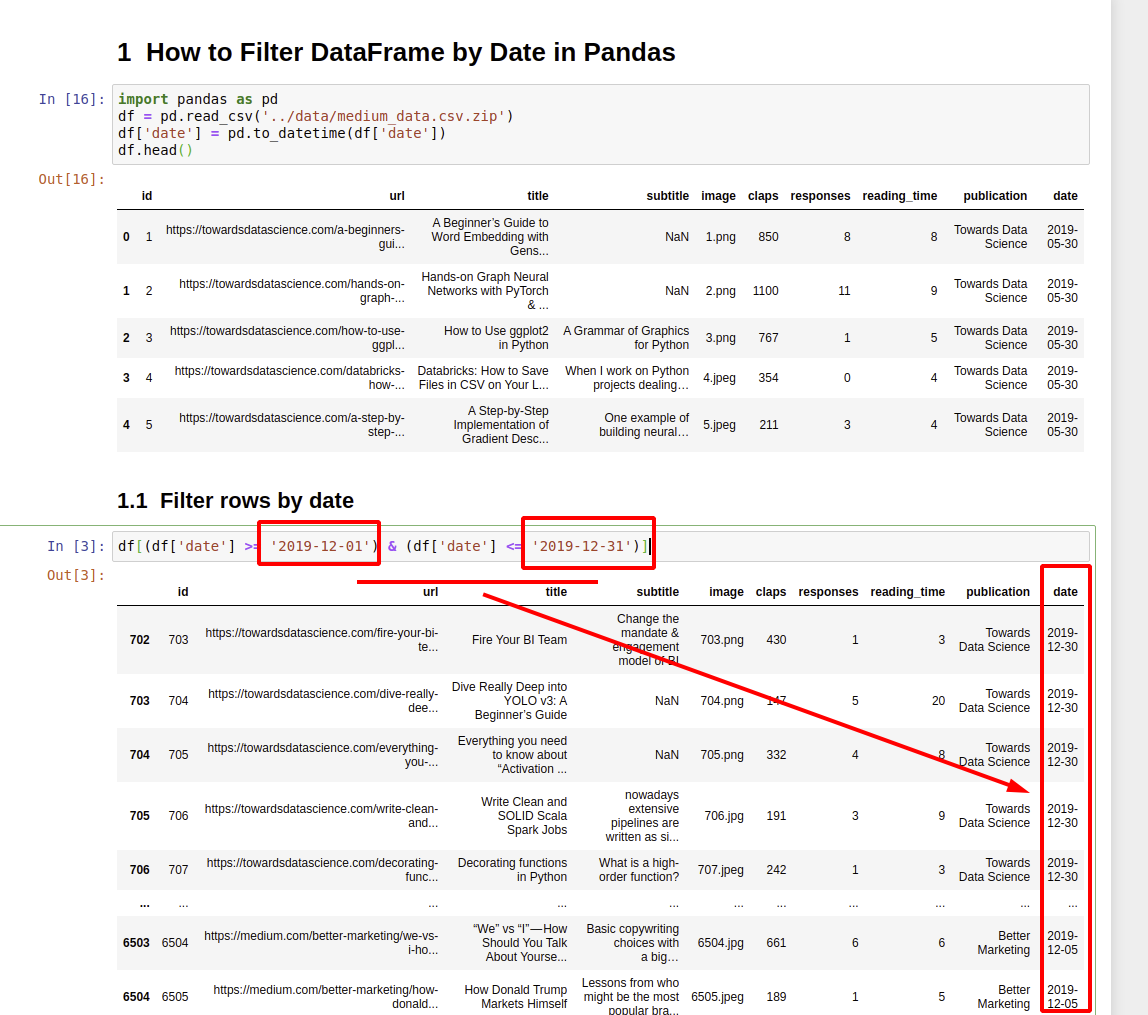
This direct comparison is often the preferred method:
# Method C: Direct comparison with date strings (most readable)
start_date = '2022-11-01'
end_date = '2022-12-31'

mask = (df['viewing_date'] >= start_date) & (df['viewing_date'] <= end_date)
pre_christmas_df = df.loc[mask]
Test your understanding!
You have a DataFrame df_views with a datetime column named watch_date. Some of your data is from 2021. For your project, you've decided you only want to analyze data from November 15th, 2022 to December 24th, 2022, inclusive.
How would you write the pandas code to create a new DataFrame filtered_df containing only the data from this specific period?
Show answer
You would use boolean masking with two conditions combined with an & operator.
import pandas as pd

# Assume df_views is already created and watch_date is a datetime column
start = '2022-11-15'
end = '2022-12-24'

mask = (df_views['watch_date'] >= start) & (df_views['watch_date'] <= end)
filtered_df = df_views.loc[mask]

# You could also write it in a single line:
# filtered_df = df_views.loc[(df_views['watch_date'] >= '2022-11-15') & (df_views['watch_date'] <= '2022-12-24')]
This efficiently selects all rows that fall within your precise date range.
Method 2: Using a DatetimeIndex
For datasets where time is the primary axis of analysis, pandas offers a more powerful and efficient structure: the DatetimeIndex. By setting your date column as the DataFrame's index, you can select data using intuitive slicing, similar to how you would slice a list in Python.
This method has two steps:
- Set the
datetimecolumn as the index usingdf.set_index('your_date_column', inplace=True). - Select date ranges using
df.loc[].
The same video from Corey Schafer that we started with also covers this elegant technique.
Python Pandas Tutorial (Part 10): Working with Dates and Time Series Data
Let's return to the 'Python Pandas Tutorial (Part 10)' video to see a more advanced and efficient filtering method.
Now, please watch from 18:20 to 21:05. This part demonstrates how to set the date column as the DataFrame index and then use simple slicing (df.loc['YYYY-MM-DD':'YYYY-MM-DD']) to select a range of dates. Notice how much cleaner the selection syntax is.
Here is how you would apply this to our problem:
# Assume df is your DataFrame and 'viewing_date' is a datetime column
df_indexed = df.set_index('viewing_date')

# Now, you can slice directly with strings!
# This selects all data from November and December 2022
pre_christmas_df = df_indexed.loc['2022-11':'2022-12']
This method is not only highly readable but can also be more performant on very large time series datasets.
Conclusion
You have now learned the essential techniques for zeroing in on a specific time window within your data. This filtering is what transforms a general dataset into one that is tailored to answer a specific, time-sensitive question.
Key Takeaways:
- Always convert to
datetime: Before any time-based filtering, ensure your date column is converted usingpd.to_datetime(). - Boolean masking is flexible: Creating masks using logical operators (
&,|) and direct date comparisons gives you fine-grained control over selection. The.isin()method is particularly useful for selecting multiple months. DatetimeIndexis efficient and elegant: For time-centric data, setting aDatetimeIndexallows for clean, intuitive slicing and can improve performance.
In our journey so far, we have sourced, scraped, cleaned, standardized, and now filtered our data. The pieces are ready.
In the next lesson, we will perform the final step of our data preparation: Consolidate cleaned data into a single tidy dataset with columns for country, movie title, viewing metrics, and date. This will create the master dataset upon which we will build all our analyses and visualizations.