Hello! Welcome back to our course on building a production-ready website with Astro.
In our last lesson, you learned how to supercharge your content by embedding interactive React components directly into your MDX files. This gave you the power to create rich, engaging individual content pages. However, your content currently lives in isolation within the src/content/ directory. For a real website, we need a way to present this content to users, for example, by creating a main blog page that lists all your articles.
Today's lesson focuses on exactly that. Our learning outcome is to query and filter your content collections programmatically on a page. You will learn how to use Astro's built-in functions to fetch entries from your collections, select only the ones you need, and display them. This skill is the backbone of creating any content-driven pages, from blog indexes and service listings to case study archives.
Querying Content with getCollection
To access the content you've authored, Astro provides a powerful helper function called getCollection. This function, imported from the special astro:content module, allows you to retrieve all the entries from a specified collection. It runs at build time, gathering your content and making it available to your Astro pages as a data array.
Let's start by creating a page to list all our blog posts.
- Create a new file at
src/pages/blog.astro. - Inside this file, you'll import
getCollectionand call it, passing the name of the collection you want to query (in this case,'blog').
---
// src/pages/blog.astro
import { getCollection } from 'astro:content';

// getCollection returns a promise, so we use await
const allBlogPosts = await getCollection('blog');
---

<html lang="en">
<head>
  <meta charset="utf-8" />
  <meta name="viewport" content="width=device-width" />
  <title>Our Firm's Blog</title>
</head>
<body>
  <h1>Our Firm's Blog</h1>
  <p>Here you will find the latest news and insights.</p>
  <ul>
    {allBlogPosts.map(post => (
      <li>
        <a href={`/blog/${post.slug}/`}>{post.data.title}</a>
        <p>{post.data.description}</p>
      </li>
    ))}
  </ul>
</body>
</html>
In this example:
await getCollection('blog')returns an array where each item represents one of your.mdxfiles insrc/content/blog/.- Each
postobject contains several properties, but for now, we're interested inpost.slug(a URL-friendly version of the filename, perfect for links) andpost.data(the frontmatter you defined in your schema). - We use the standard JavaScript
.map()function to iterate over the array and render an HTML list item for each post.
This pattern of fetching data in the frontmatter script and then rendering it in the template below is central to how Astro works.
Filtering and Sorting Your Queries
In a real-world project, you'll rarely want to display every single piece of content. For an accounting firm's website, you'll want to hide draft articles or posts scheduled for a future date. getCollection makes this straightforward by accepting an optional filter function.
To get a foundational understanding of querying and filtering, let's turn to the official documentation.
Content collections - Astro Docs
The Astro docs provide the definitive guide to querying collections. Focus on how getCollection works and how you can use its optional filter function.
Please read the sections 'Querying Collections' and 'Filtering collection queries'. Pay close attention to the syntax of the filter callback function; it's a pattern you will use frequently.
As the documentation shows, the filter function is passed as the second argument to getCollection. This function receives each content entry, and you decide whether to include it in the final array by returning true or false.
Let's refine our blog page to only show published posts and sort them by date.
1. Filtering Out Drafts and Future Posts
In your blog schema, you likely have an isDraft: z.boolean().optional() and a pubDate: z.date(). We can use these to create a production-ready query.
The filter function receives an object representing the entry, which contains id, slug, collection, and data. We're interested in the data (frontmatter).
---
// src/pages/blog.astro (Updated)
import { getCollection } from 'astro:content';

const publishedPosts = await getCollection('blog', ({ data }) => {
  // Return true for posts that are NOT drafts AND have a pubDate in the past.
  return !data.isDraft && data.pubDate <= new Date();
});
---
<!-- ... template remains the same for now, just uses publishedPosts ... -->
This is much more robust. Now, even if you have dozens of draft articles in your src/content/blog directory, they won't appear on the live site.
2. Sorting by Publication Date
getCollection returns entries in an unpredictable order. You almost always want to sort them. Since the result is a standard JavaScript array, you can simply chain the .sort() method.
To sort blog posts from newest to oldest, you can compare their pubDate values.
---
// src/pages/blog.astro (Final Version)
import { getCollection } from 'astro:content';

const posts = await getCollection('blog', ({ data }) => {
  return !data.isDraft && data.pubDate <= new Date();
});

// Sort posts by date, newest to oldest
const sortedPosts = posts.sort((a, b) => b.data.pubDate.valueOf() - a.data.pubDate.valueOf());
---

<html lang="en">
<!-- ... head ... -->
<body>
  <h1>Our Firm's Blog</h1>
  <p>Here you will find the latest news and insights.</p>
  <ul>
    {sortedPosts.map(post => (
      <li>
        <a href={`/blog/${post.slug}/`}>{post.data.title}</a>
        <p>{post.data.description}</p>
      </li>
    ))}
  </ul>
</body>
</html>
Notice we use .valueOf() on the date objects to get their numeric representation for a reliable comparison. This combination of getCollection, a filter callback, and .sort() is a powerful and common pattern in Astro.
The following article provides another clear, practical example of this exact workflow.
How to Use Astro Content Collections
This blog post from astrocourse.dev reinforces these concepts with a concise, real-world code example. It's a great way to see the same pattern in a slightly different context.
Read the section 'How to Query and Filter Content'. Notice how the author combines filtering and sorting into a single, chained statement. This is a common and efficient way to write your queries.
Advanced Filtering: By Subdirectory
As your site grows, you might want to organize content within a collection. For instance, your accounting firm might have blog posts for "individuals" and for "businesses". You can organize these into subfolders:
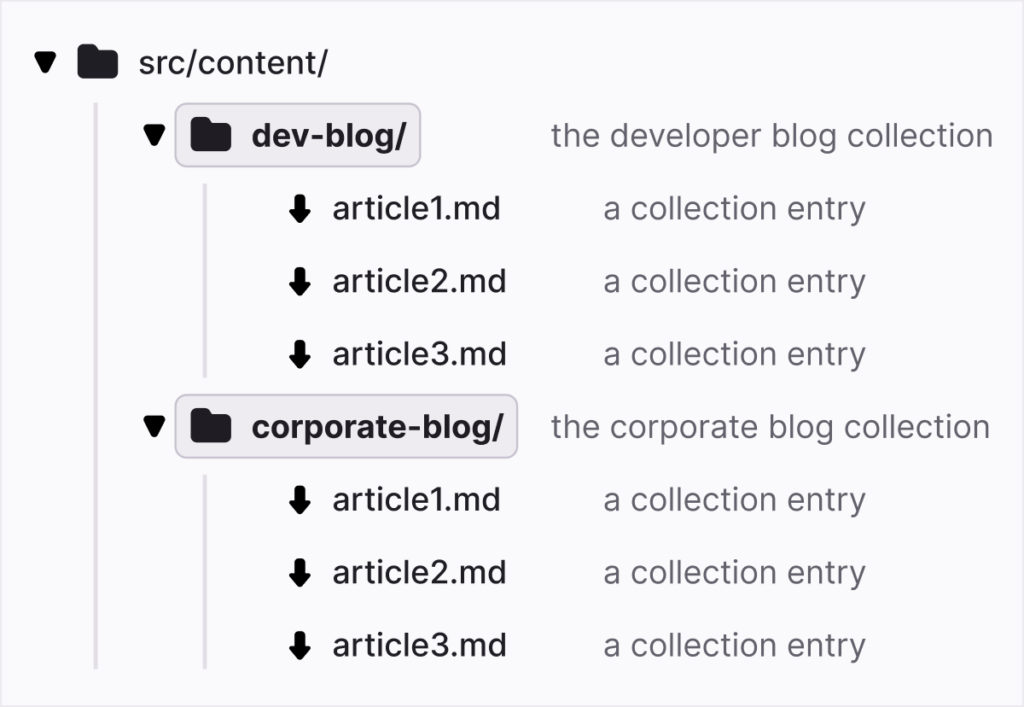
You can filter for these by checking the entry.id, which includes the subfolder path. For example, to get only the posts from the businesses subdirectory:
const businessPosts = await getCollection('blog', (entry) => {
  return entry.id.startsWith('businesses/');
});
This allows you to manage different content types within a single collection and create separate pages for them.
Test your understanding!
Imagine your accounting website has a services collection to manage its service offerings. Each service in src/content/services/ has frontmatter with title, description, and a boolean isFeatured.
Your task is to create a new page at src/pages/featured-services.astro that displays only the featured services.
- What would the
getCollectioncall look like to fetch only the entries whereisFeaturedistrue? - How would you then map over the result to display a list of the featured service titles?
Show answer
The file src/pages/featured-services.astro would look like this:
---
import { getCollection } from "astro:content";

// 1. Filter the 'services' collection for featured items.
const featuredServices = await getCollection("services", ({ data }) => {
  return data.isFeatured === true;
});
---
<html lang="en">
<head>
    <title>Our Featured Services</title>
</head>
<body>
    <h1>Our Featured Accounting Services</h1>
    <ul>
        {/* 2. Map over the filtered results to display them. */}
        {featuredServices.map(service => (
            <li>{service.data.title}</li>
        ))}
    </ul>
</body>
</html>
This demonstrates how to use getCollection with a filter to programmatically select and display a specific subset of your content, a core skill for building dynamic pages.
Conclusion
In this lesson, you've bridged the gap between authoring content and displaying it. You now have the fundamental skill to build dynamic index pages for any type of content on your site.
Key Takeaways:
- Use
getCollection('collection-name')fromastro:contentto query all entries in a collection. - Provide a callback function to
getCollectionto filter entries based on their frontmatter (data) or file path (id). This is essential for hiding drafts or creating specialized listings. - Chain the
.sort()method to the result ofgetCollectionto order your content, such as sorting blog posts by date. - This entire process happens at build time, ensuring your final site is static, fast, and secure.
Up Next: You can now create a list of all your blog posts. But what happens when a user clicks on a post's title? Right now, that link is broken because no page exists for the individual post. In our next module, "Dynamic Routing and Layouts," we will start by creating a consistent page structure with a base layout, and then you'll learn how to use getStaticPaths to automatically generate a unique page for every single entry in your collections.