Hello! Welcome to the first lesson in our module on Dynamic Routing and Layouts.
In the last module, you did an excellent job mastering how to author, query, and style content with MDX. You learned how to use the <Content /> component and pass a components prop to swap default HTML elements with your own styled Astro components. This gave you fine-grained control over the content itself.
However, if you were to create multiple pages right now (like a home page, an about page, and a contact page), you would find yourself copying and pasting the same HTML boilerplate—the <html>, <head>, and <body> tags, along with headers and footers—on every single page. This violates the "Don't Repeat Yourself" (DRY) principle and makes site-wide updates incredibly tedious.
Today, we'll solve this by creating a base layout for a consistent page structure using the <slot /> element. This is a foundational step in building the clean, maintainable architecture you're aiming for.
The Problem: Repetitive Boilerplate
Imagine you have two pages, index.astro and about.astro. They might look something like this:
src/pages/index.astro
---
---
<html lang="en">
<head>
  <meta charset="utf-8" />
  <title>Home | My Accounting Site</title>
</head>
<body>
  <header>My Site Header</header>
  <main>
    <h1>Welcome to the Home Page</h1>
  </main>
  <footer>My Site Footer</footer>
</body>
</html>
src/pages/about.astro
---
---
<html lang="en">
<head>
  <meta charset="utf-8" />
  <title>About Us | My Accounting Site</title>
</head>
<body>
  <header>My Site Header</header>
  <main>
    <h1>About Our Firm</h1>
  </main>
  <footer>My Site Footer</footer>
</body>
</html>
Notice how much code is duplicated. The only parts that change are the page title and the content inside <main>. This is where layouts come in.
The Solution: Astro Layouts and the <slot />
An Astro layout is simply an Astro component that provides a reusable page structure. By convention, these are placed in a src/layouts directory. The key to making them work is the <slot /> element.
The <slot /> acts as a placeholder where you can inject content from other Astro files. Given your background with React, you can think of it as serving a similar purpose to the children prop—it's where the content you place between the component's opening and closing tags gets rendered.
To see this in action, the following video provides a clear, practical walkthrough of creating and using your first layout.
Astro Blog Course #3 - Layouts
This video from Coding in Public demonstrates how to refactor repetitive code into a reusable layout, explaining the roles of the <slot /> element and Astro.props for passing page-specific data.
Please watch from the beginning until 04:40. Focus on how a MainLayout.astro file is created, how the <slot /> element is used as a content placeholder, and how props like title are passed to the layout to handle dynamic data.
Deconstructing the Layout Process
As you saw in the video, creating and using a layout involves a few straightforward steps. Let's break them down.
1. Create the Layout Component
First, create a new folder src/layouts in your project. Inside it, create a new file, for example, BaseLayout.astro. This file will contain all your common HTML boilerplate.
2. Define the Structure with <slot />
Inside BaseLayout.astro, you'll define the full HTML structure for your pages. The crucial part is placing the <slot /> element where you want the unique content of each page to appear.
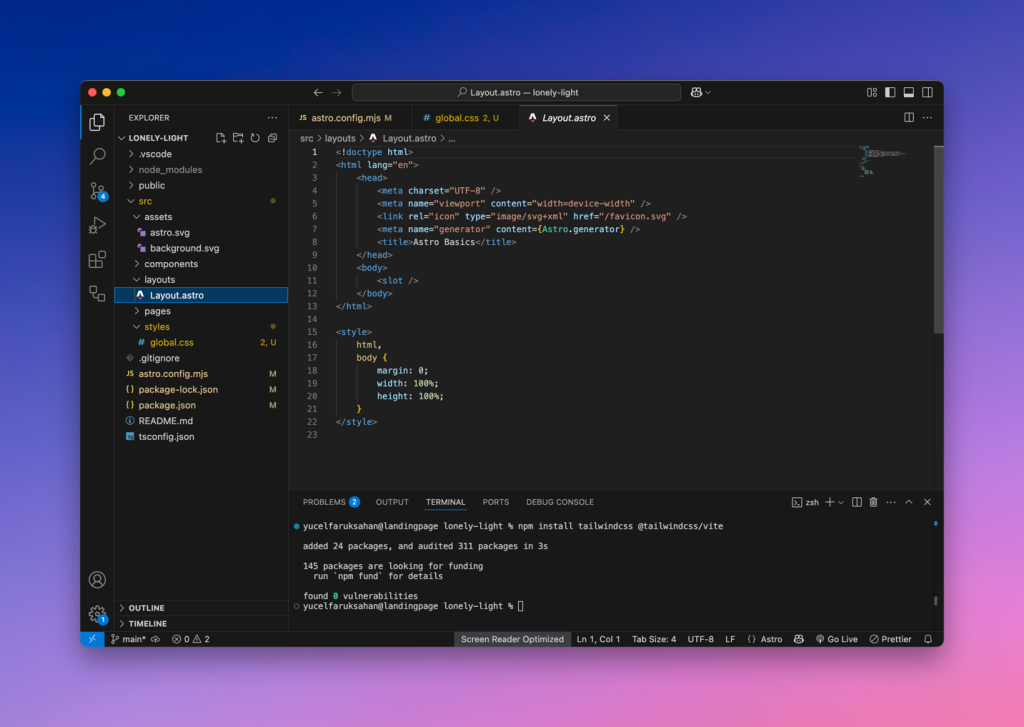
3. Handle Dynamic Data with Props
Your layout isn't static. Different pages need different titles, meta descriptions, and so on. You handle this by passing props to your layout, just like any other component.
Inside BaseLayout.astro, you access these props using Astro.props:
{/* src/layouts/BaseLayout.astro */}
---
// Destructure the props passed from the page
const { title, description } = Astro.props;
---
<html lang="en">
<head>
  <meta charset="utf-8" />
  <meta name="viewport" content="width=device-width" />
  <meta name="description" content={description} />
  <title>{title} | My Accounting Site</title>
</head>
<body>
  <header>
    <!-- Your site navigation would go here -->
  </header>
  <main>
    {/* Page content will be injected here */}
    <slot />
  </main>
  <footer>
    <!-- Your site footer would go here -->
  </footer>
</body>
</html>
4. Apply the Layout to a Page
Finally, you refactor your pages to use this layout. You remove all the boilerplate, import the layout, and wrap your page-specific content within the layout component's tags, passing any necessary props.
{/* src/pages/index.astro */}
---
import BaseLayout from '../layouts/BaseLayout.astro';
---
<BaseLayout
  title="Home"
  description="Welcome to our professional accounting services."
>
  <h1>Welcome to Our Firm</h1>
  <p>This is the content for the home page.</p>
</BaseLayout>
This approach is powerful because it centralizes your page structure, making your project cleaner and much easier to maintain. For a detailed, text-based guide that you can refer back to, the official Astro documentation is an excellent resource.
Build a blog tutorial: Build your first layout - Astro Docs
The official Astro tutorial provides a step-by-step guide to creating and using your first layout. This reinforces the concepts from the video and serves as a great written reference.
Read the sections 'Create your first layout component', 'Use your layout on a page', and 'Pass page-specific values as props'. This will solidify your understanding of the core workflow.
Test your understanding!
Now it's your turn to put this into practice.
- In your Astro project, create a new file at
src/layouts/BaseLayout.astro. - Inside
BaseLayout.astro, create a full HTML document structure. It should accepttitleanddescriptionas props and use them to populate the<title>and a<meta name="description">tag in the<head>. - Place a
<slot />element inside the<body>tag. - Refactor your
src/pages/index.astropage to use thisBaseLayout. Pass it a unique title and description. - Create a new page,
src/pages/about.astro, that also uses theBaseLayoutbut with a different title, description, and content.
Verify your work by navigating between your home page and /about in the browser. You should see the content and browser tab title change, but the underlying structure should remain the same.
Show answer
1. src/layouts/BaseLayout.astro
---
interface Props {
title: string;
description: string;
}
const { title, description } = Astro.props;
---
<!DOCTYPE html>
<html lang="en">
<head>
<meta charset="UTF-8" />
<meta name="viewport" content="width=device-width" />
<meta name="description" content={description} />
<title>{title} | Premium Accounting</title>
<style>
/* Basic styles for demonstration */
body {
font-family: system-ui, sans-serif;
background-color: #f4f4f9;
margin: 0;
display: flex;
flex-direction: column;
min-height: 100vh;
}
header, footer {
background-color: #0d1b2a;
color: white;
padding: 1rem 2rem;
}
main {
flex-grow: 1;
padding: 2rem;
max-width: 800px;
margin: 0 auto;
width: 100%;
}
</style>
</head>
<body>
<header>
<nav>
<a href="/">Home</a> |
<a href="/about">About Us</a>
</nav>
</header>
<main>
<slot />
</main>
<footer>
<p>© {new Date().getFullYear()} Premium Accounting. All rights reserved.</p>
</footer>
</body>
</html>
2. src/pages/index.astro
---
import BaseLayout from '../layouts/BaseLayout.astro';
---
<BaseLayout
  title="Home"
  description="Expert accounting and financial services to help your business thrive."
>
  <h1>Welcome to Premium Accounting</h1>
  <p>Your trusted partner in financial clarity and growth.</p>
</BaseLayout>
3. src/pages/about.astro
---
import BaseLayout from '../layouts/BaseLayout.astro';
---
<BaseLayout
  title="About Us"
  description="Learn about our firm's mission, values, and the expert team dedicated to your success."
>
  <h1>About Our Firm</h1>
  <p>We are a team of certified accountants committed to providing exceptional service.</p>
</BaseLayout>
Conclusion
Excellent work! You have successfully created a reusable base layout, which is a cornerstone of any scalable and maintainable website. You now understand how to abstract common UI elements into a single component, use the <slot /> to inject page-specific content, and pass data via props to customize elements like the page title.
Key Takeaways:
- Layouts prevent code duplication by providing a single source of truth for your site's structure.
- The
<slot />element is the placeholder where a page's unique content is rendered within a layout. - You can pass props to layouts just like any other component to handle dynamic data (e.g., titles, meta descriptions).
- This pattern is fundamental to building a clean architecture that's easy to update and scale.
Up Next:
This BaseLayout is the perfect container for all the pages on your site. In our next lesson, we will leverage it to do something truly powerful: generate dynamic pages from your content collections using getStaticPaths. You'll learn how to programmatically create a unique URL and page for every blog post, service, and case study you've defined in your MDX collections.