Introduction
In our recent lessons, you've learned to declare variables, work with different data types, and construct dynamic strings using template literals. You've seen the console.log() command used to display the output of these operations, but we've treated it as a simple utility. Today, we formally explore the browser's console and the console.log() function, not just as a way to print values, but as your single most important tool for debugging.
As a QA engineer, your job is to find bugs. The first step in finding a bug is often understanding why a program's actual behavior deviates from its expected behavior. The console is your window into the program's execution, allowing you to inspect variables, track logic, and pinpoint the exact source of an error. This lesson will show you how to use console.log() to move from guessing what's wrong to systematically diagnosing and proving it.
What is the Console?
Before we start logging messages, it's crucial to understand what the console is and its role in development. It's more than just a place where messages appear; it's an interactive environment connected directly to the browser's JavaScript engine.
The following video provides an excellent high-level overview. It explains that while professional developers use console.log() to track program behavior and identify issues, beginners also use it to see the results of their code, since modifying the webpage itself is a more advanced topic. This distinction is important for building the right mental model.
The JavaScript Console Explained for Absolute Beginners
Watch the first part of the video "The JavaScript Console Explained for Absolute Beginners" to understand the console's purpose.
Pay close attention to the explanation from the beginning up to the main explanation. The speaker clarifies why console.log is so central for learners and how it differs from its use in production code. This context will be invaluable as you write your first scripts.
As the video highlighted, the console is our primary interface for interacting with our running JavaScript code. We can execute code directly in it, and more importantly, our scripts can send messages back to it.
Your First Debugging Tool: console.log()
At its simplest, console.log() takes a value and prints it to the console. You've already done this with simple strings and numbers. But its real power comes from inspecting the state of your program at various points.
Let's explore some effective ways to use it. The freeCodeCamp article "JavaScript Console.log() Example" offers several practical techniques.
JavaScript Console.log() Example – How to Print to the Console in JS
This article provides practical examples of using console.log(). We'll focus on how to log multiple values efficiently.
Read the sections console.log and Multiple Values. Pay special attention to the trick of wrapping variables in curly braces, like console.log({ variableName }). This is a modern, highly readable way to inspect a variable's name and its value simultaneously.
Let's see this in action. Imagine you have a few variables:
let testId = 'TC-042';
let status = 'passed';
let duration = 1250; // in milliseconds

// Logging them one by one works, but is verbose
console.log(testId);
console.log(status);
console.log(duration);

// Logging them with labels is better
console.log('Test ID:', testId);
console.log('Status:', status);

// The best way: using the object shorthand
console.log({ testId, status, duration });
If you run that last line in your browser's console, you'll see a nicely formatted, interactive object that clearly labels each value. This technique is incredibly useful for quickly checking the state of multiple variables.
Debugging a Logical Error in Practice
Now, let's use this tool to solve a problem. A logical error is when your code runs without crashing but produces the wrong result. Your background in manual QA is all about spotting these discrepancies; console.log() helps you find the cause.
Remember the concept of type coercion? Let's revisit a common bug it causes. A developer has written a simple script to add two numbers from a form. However, the result is wrong.
// Simulating input from a web form, which is always text (strings)
let input1 = '5';
let input2 = '1';

// The developer intends to add these numbers
let sum = input1 + input2;

// The expected output is 6, but the program will show '51'.
console.log(`The calculated sum is: ${sum}`);
This is a classic bug. The developer assumed sum would be 6. As a tester, you see the output is '51' and file a bug report. With console.log(), you can go further and provide the root cause.
Let's debug this systematically.
- Confirm the output: We've already done this.
console.log(sum)shows'51'. - Inspect the inputs: Are the inputs what we think they are?
console.log({input1, input2}); - Check the types: The bug seems related to the
+operator, which behaves differently for numbers and strings. Let's verify their types.console.log('Type of input1:', typeof input1); console.log('Type of input2:', typeof input2); console.log('Type of sum:', typeof sum);
Running this code will give you the "Aha!" moment. The console will clearly report that input1 and input2 are strings. This proves that the issue is string concatenation, not numerical addition. The fix would involve converting the inputs to numbers (e.g., using parseInt()), but identifying the problem is the critical first step.
This process is visualized perfectly in the following image. A developer is paused in the debugger and uses the console to test a fix (parseInt()) for this exact problem.

Beyond .log(): Different Message Levels
The console object has other methods that are useful for providing more context to your messages. These are especially important in larger applications where the console can get crowded.
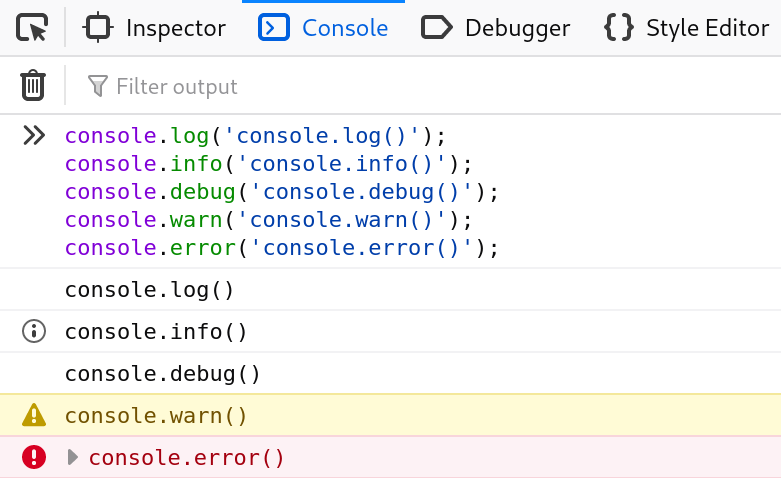
The most common and useful methods besides console.log() are:
console.warn(): For messages that indicate a potential problem, but not a full-blown error. For example, using a deprecated function. Browsers typically display these in yellow with a warning icon.console.error(): For messages that indicate an error has occurred. This is for when something has definitely gone wrong. Browsers show these in red, making them impossible to miss.
Let's apply this to a QA scenario. Imagine you're writing a script to verify a user's calculated age.
let userBirthYear = 1990;
let currentYear = 2023;
let calculatedAge = currentYear - userBirthYear;

let expectedAge = 33;

if (calculatedAge === expectedAge) {
  console.log('Age calculation test: PASSED');
} else if (calculatedAge < 0) {
  console.error(`Age calculation test: FAILED. Calculated age is negative: ${calculatedAge}`);
} else {
  console.warn(`Age calculation test: FAILED. Expected ${expectedAge}, but got ${calculatedAge}`);
}
By using different log levels, you create a much richer and more informative test output. A passing test gives a simple log. A failing test immediately stands out as a warning or a critical error, guiding you to the most important issues first.
For a summary of these console variations and other useful tips, review the following resource.
JavaScript Console.log() Example – How to Print to the Console in JS
This article details several console methods.
Focus on the sections Variations of logs to see the syntax for info, warn, and error. Also, read the small section on Clear, which introduces console.clear(), a simple but very handy command for keeping your workspace tidy during a debugging session.
Conclusion
In this lesson, you've moved from simply seeing console.log() to understanding it as a fundamental tool for software quality. You now know how to inspect the state of your program, diagnose logical errors by checking values and types, and use different log levels to create meaningful output.
Key Takeaways:
- The console is an interactive environment that provides a window into the JavaScript engine.
console.log()is your primary tool for inspecting variables and understanding program flow.- The
console.log({ var1, var2 })syntax is a powerful way to view the names and values of multiple variables at once. - Systematic use of
console.log()withtypeofcan help you diagnose logical errors, such as those caused by type coercion. console.warn()andconsole.error()allow you to add semantic meaning and visual priority to your debug messages, which is critical for test reporting.
In our last example, we used an if statement to check a condition. This ability to make decisions is the foundation of all non-trivial programs. In our next lesson, we will formally dive into Logic and Control Flow, starting with if, else if, and else statements. This will empower you to write scripts that can react differently to various conditions, a core skill for building powerful and intelligent automated tests.