Hello! Welcome to the first lesson of our second module, Object-Oriented Python Essentials.
In the last module, we refreshed your Python fundamentals, culminating in learning how to use modules to organize and reuse code. That was our first step into building larger, more structured programs. Now, we're going to take a giant leap forward by learning Object-Oriented Programming (OOP). This is the paradigm that modern web frameworks like Django are built on, and mastering it is essential for your goal of becoming a full-stack developer.
Today's lesson directly addresses the learning outcome: Define classes with attributes and methods. We will learn how to create "blueprints" for the objects that will make up our applications—things like users, and eventually, the tasks in your task manager project.
1. What Are Classes and Objects?
In programming, we often want to model real-world things. A "thing" can be described by what it is (its properties) and what it does (its behaviors).
- A class is a blueprint for creating objects. It defines a set of properties and behaviors that all objects of that type will have.
- An object is a specific instance of a class. It's a concrete entity built from the blueprint, with its own unique values for the properties.
Think about a Task in your future task manager app. The blueprint for any task would define that it must have a title and a status. These are its properties, or in programming terms, its attributes. The blueprint would also define what you can do with a task, like mark_as_complete(). This is its behavior, or its method.
This image provides a great visual analogy using a dog object:

To build our understanding, let's start with a foundational reading.
Python Classes: The Power of Object-Oriented Programming
This article from Real Python provides excellent definitions for the core concepts of classes, objects, attributes, and methods. It uses the classic 'blueprint for a house' analogy, which is a great way to start.
Please read the section titled 'Getting Started With Python Classes'. Focus on the distinction between a class (the blueprint) and an object (the house), and the definitions of attributes (data) and methods (behavior).
2. Defining a Simple Class in Python
Now that we have the concept down, let's see it in code. We'll start with the most basic approach to see how the pieces fit together.
This video from CS Dojo provides a clear, step-by-step demonstration. It begins by showing how to create objects and set their attributes manually. This isn't the best practice, but it's a very clear way to understand the relationship between an object and its data.
Classes and Objects with Python - Part 1 (Python Tutorial #9)
This video walks through the creation of a Robot class. We'll focus on the first part, which demonstrates defining a class, creating instances (objects), setting their attributes, and calling their methods.
Watch from the beginning up to 05:28. Pay close attention to: The class Robot: syntax. How objects r1 and r2 are created. How attributes like r1.name = "Tom" are assigned after the object is created. The self parameter in the introduce_self method and what it represents.
As you saw in the video, you can create a class, create an instance, and then "attach" data to it using dot notation. Let's apply this to our Task example:
# Define a blueprint for a Task using the 'class' keyword
class Task:
    # This is a method: a function defined inside a class.
    # 'self' is a special parameter that refers to the specific object (the instance)
    # that the method is being called on.
    def display_task(self):
        # We assume the object will have 'title' and 'status' attributes.
        print(f"Task: {self.title} -- Status: {self.status}")

#--- Let's use our blueprint ---

# Create a specific object (an instance) from the Task class
task_one = Task()

# Now, assign attributes (data) to this specific instance
task_one.title = "Learn Python Classes"
task_one.status = "In Progress"

# Create a second, completely separate object from the same blueprint
task_two = Task()
task_two.title = "Set up Django project"
task_two.status = "Not Started"

# Call the method on the first object.
# Inside display_task(), 'self' will refer to 'task_one'.
task_one.display_task()
# Expected Output: Task: Learn Python Classes -- Status: In Progress

# Call the same method on the second object.
# This time, 'self' will refer to 'task_two'.
task_two.display_task()
# Expected Output: Task: Set up Django project -- Status: Not Started
This example highlights a key concept: task_one and task_two are both Task objects, but they maintain their own separate data.
3. A Better Way: The __init__ Method
Manually assigning attributes for every new object works, but it's repetitive and error-prone. What if you forget to assign an attribute?
Python provides a much cleaner and safer way to handle this using a special method called __init__. This method is an initializer (often called a constructor). It runs automatically every time you create a new object from a class. Its primary job is to set up the object's initial attributes.
This diagram shows how __init__ fits into a class definition:
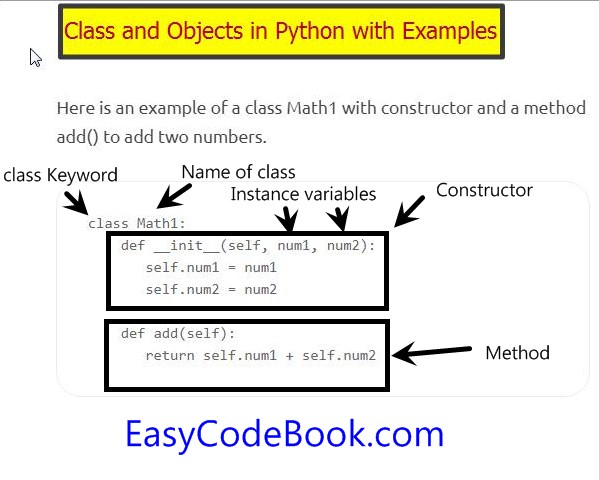
Let's see how __init__ cleans up the Robot class from the video.
Classes and Objects with Python - Part 1 (Python Tutorial #9)
Continuing with the CS Dojo video, this next part introduces the __init__ method to solve the problem of manual attribute assignment. This is the standard and correct way to initialize objects in Python.
Watch from 07:05 to 10:28. Notice how creating a robot is now a single, clean line of code because __init__ handles the setup.
Now, let's refactor our Task class to use __init__. We can also add a new method to change the task's state.
class Task:
    # The __init__ method is called automatically when a new Task object is created.
    # We pass the initial data as arguments here.
    def __init__(self, title, description, status="Not Started"):
        # The 'self' keyword is used to attach the data to the specific object.
        self.title = title
        self.description = description
        self.status = status

    # A method to display the task's data
    def display_task(self):
        print(f"Title: {self.title}")
        print(f"Description: {self.description}")
        print(f"Status: {self.status}")

    # A method to change the object's state
    def mark_as_complete(self):
        self.status = "Completed"
        print(f"Task '{self.title}' has been marked as complete!")

#--- Using our improved blueprint ---

# Creating an object is now much cleaner.
# The arguments we pass here are sent to the __init__ method.
task1 = Task("Learn Django Models", "Read the official documentation on the ORM.")
task2 = Task("Build First View", "Create a simple function-based view.", "In Progress")

# Display the initial state of task1
task1.display_task()
print("---") # separator

# Now, let's call a method that changes its state
task1.mark_as_complete()
print("---")

# Display the new state of task1
task1.display_task()

# Expected Output:
# Title: Learn Django Models
# Description: Read the official documentation on the ORM.
# Status: Not Started
# ---
# Task 'Learn Django Models' has been marked as complete!
# ---
# Title: Learn Django Models
# Description: Read the official documentation on the ORM.
# Status: Completed
This is the fundamental pattern you will use constantly in Django and other object-oriented code.
Test your understanding!
For your task manager application, you'll need to represent users. Create a User class with the following specifications:
- It should have
usernameandemailas attributes. - These attributes should be set when a
Userobject is created, using the__init__method. - It should have a method called
display_profile()that prints the user's username and email.
Create an instance of your User class and call the display_profile() method to test it.
Show answer
Here's one way to implement the User class:
class User:
    def __init__(self, username, email):
        self.username = username
        self.email = email

    def display_profile(self):
        print(f"Username: {self.username}")
        print(f"Email: {self.email}")

# Create an instance of the User class
new_user = User("alex_dev", "alex@example.com")

# Call the method on the instance
new_user.display_profile()

# Expected Output:
# Username: alex_dev
# Email: alex@example.com
Conclusion
Great work! You've just taken your first and most important step into Object-Oriented Programming. Understanding how to bundle data (attributes) and behavior (methods) into classes is the foundation for building complex, organized, and reusable code.
Key Takeaways:
- A class is a blueprint, and an object (or instance) is a concrete item built from that blueprint.
- Attributes are variables that belong to an object and store its data or state (e.g.,
task.title). - Methods are functions that belong to an object and define its behavior (e.g.,
task.mark_as_complete()). - The special
__init__method acts as a constructor to initialize an object's attributes when it's created. - The
selfparameter is a reference to the current instance, allowing methods to access and modify the object's specific attributes.
Preview of the Next Lesson:
In this lesson, we introduced the __init__ method as the proper way to set up an object. In our next lesson, "Use the __init__ special method to initialize object instances," we will dive even deeper into its role. We'll solidify its importance and explore more nuances of creating robust and well-structured objects right from the start.