Hello! Welcome to the final lesson of your course on full-stack web development with Python and Django.
In our last session, we put all the finishing touches on your application's code, preparing it for a production environment. You configured Gunicorn as a production-ready web server, prepared for a PostgreSQL database, secured sensitive settings using environment variables, and created a build.sh script to automate deployment tasks. All the groundwork is complete.
Today, we take the final and most exciting step: deploying your application to the internet. We will use Render, a modern Platform-as-a-Service (PaaS), to host your project. You will see how all the pieces from our previous lessons come together to launch a live, public-facing web application.
By the end of this lesson, you will have successfully deployed your Django application. You will see how your build.sh script runs your database migrations automatically and learn how to run other necessary commands, like creating an admin user, on your live server.
Let's launch your project!
1. Pushing Your Code to GitHub
Cloud hosting platforms like Render don't work with files on your local computer. Instead, they connect directly to a Git repository, usually hosted on a service like GitHub. This connection allows Render to automatically pull your latest code whenever you make changes.
Your first step is to get your project onto GitHub.
- Create a new, empty repository on your GitHub account.
- Push your entire Django project to this new repository.
Crucially, ensure your .gitignore file is working correctly and that your .env file is NOT uploaded to GitHub. This protects your sensitive credentials.
2. Setting Up Your Production Services on Render
A live web application is more than just code; it needs a database to store information and a web service to run the code and handle user requests. We will create both of these on Render.
The video below provides a fantastic, end-to-end guide for deploying a Django application on Render. We will use it to walk through the process step-by-step.
Deploy Django Project & Postgresql Database to Render for Free | 2025
This video by THE PROTON GUY demonstrates the entire deployment process on Render. We will follow its steps to create our database and web service.
First, watch the section on creating the database from 00:00:34 to 00:02:13. Then, skip ahead and watch the process of creating and configuring the web service from 00:08:39 to 00:27:09. As you watch, focus on these key configuration steps for the web service: Connecting your GitHub repository. Setting the Build Command and Start Command. Adding Environment Variables for SECRET_KEY, DEBUG, DATABASE_URL, and ALLOWED_HOSTS.
Let's break down the process shown in the video.
Step 2.1: Create the PostgreSQL Database
As shown in the first video segment (00:00:34 - 00:02:13), start by creating a new PostgreSQL service on your Render dashboard.
- Give it a unique name (e.g.,
task-manager-db). - Select the "Free" instance type for now.
Once the database is created, navigate to its "Info" page. Find the Internal Database URL and copy it. We'll need this for the web service. We use the internal URL because it provides a faster, more secure connection between services running within Render's private network.
Step 2.2: Create and Configure the Web Service
This is where you bring your code to life. Create a new Web Service on Render and follow the configuration steps from the second video segment (00:08:39 - 00:27:09).
Here's a breakdown of the most important settings:
- Repository: Connect the GitHub repository you created in Step 1.
- Runtime: Select
Python 3. - Build Command: Set this to
./build.sh. This tells Render to execute the script you created in the last lesson. This script will install your dependencies, collect your static files, and—most importantly—run your database migrations. - Start Command: This command starts your application. Use Gunicorn, pointing it to your project's
wsgi.pyfile. Replaceyour_project_namewith the actual name of your Django project folder (the one containingsettings.py).gunicorn your_project_name.wsgi:application - Instance Type: Select "Free".
- Environment Variables: This is where you provide the production-specific settings for your application.
- Click "Add Environment Variable" for each of the following:
SECRET_KEY: Generate a new, random string for production. You can use an online generator or runpython -c 'from django.core.management.utils import get_random_secret_key; print(get_random_secret_key())'in your local terminal.DEBUG: Set the value toFalse.DATABASE_URL: Paste the Internal Database URL you copied from your PostgreSQL service.PYTHON_VERSION: Set this to a specific Python version you've been using, for example,3.11.4. This ensures consistency between your local and production environments.
- Click "Add Environment Variable" for each of the following:
After filling in these details, click "Create Web Service".
3. Monitoring the Deployment and Post-Deployment Commands
Once you create the service, Render will start the first deployment. You can watch its progress in the "Logs" tab.
First, you'll see the output of your build command. This is your build.sh script in action! You will see lines showing:
pip install -r requirements.txtinstalling your packages.python manage.py collectstatic --no-inputgathering your static files.python manage.py migrateapplying your database schema to the new PostgreSQL database.
This demonstrates how post-deployment commands like migrations are automated. The new code version is only started after the build (including migrations) completes successfully.
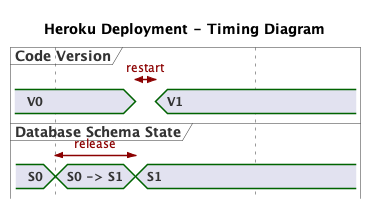
After the build succeeds, Render will execute your start command, and you'll see logs from Gunicorn indicating your server is running.
Running Manual Commands: Creating a Superuser
Some commands, like creating an administrator account, only need to be run once and are interactive. You can't put them in the build.sh script. For this, Render provides a shell.
The official Render documentation explains how to run one-off commands after deployment, which is exactly what we need to do to create a superuser.
Read the short section titled 'Create a Django admin account'. It provides the exact command to run in the Render Shell.
As the documentation describes:
- Go to your Web Service's page on the Render dashboard.
- Click on the "Shell" tab.
- In the command prompt, type the following and press Enter:
python manage.py createsuperuser - Follow the prompts to create your username and password.
You have now run a command directly on your live server and modified your production database.
Test your understanding!
When deploying an application, why would you put the migrate command in the build.sh script but run the createsuperuser command manually in the shell afterwards?
Show answer
The migrate command should run automatically on every deployment to ensure the database schema is always in sync with the application's code. Placing it in build.sh automates this process. The createsuperuser command, however, is typically a one-time setup task. It's also interactive (prompts for a username and password), which doesn't work in a non-interactive build script. Therefore, it's best run manually in a shell after the initial deployment.
4. Resolving Host Header Errors and Verifying
There's one final step. If you visit your new URL (e.g., your-app.onrender.com), you might see a "DisallowedHost" error. This is Django's security at work. Your live URL needs to be added to ALLOWED_HOSTS.
- Copy your application's URL from the top of your Render service page.
- Go to the "Environment" tab for your web service.
- Add another environment variable:
- Key:
ALLOWED_HOSTS - Value: Paste your Render URL here (e.g.,
your-app.onrender.com). If you also want to allowwww, you can add it as a comma-separated value:your-app.onrender.com,www.your-app.onrender.com.
- Key:
- Save the changes. Render will automatically start a new deployment.
Once the deployment is complete, your site will be live!
To verify everything works:
- Visit your
.onrender.comURL. You should see your application's homepage. - Navigate to the
/admin/path and log in with the superuser credentials you created in the Render Shell.
If you can log in, congratulations! Your site is live, connected to a production database, and fully functional.
Conclusion
You did it! You have successfully taken a Django project from your local machine to a live production server on the internet. This is a massive milestone and the culmination of everything you've learned in this course.
Key Takeaways:
- Production deployments are done from a Git repository, not by uploading files directly.
- A production app requires separate services, like a PostgreSQL database and a Web Service, which are configured to work together.
- The Build Command (
./build.sh) is used to run automated setup tasks likepip installandmigrateon every deployment. - The Start Command (
gunicorn ...) is used to run the application server that handles live traffic. - Environment variables are the key to configuring your app for production, keeping secrets safe and settings correct.
- The Render Shell provides a way to run manual, one-off commands like
createsuperuseron your live server.
You now have the complete skill set to build and deploy full-stack web applications with Python and Django. You are well-equipped to start building the Task Manager portfolio project you set out to create. From here, you can continue to explore more advanced topics like building REST APIs, writing automated tests, or integrating modern frontend frameworks.
Congratulations on completing the course