Hello! Welcome to our next lesson in the "Shell Scripting and Automation" module.
In our last lesson, we mastered using exit codes to make our scripts more robust and communicate their success or failure. As you start writing and managing a collection of scripts, configuration files, and other text-based assets, a new challenge emerges: How do you keep track of changes over time? How can you revert to a previous working version if a change breaks something? This is where version control comes in.
Today's lesson addresses the learning outcome: Use basic Git commands to track changes, and interact with a remote repository. We'll explore Git, the most popular version control system in the world. For a Linux administrator, Git is an indispensable tool not just for software development, but for managing system configurations, automation scripts, and documentation.
1. How Git Thinks: A Conceptual Overview
Before we start typing commands, it's crucial to understand the mental model behind Git. Your learner preference for starting with theory will be particularly helpful here, as grasping this model makes the commands much more intuitive.
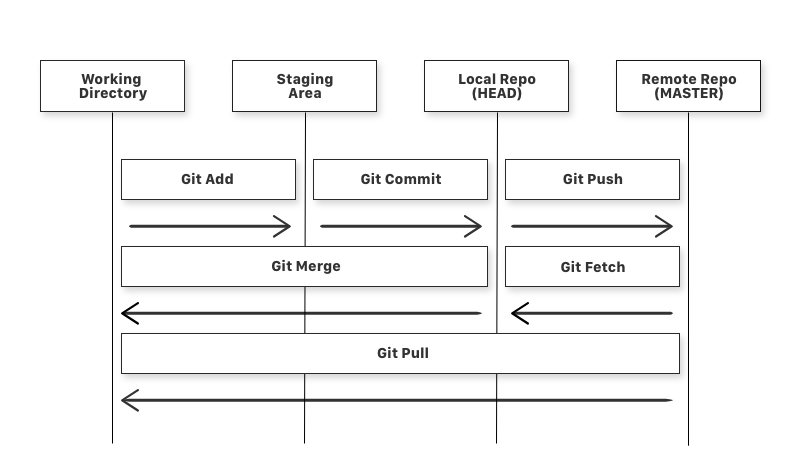
At its core, Git manages files as they move between four distinct areas.
How Git Works: Explained in 4 Minutes
To get a high-level overview of this process, watch this short, excellent explainer from ByteByteGo. It visualizes the journey of your code through Git's four main locations.
Please watch the entire video (it's short!). Focus on understanding the names and purposes of the four areas: Working Directory, Staging Area, Local Repository, and Remote Repository.
As the video explained, the four key areas are:
- Working Directory: Your project folder on your local machine where you actively edit files.
- Staging Area (or Index): A holding area where you gather a set of changes you want to save.
- Local Repository: The
.gitdirectory inside your project folder. It contains the entire history of your project in the form of "snapshots" or "commits." This is stored entirely on your own machine. - Remote Repository: A version of your repository hosted on a server, often on a service like GitHub. This allows for collaboration and backup.
The entire Git workflow consists of commands that move your changes between these areas.
Git vs. GitHub
A common point of confusion is the difference between Git and GitHub.
An Intro to Git and GitHub for Beginners (Tutorial)
This article from the HubSpot Product Team provides a concise explanation of the distinction.
Read the section titled "Step 0: Install git and create a GitHub account," focusing on the callout box labeled "Git and GitHub."
In short:
- Git is the command-line tool, the software that does the version tracking on your local machine.
- GitHub (and alternatives like GitLab or Bitbucket) is a web-based service that hosts your Git repositories, adding features like collaboration tools, issue tracking, and a web interface. You can use Git without GitHub, but you can't use GitHub without Git.
2. The Local Workflow: Tracking Your Changes
Now let's get practical. We'll focus on the local workflow first: creating a repository and tracking changes to files within it. For this, we'll follow a comprehensive video guide.
Step 1: Installation and Configuration
First, you need to have Git installed and configured with your identity.
This first segment from the 'Git Essentials' video by Learn Linux TV will show you how to check for Git and install it if needed. It then covers the one-time setup of your user name and email, which is required before you can make any changes.
Watch from 02:31 to 03:32 to see how to install Git. Then, skip ahead and watch from 11:34 to 12:44 to see how to configure your user identity. Make sure to run these configuration commands on your own system, using your own name and email.
The two essential configuration commands are:
git config --global user.name "Your Name"
git config --global user.email "your.email@example.com"
Git embeds this information into every change you make, so it's clear who did what.
Step 2: The Core Workflow: Init, Add, Commit
Now we'll walk through the fundamental cycle of tracking files.
- Initialize a repository.
- Create or modify files.
- Stage the changes you want to save.
- Commit those staged changes into a permanent snapshot.
The next part of the 'Git Essentials' video demonstrates this entire loop.
Watch from 03:32 to 14:50. This is the most important part of the lesson. Pay close attention to the sequence of commands: git init, git status, git add, and git commit.
Let's summarize that critical workflow:
git init <directory_name>: Creates a new local repository in the specified directory. This is where the magic.gitfolder is created.git status: Your most-used command. It tells you the current state of your working directory and staging area, showing untracked, modified, and staged files.git add <file_name>: Takes the changes from your working directory and places them in the staging area, preparing them for the next commit.git commit -m "Descriptive message": Takes everything in the staging area and creates a permanent, versioned snapshot in your local repository. The message is crucial for understanding the history later.
Test your understanding!
- Create a new directory called
my_scripts. - Initialize a Git repository inside it.
- Create a simple shell script inside this directory named
hello.shthat just containsecho "Hello, Git!". - Check the status of your repository. What does Git tell you about
hello.sh? - Add
hello.shto the staging area. - Check the status again. How has the output changed?
- Commit the file with the message "Initial commit of hello script".
Show answer
# 1. Create directory
mkdir my_scripts
cd my_scripts

# 2. Initialize repository
git init

# 3. Create script
echo 'echo "Hello, Git!"' > hello.sh

# 4. Check status
git status
# Output will show 'hello.sh' under "Untracked files".

# 5. Add to staging
git add hello.sh

# 6. Check status again
git status
# Output will now show 'hello.sh' under "Changes to be committed".

# 7. Commit the file
git commit -m "Initial commit of hello script"
Step 3: Inspecting and Undoing Changes
A version control system isn't useful if you can't review history or undo mistakes.
This final segment on the local workflow shows you how to view the history of your changes and, importantly, how to revert a change that you no longer want.
Watch from 14:50 to 22:13. Focus on the purpose of git log, git diff, and git revert.
git log: Shows the history of commits, with their unique IDs (hashes), author, date, and commit message. Usegit log --onelinefor a compact view.git diff: Shows the exact line-by-line differences between your working directory and your last commit.git revert <commit_id>: Creates a new commit that is the exact opposite of a previous commit. This is a safe, non-destructive way to undo changes, as it preserves the project history.
3. The Remote Workflow: Collaboration and Backup
Now let's connect our local work to a remote repository. This is how you back up your work and collaborate with others. For this, you will need a free account on a service like GitHub.
There are two main ways to start working with a remote repository:
Workflow A: Cloning an Existing Repository
This is the most common scenario: you want to contribute to a project that already exists on GitHub.
The 'Git Essentials' video shows how to use git clone to download a copy of a remote repository to your local machine.
Watch from 22:13 to 24:47. Notice how git clone automatically sets up the connection to the remote repository for you.
The command is simple: git clone <URL_of_remote_repo>. This creates a local copy, including the full history, and pre-configures it to know where the "origin" remote is.
Workflow B: Pushing a Local Repository to a New Remote
This is what you do when you start a project locally and now want to publish or back it up to GitHub.
This last segment of the video walks you through the entire process: creating an empty repository on GitHub, linking your local repo to it, and pushing your commits.
Watch from 24:47 to the end. The process involves git remote add and git push. Note the modern authentication method using a Personal Access Token, which is now standard for GitHub.
The key commands are:
git remote add origin <URL_of_new_github_repo>: This command "adds" a reference to a "remote" repository, gives it the nickname "origin", and points it to the specified URL.git push -u origin main: This "pushes" your local commits to the remote named "origin". The-uflag sets the localmainbranch to track the remotemainbranch, so in the future you can just typegit push. (Note: Your default branch might be namedmasteron older Git versions).
Workflow C: Staying in Sync with git pull
The push command sends your changes up to the remote. But what if a collaborator pushed their own changes? You need to bring those changes down to your local repository. This is done with git pull.
git pull origin main
This command fetches the latest changes from the main branch on the origin remote and merges them into your local main branch. This keeps your local copy up-to-date with the central repository.
Conclusion
You now have a solid foundation in the essential Git commands for both local version tracking and interacting with a remote repository. This is a skill that will serve you well throughout your career as a Linux professional.
Key Takeaways:
- Conceptual Model: Git tracks files as they move from the Working Directory to the Staging Area, and are then saved in the Local Repository via commits.
- Local Workflow: The core loop is
git status(to see what's happening),git add(to stage changes), andgit commit(to save a snapshot). - Inspecting History: Use
git logto see past commits andgit diffto see specific changes. - Remote Interaction:
git cloneto download an existing project.git pushto upload your local commits.git pullto download updates from others.
Preview of the Next Lesson:
We've just learned how to manage changes to text files (like our scripts) using Git. In our next lesson, we will "Explain the purpose of configuration management (e.g., Ansible)". You'll see how tools like Ansible use simple text files (called playbooks) to define and enforce the state of entire systems. Managing these critical playbook files with Git is a cornerstone of modern, automated infrastructure management, providing a perfect real-world application for the skills you've learned today.