Welcome to your first lesson! We're kicking off your journey into "vibe coding" by tackling the most important first step: crafting a powerful initial prompt. In this lesson, you'll learn how to clearly define the high-level goal and style for a project. Mastering this will give you a solid foundation for everything that follows, from building high-conversion landing pages to designing business applications.
Your goal is to move from an idea in your head to a functional app on the screen, and the initial prompt is the bridge that makes it happen. Let's get started.
What is "Vibe Coding"?
Before we write our first prompt, let's clarify what "vibe coding" means. It's a new way of creating software where you don't write traditional code line-by-line. Instead, you describe the project's purpose, functionality, and, most importantly, its vibe—the aesthetic feel and user experience—in plain English. The AI then acts as your developer, translating your vision into code.
To get a feel for this, let's turn to an article that explores this concept.
Prompts for vibe coding: a roundup and how to start
This article provides a great introduction to the concept of vibe coding and the importance of a good prompt.
Please read the introduction to understand the core idea. Then, focus on the section "What makes a good prompt". Pay close attention to the four main parts it identifies.
As you just read, the AI is a literal assistant; it can't read your mind. A vague request like "build me a website" will yield a generic, uninspired result. The key is to provide a detailed and structured "brief," much like you would for a human designer or developer. This brief is your prompt.
The Anatomy of a Great Initial Prompt
A strong initial prompt acts as the blueprint for your entire project. The article you just read breaks it down into four essential components:
- Identity: What are you building? Is it a landing page, a business tool, a game, or a portfolio? Be specific.
- Audience: Who is this for? The needs of a busy professional are very different from those of a casual user. Defining the audience helps the AI make countless small decisions about layout, language, and complexity.
- Features: What does it actually do? This is where you list the core functionalities. Instead of "a contact form," specify "a contact form with fields for name, email, and message, and a 'Send' button."
- Aesthetic: This is the "vibe." How should it look and feel? Use descriptive adjectives. Is it "minimalist and clean," "bold and energetic," or "professional and trustworthy"?
These four elements provide the AI with the what, the who, the how, and the feel.
Look at this image, which shows a detailed prompt for creating the home screen of an investment app. Notice how it provides specific instructions for each part of the design.
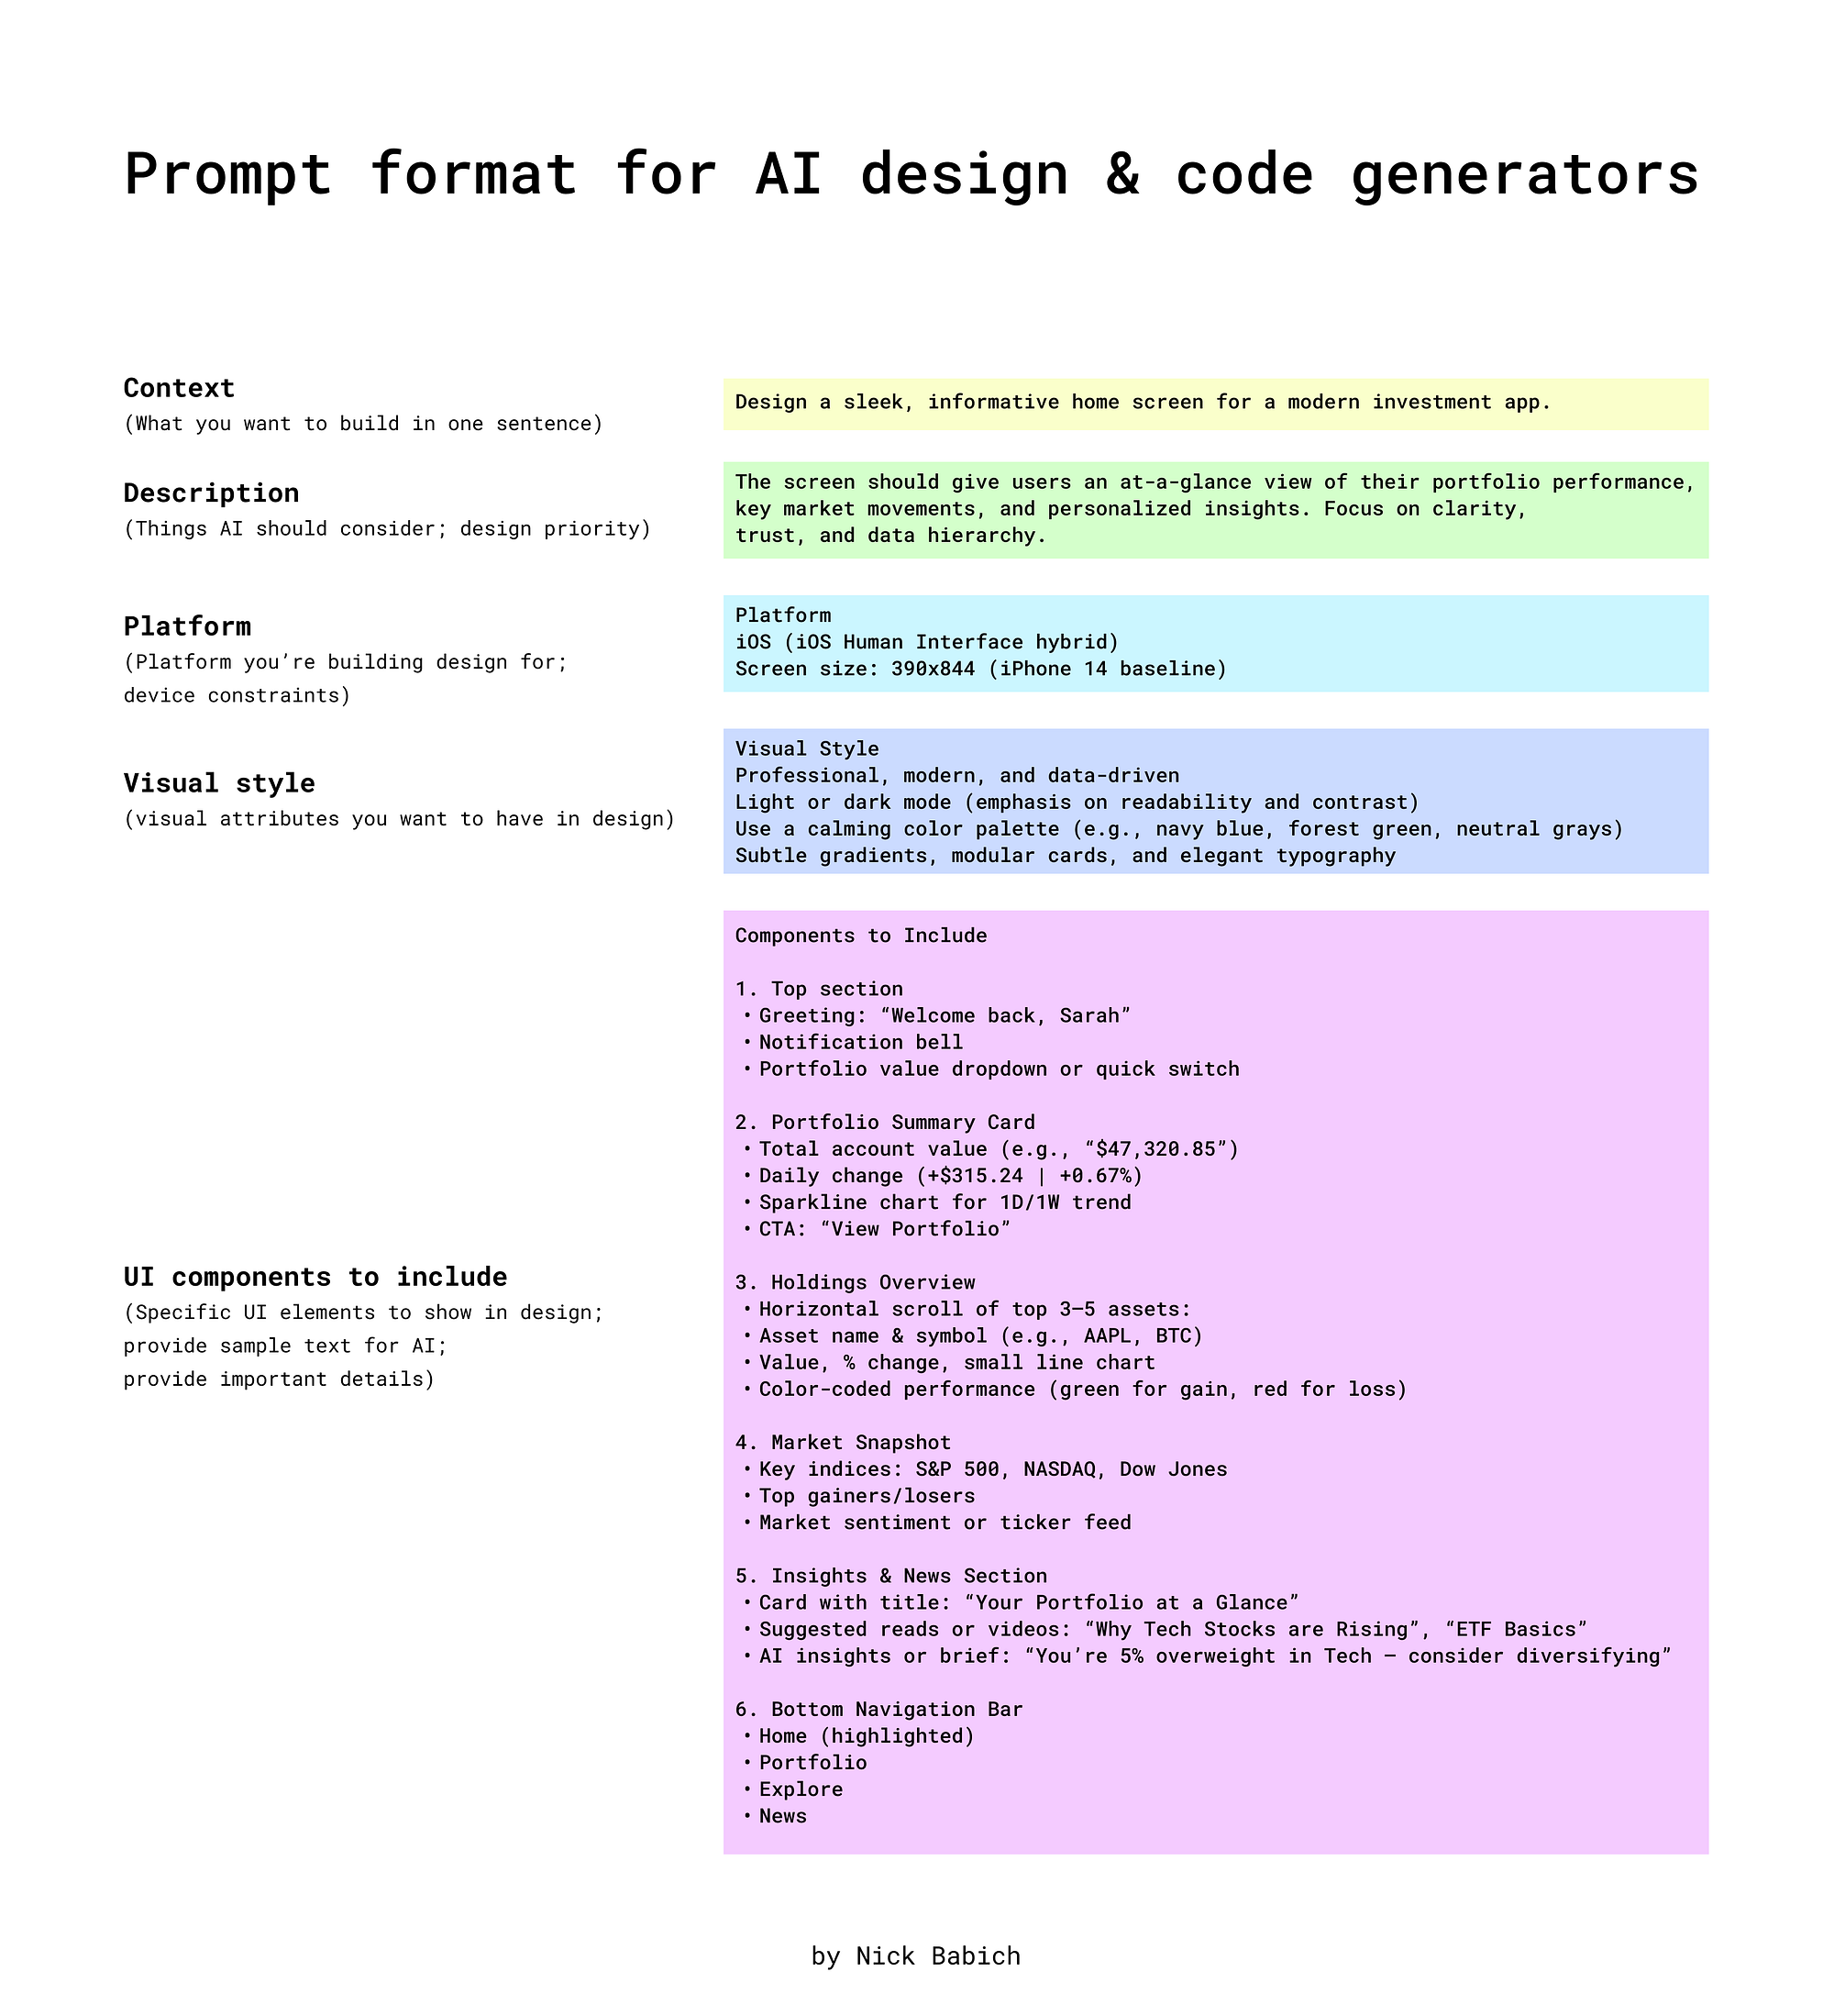
The fields in the image—Context, Description, Visual Style, and Components—map directly to the four parts we just discussed.
- Context and Description define the Identity and Audience.
- Components to Include and UI components to include specify the Features.
- Visual Style clearly defines the Aesthetic.
Here is another example of a well-structured prompt. While the labels are different, the underlying principle is the same: providing clear, categorized instructions.

In this example, "Persona" and "Context" inform the Audience and Identity, "Goal (Task)" outlines the Features, and the tone mentioned in "Constraint" contributes to the Aesthetic.
From Theory to Practice
Let's see how this structure works in practice. A great workflow, especially for visual projects like landing pages, involves preparing your content before you even start prompting. This means writing your text (copy) and defining your visual guidelines first.
This video demonstrates a very practical approach to building a landing page. The creator prepares his text and a "design guide" and then combines them into a single, powerful initial prompt.
Lovable Landing Page Tutorial for Beginners
Watch how the creator prepares his content upfront and then feeds it all to the AI in one go. This is a highly effective technique.
Pay attention to the first two minutes, where he discusses preparing the landing page copy and then creating a design guide. Finally, watch how he combines everything into his initial prompt for Lovable.
By providing both the content and the style guide at once, you give the AI a complete picture of your vision, leading to a much stronger first draft.
Now, let's analyze a complete prompt example from the "Prompts for vibe coding" article you read earlier.
Prompts for vibe coding: a roundup and how to start
Let's return to the article and examine a full prompt.
Read the "Focus mode timer" example in the "Prompts for vibe coding web apps" section. As you read, try to identify the four key components: identity, audience, features, and aesthetic.
Let's break down the "Focus mode timer" prompt together:
- Identity: "Build a Pomodoro timer web app..."
- Audience: "...designed for deep focus." (This implies a user who wants minimal distractions).
- Features: "A default 25-minute timer...", "Simple 'Start', 'Pause', and 'Reset' buttons...", "play a gentle singing bowl sound...", "Include a small text area..."
- Aesthetic: "...very clean with lots of empty space. No bright colors, just shades of grey and beige...", "soft, creamy off-white...", "thin, elegant serif font..."
See how the combination of these elements paints a vivid picture for the AI? This level of detail is what separates a generic timer from the specific, "zen" experience the prompter envisioned.
Your Turn: Draft an Initial Prompt
Now it's time to apply what you've learned. Your task is to draft an initial prompt for a simple project.
Project Idea: A personal portfolio landing page for a freelance virtual assistant who specializes in database collection and data entry.
Using the four key components, draft a prompt to build this landing page. Think about what a potential client would need to see to be convinced to hire this person. What should the page feel like? Professional? Modern? Friendly?
Use the template below to structure your thoughts and write your prompt.
1. Identity:
- What is it? (e.g., "A single-page portfolio website...")
2. Audience:
- Who is it for? (e.g., "Small business owners or managers looking to hire...")
3. Features:
- What sections should be included? (e.g., A hero section with a headline, an "About Me" section, a "Services" section listing data entry and database collection, a "Contact" section with a simple form...)
4. Aesthetic:
- What is the vibe? (e.g., "Clean, professional, and organized. Use a color palette of navy blue, white, and a light grey. The typography should be a clear, modern sans-serif font like Lato or Montserrat...")
Take about 10 minutes to write your prompt in a text editor or on paper. There's no single right answer; the goal is to practice thinking in this structured way.
Key Takeaways and Next Steps
Congratulations on completing your first lesson! You've taken a crucial step towards mastering AI-driven development.
Here are the key takeaways:
- Vibe coding is about communicating your vision—functionality and feeling—to an AI.
- The initial prompt is your project's blueprint. A great one saves you hours of refinement later.
- A strong prompt clearly defines the project's identity (what), audience (who), features (how), and aesthetic (vibe).
- Structure is key. Organizing your prompt into logical sections helps the AI deliver better results.
In our next lesson, we will explore zero-shot prompting. Now that you know how to write a detailed initial request, we'll see how you can use it to get an AI to generate a simple design concept, like a logo or an icon, without needing to provide it with any prior examples.