Hello and welcome to the final lesson of our course!
In our last session, we built a comprehensive end-to-end test that validates the entire produce-consume-acknowledge cycle of our broker. We used testcontainers-go to spin up a PostgreSQL database, treating Docker as a dependency for our tests.
In this capstone lesson, we'll flip the script. We are now moving from testing to deployment. Our focus will be on packaging our broker into a container and using Docker Compose to orchestrate a complete, local deployment environment. This lesson directly addresses the final learning outcome: Containerize the broker and its dependencies using Docker and Docker Compose for local deployment.
By the end of this lesson, you will have:
- Created an optimized, multi-stage
Dockerfileto build a minimal container image for our Go broker. - Written a
docker-compose.ymlfile to define and run our broker and its PostgreSQL database as a cohesive application stack. - Mastered the workflow for building, running, and managing the local deployment of your system.
This is where all our hard work comes together, transforming our source code into a portable, deployable system.
1. Why Containerize? The Role of Docker
As a software engineer with extensive experience, you're likely familiar with the challenges of environment consistency—the "it works on my machine" problem. Docker solves this by packaging an application and its dependencies into a standardized, isolated unit called a container.
For our project, this means we can package our Go binary, along with any necessary OS libraries, into a single image. This image can then be run identically on any machine with Docker, from your local development machine to a production server in the cloud.
2. Building an Optimized Go Docker Image
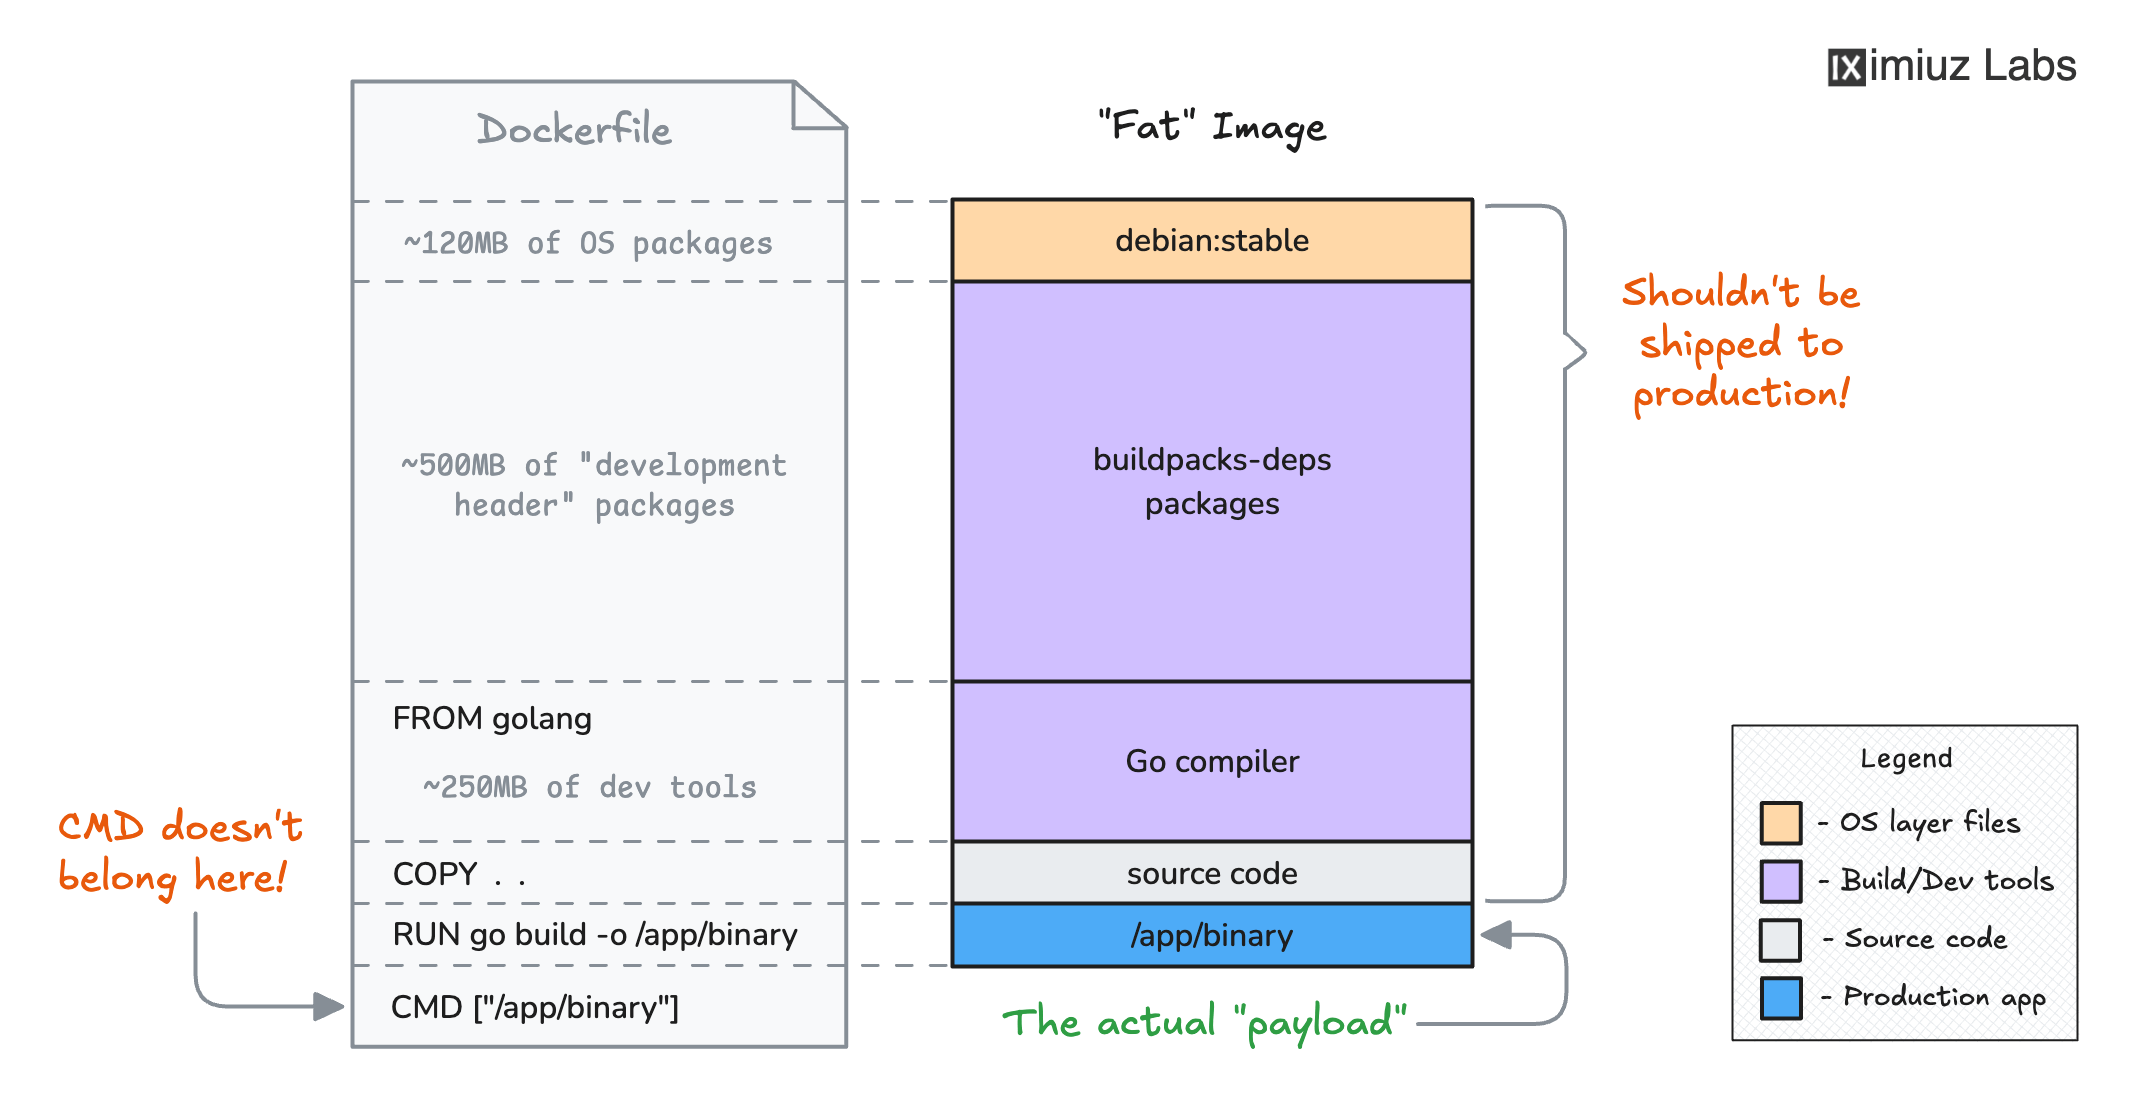
Our first task is to write a Dockerfile. This is a text file that contains instructions for building a Docker image. A naive approach would be to copy our source code into a Go-based image and build it there. However, this results in a "fat" image containing the entire Go toolchain, compilers, and source code, which are unnecessary for running the application.
The professional standard for compiled languages like Go is to use a multi-stage build.
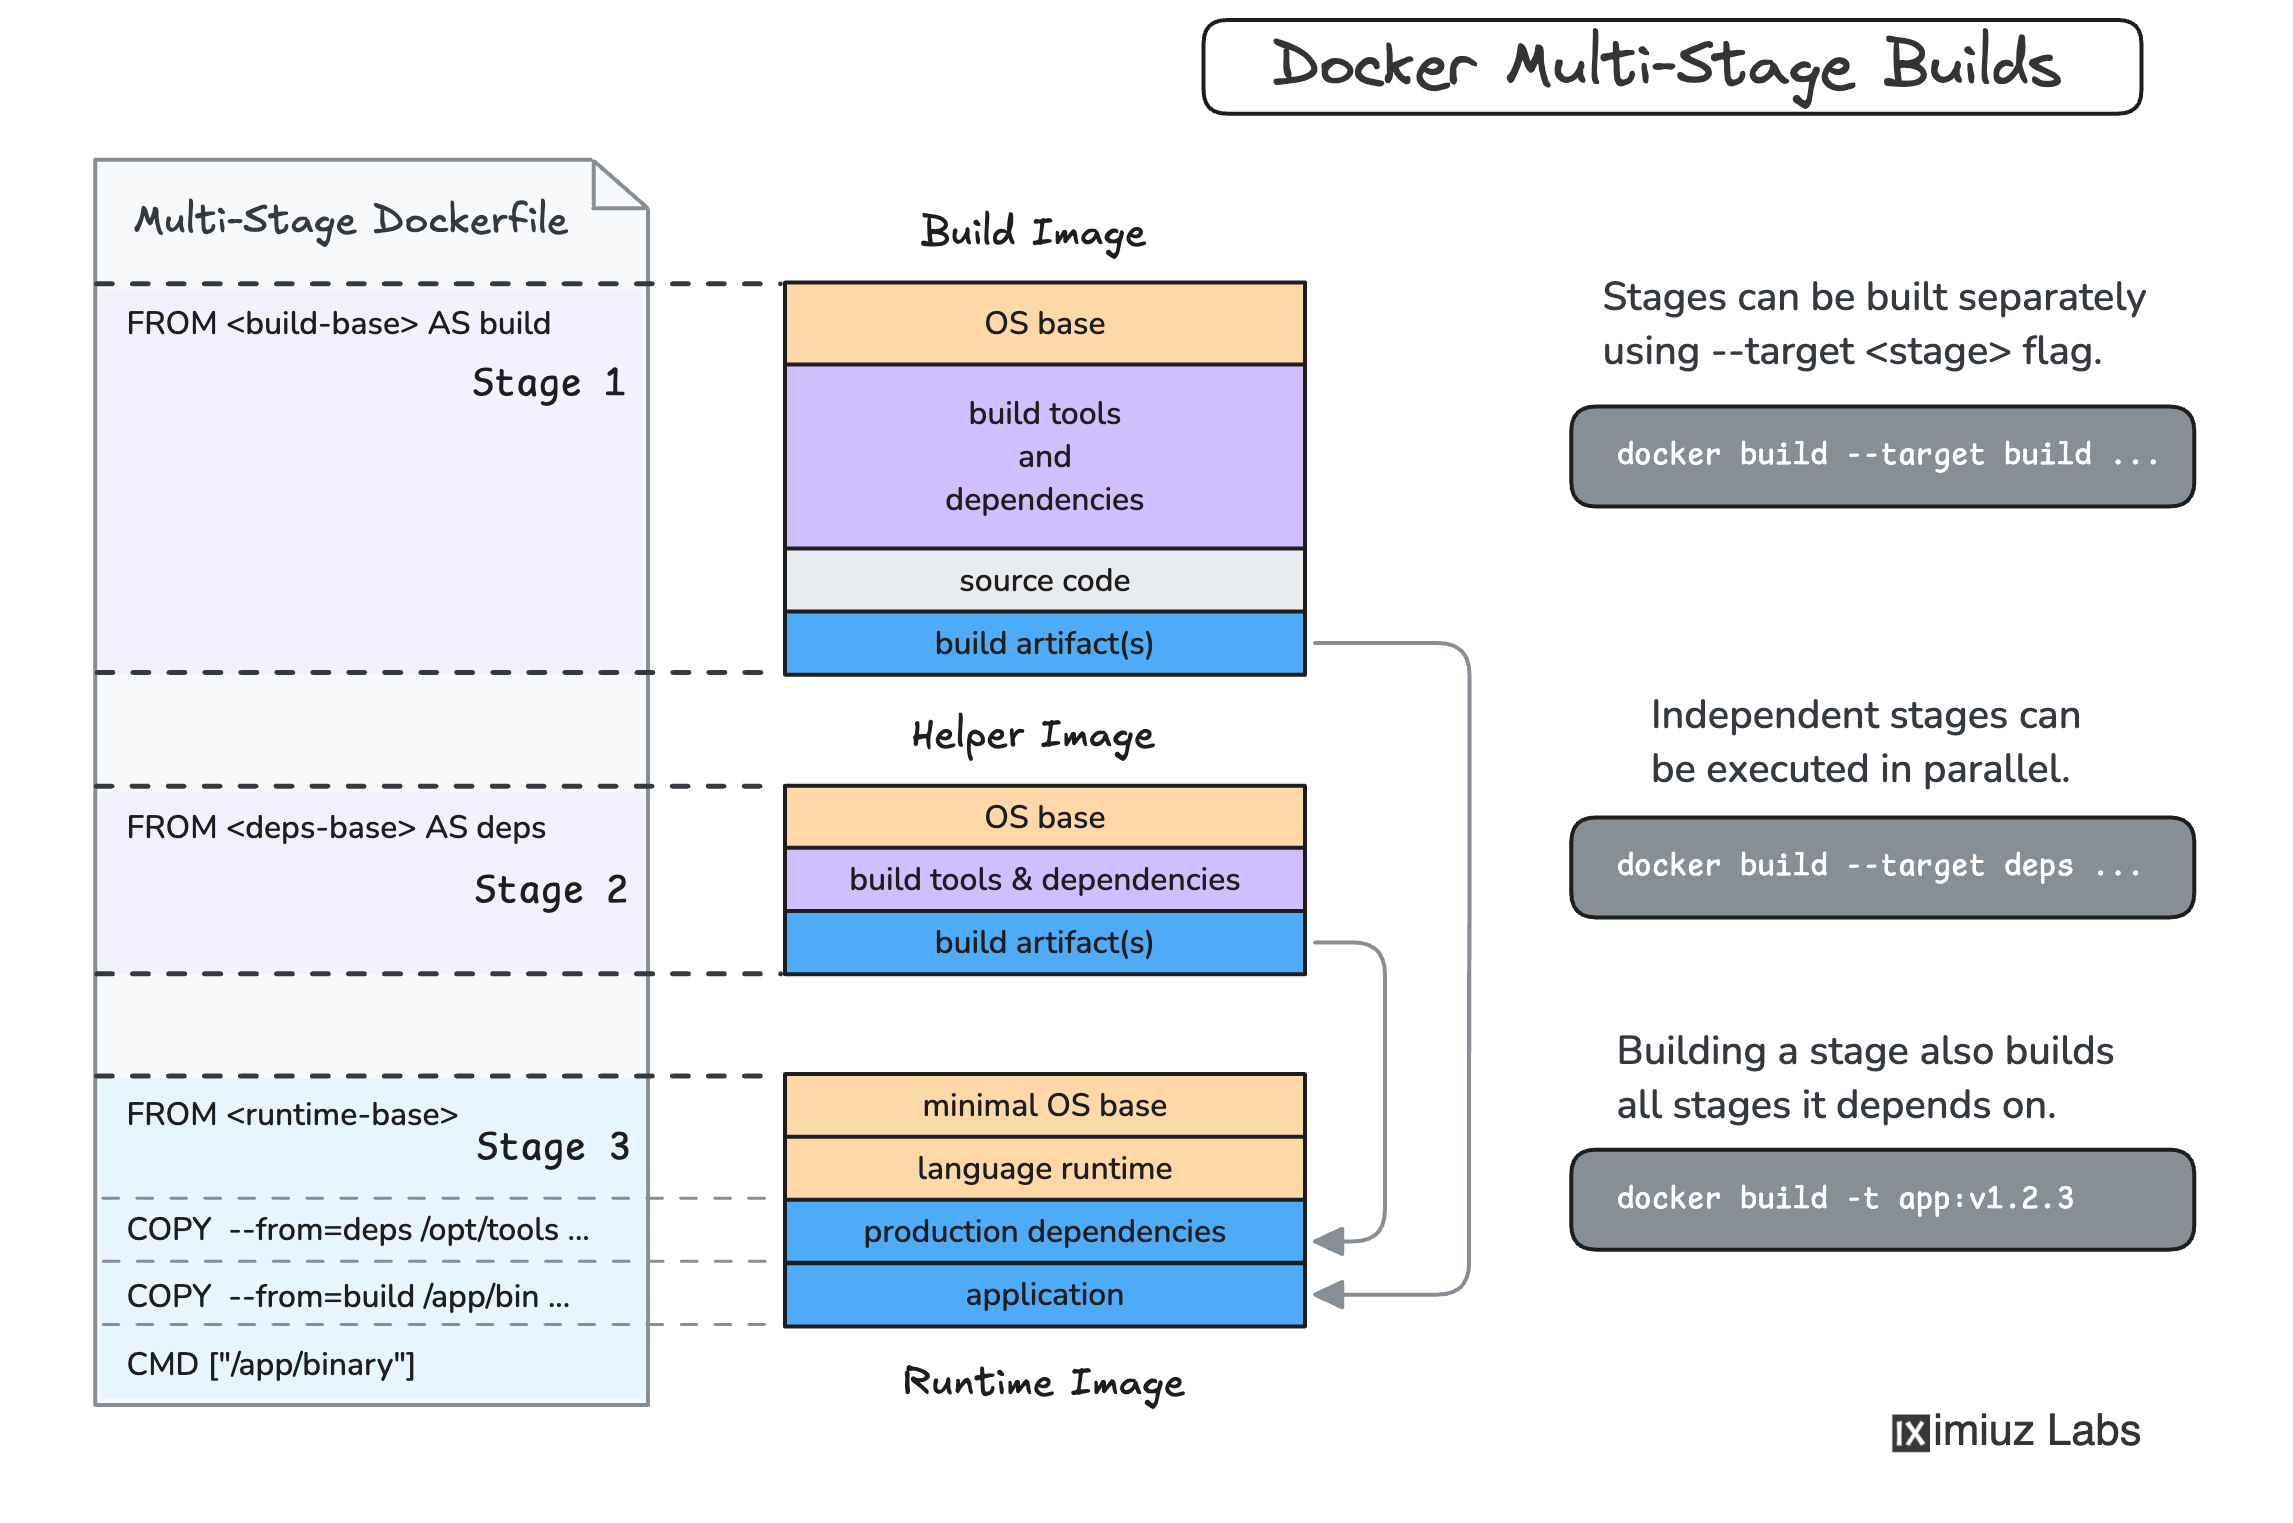
Let's see this in action. The following two videos provide excellent explanations of this process.
Dockerfile for Golang Step by Step 2024 (multi-stage build with distroless/scratch)
First, this video from David Hwang provides a clear, step-by-step walkthrough of creating a multi-stage Dockerfile for a Go application, explaining the 'why' behind each stage.
Watch from the beginning to 07:05. This covers the entire process: the concept of multi-stage builds, creating the builder stage, creating the final lightweight stage, and building/running the container.
Build a CRUD Rest API in Go using Mux, Postgres, Docker and Docker Compose #golang #docker
This second video, by Francesco Ciulla, shows a slightly different but equally valid approach to creating a Dockerfile for a Go REST API. Seeing a second example will help solidify the pattern.
Watch from 21:19 to 24:47. Pay attention to the Dockerfile commands used: FROM, WORKDIR, COPY, RUN, EXPOSE, and CMD.
Creating the Dockerfile
Now, let's create a Dockerfile in the root of your broker project. Based on the principles from the videos, we'll create a two-stage build.
# Stage 1: The Builder
# We use a specific Go version on Alpine Linux as our build environment.
FROM golang:1.21-alpine AS builder


# Set necessary environment variables
# CGO_ENABLED=0 is critical for creating a static binary that can run in a minimal container.
ENV CGO_ENABLED=0 GOOS=linux


# Set the working directory inside the container
WORKDIR /app


# Copy go.mod and go.sum files to download dependencies first.
# This leverages Docker's layer caching. Dependencies are only re-downloaded if go.mod/go.sum change.
COPY go.mod go.sum ./
RUN go mod download


# Copy the entire source code
COPY . .


# Build the application.
# -ldflags "-s -w" strips debugging information, reducing binary size.
# -o /app/broker specifies the output path for the executable.
# We build the main executable from the cmd/broker directory.
RUN go build -ldflags="-s -w" -o /app/broker ./cmd/broker


# ---


# Stage 2: The Final Image
# We use 'scratch' which is an empty image. This is the most minimal possible base.
# 'alpine' is another good choice if you need a shell or basic utilities.
FROM scratch


# Copy the compiled binary from the 'builder' stage.
COPY --from=builder /app/broker /broker


# Expose the TCP port our broker listens on.
# Replace 9092 with the port your broker uses.
EXPOSE 9092


# Set the entrypoint for the container. This is the command that will be run when the container starts.
ENTRYPOINT ["/broker"]
Place this Dockerfile in your project's root directory. With this file, you can now build a lean, production-ready image of your broker by running docker build -t mini-kafka-broker . in your terminal.
3. Orchestrating with Docker Compose
Building a single image is great, but our broker is useless without its PostgreSQL database. This is where Docker Compose comes in. It's a tool for defining and running multi-container Docker applications using a simple YAML file.
We will create a docker-compose.yml file to define two services:
broker: Our Go application, built from theDockerfilewe just created.db: A standard PostgreSQL database, pulled from Docker Hub.
We'll also configure a network for them to communicate and a volume to persist the database data.
For a comprehensive overview of Docker Compose concepts, the following article is an excellent reference.
A Deep Dive into Docker Compose
This article, 'A Deep Dive into Docker Compose', provides a thorough yet accessible guide to the key components and best practices for using Docker Compose.
Read the following sections to get a solid foundation: 'Understanding the Docker Compose File Structure' (intro to version, services, networks, volumes) 'Configuring Services in Docker Compose' (image, ports, env vars, volumes) 'Working with Environment Variables in Docker Compose' (using .env files) 'Networking in Docker Compose' (default network, service names as hostnames) 'Volumes and Persistent Storage in Docker Compose' 'Advanced Docker Compose Features' (focus on depends_on and healthcheck) \nFocus on how these concepts allow us to define a complete application stack in a single file.
Creating the docker-compose.yml File
Now let's apply these concepts. Create a docker-compose.yml file in your project root.
version: '3.8'

services:


  # The PostgreSQL Database Service
  db:
    image: postgres:15-alpine
    container_name: broker_db
    environment:
      POSTGRES_USER: ${POSTGRES_USER}
      POSTGRES_PASSWORD: ${POSTGRES_PASSWORD}
      POSTGRES_DB: ${POSTGRES_DB}
    ports:


      # Map container port 5432 to host port 5432 for easy debugging with a DB client
      - "5432:5432"
    volumes:


      # Persist database data in a named volume
      - postgres_data:/var/lib/postgresql/data
    healthcheck:


      # Wait for the database to be ready before other services start
      test: ["CMD-SHELL", "pg_isready -U ${POSTGRES_USER} -d ${POSTGRES_DB}"]
      interval: 10s
      timeout: 5s
      retries: 5
    restart: unless-stopped


  # The Broker Service
  broker:
    container_name: broker_app


    # Build the image from the Dockerfile in the current directory
    build: .
    ports:


      # Expose the broker's TCP port to the host
      - "9092:9092"
    environment:


      # The application needs to know how to connect to the database.
      # 'db' is the hostname, which Docker Compose resolves to the IP of the 'db' service.
      DB_CONN_STRING: "postgres://${POSTGRES_USER}:${POSTGRES_PASSWORD}@db:5432/${POSTGRES_DB}?sslmode=disable"
    depends_on:
      db:
        condition: service_healthy
    restart: unless-stopped

volumes:
  postgres_data:
Configuration with .env
Notice the ${...} syntax. Docker Compose automatically substitutes these variables from a .env file in the same directory. This is a best practice for managing configuration and secrets.
Create a .env file in your project root:
# PostgreSQL Credentials
POSTGRES_USER=myuser
POSTGRES_PASSWORD=mypassword
POSTGRES_DB=brokerdb
Important: Remember to add .env to your .gitignore file to avoid committing credentials to version control.
4. Running the Full Stack
With the Dockerfile, docker-compose.yml, and .env files in place, you can now manage your entire application stack with simple commands.
The video you watched earlier also provides a live demonstration of this process.
Build a CRUD Rest API in Go using Mux, Postgres, Docker and Docker Compose #golang #docker
Let's revisit Francesco Ciulla's video to see how to use the Docker Compose CLI to manage the application stack. This is a great practical demonstration.
Watch the following segments: Compose File Walkthrough (24:47 - 29:40): See how the Go app and Postgres DB services are defined and connected. Running the Stack (29:53 - 37:13): Observe the use of docker compose up, docker compose build, and docker ps to start and check the services. Development Workflow (44:32 - 47:54): Learn how to force a rebuild with --build when your code changes.
Here are the key commands for you to use:
-
Start the application:
# This command builds the 'broker' image and starts both containers. # The '-d' flag runs them in detached mode (in the background). docker compose up --build -d -
Check the status:
# See which containers are running docker compose ps -
View logs:
# Follow the logs for all services docker compose logs -f # Or view logs for a specific service docker compose logs -f broker -
Stop the application:
# Stops and removes the containers. The '--volumes' flag also removes the named volume.
docker compose down --volumes
Your broker application will need to be configured to read the DB_CONN_STRING from its environment variables (which you've likely already set up in Module 3) and run the database migrations on startup (covered in Module 2). Once running, you can use the CLI you built to interact with your fully containerized broker system!
Course Conclusion
Congratulations! You have successfully built a simplified, Kafka-like message broker from the ground up, and you've now packaged it for deployment. This is the culmination of everything we've learned together.
Let's take a moment to reflect on the journey:
- You mastered project setup and dependency management, creating a professional Go project structure.
- You embraced interface-driven design to build a modular and testable system with swappable backends.
- You gained deep experience with PostgreSQL integration, including connection management, migrations, and transactions.
- You built a robust network server with a custom binary protocol, handling concurrency with goroutines and channels.
- You implemented core broker logic for topics, partitions, producers, and consumer groups, including stateful offset management.
- You developed a comprehensive testing strategy, from unit and integration tests to full end-to-end validation.
- And finally, you learned to containerize and orchestrate your application using Docker and Docker Compose, preparing it for real-world deployment.
You set out with the ambitious goal of building this system to achieve mastery of Go, and you've done it. The skills you've honed here are directly applicable to building high-performance, distributed systems of any kind.
From here, you could explore deploying this system to a cloud provider using Kubernetes, dive deeper into Kafka's more advanced features like replication and log compaction, or apply these patterns to your next big project. The foundation you've built is solid. Well done