Hello! Welcome back.
In our last lesson, we implemented a graceful shutdown mechanism, making our server robust and production-aware. It now handles termination signals correctly, ensuring no in-flight requests are dropped during a restart.
Today, we'll continue enhancing our service's production readiness by tackling observability. A running application that you can't see inside of is a black box. We're going to add a window into that box using structured logging.
Your Goal for Today
Learning Outcome: Add structured logging using slog and middleware for request tracing.
Instead of logging simple, unstructured strings with fmt.Println() or the basic log package, modern services use structured logs (typically JSON). These logs are not just for human eyes; they are designed to be ingested, parsed, and queried by machines and logging platforms. This allows for powerful analysis, alerting, and debugging.
We will use Go's standard slog package to produce these logs. More importantly, we'll implement this as a middleware, so every request is automatically logged. We'll also introduce a request tracing ID to correlate all log entries generated by a single API call.

1. An Introduction to Structured Logging with slog
Go 1.21 introduced the log/slog package, providing a fast and flexible structured logging solution in the standard library. Before we write any code for our project, it's crucial to understand the "why" and "how" of this package.
The following video from Better Stack provides an excellent introduction. It contrasts slog with the older log package and walks through the core features we'll be using today.
Go Structured Logging with the slog Package (Golang)
Watch this video, 'Go Structured Logging with the slog Package', to get a solid foundation in slog's core concepts.
Please watch from the beginning (00:00) until 09:42. Focus on these key points: The Problem with log (00:45): Understand the limitations of the traditional log package. slog Levels (05:29): See how slog handles different severity levels like Debug, Info, and Error, and why the default level is Info. Handlers (TextHandler and JSONHandler) (06:44): Grasp the concept of a Handler, which controls the final output format. We will be using JSONHandler for our project.
As the video explains, slog is built on three main components:
Logger: The front-end API you use to create log entries (e.g.,slog.Info(...)).Handler: The back-end that formats the log entry and writes it to a destination (e.g.,slog.NewJSONHandler(os.Stdout, ...)).Record: The data structure that holds all log information (time, level, message, attributes) as it passes from theLoggerto theHandler.
This separation of concerns is a powerful design principle, allowing you to change your logging backend (output format, destination) without changing the application code that generates the logs.
2. Adding Context: Attributes and Child Loggers
The real power of structured logging comes from adding contextual attributes—key-value pairs that enrich your log messages.
slog offers two ways to add attributes:
- Inline key-value pairs:
slog.Info("message", "key1", "value1", "key2", 123) - Typed
slog.Attrhelpers:slog.Info("message", slog.String("key1", "value1"), slog.Int("key2", 123))
As a seasoned developer, you'll appreciate the safety of the second approach. The first approach is convenient but can lead to silent errors if you provide an odd number of arguments (a key without a value). The slog.Attr helpers catch this at compile time. We will exclusively use the slog.Attr style in our project.
Often, you'll want to add the same piece of context (like a request_id) to many log messages. Instead of passing it to every call, you can create a child logger that includes this attribute automatically.
Let's continue with the video to see how to add attributes and create child loggers.
Go Structured Logging with the slog Package (Golang)
This next segment of the video demonstrates how to add custom attributes and create reusable child loggers.
Please watch the following two segments: Logging Custom Attributes (11:23 - 15:29): Pay attention to the two different syntaxes for adding attributes and why the slog.Attr form provides strong typing. Child Loggers with logger.With (19:55 - 24:23): This is a critical concept. Understand how logger.With(...) creates a new logger that automatically includes a set of attributes in all its output.
The logger.With(...) method is the key to our request tracing implementation. We will use it to create a logger that is "scoped" to a single HTTP request, containing its unique ID.
3. Implementing a Logging Middleware
Now let's apply these concepts to our API. We want to log every incoming request without cluttering our actual HTTP handlers. This is a perfect use case for middleware.
A middleware is a function that wraps an http.Handler, allowing you to execute code before and/or after the next handler in the chain.
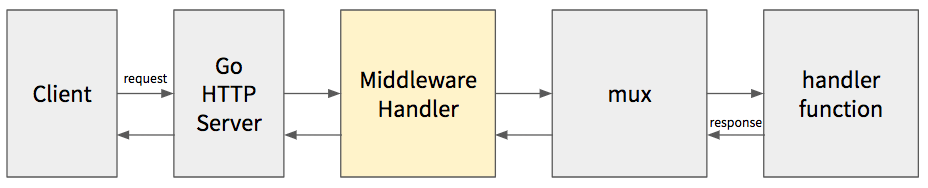
We will create a middleware that:
- Extracts details from the
http.Request. - Logs these details as a structured
slogentry. - Passes control to the next handler.
The following article from Alex Edwards provides a clean, practical example of a logRequest middleware that does exactly this.
Making and using HTTP Middleware in Go
This article, 'Making and using HTTP Middleware in Go', demonstrates the standard pattern for creating middleware. We'll focus on the final, realistic example which implements a logRequest middleware with slog.
Read the section titled 'A more realistic example'. Focus your attention on the logRequest middleware function. Notice how it extracts request details like IP, method, and URL and uses slog.Group to organize the attributes neatly.
4. Project Integration: From Logging to Tracing
We are now ready to build the full solution for our project. We will create two middlewares that work together to provide request tracing.
requestIDMiddleware: This will check for a correlation ID header (e.g.,X-Correlation-ID). If it's missing, it will generate a new unique ID. This ID is then added to the request's context.loggingMiddleware: This will create a request-scoped child logger usinglogger.With(...)to include the correlation ID from the context. It will then log the initial request details and pass control to the router.
Here's how you can implement this in your project. It's common to place middleware in an internal/middleware package.
Step 1: Create a logger utility
It's good practice to have a helper for creating your application's base logger. Let's create internal/log/log.go:
// internal/log/log.go
package log

import (
	"log/slog"
	"os"
)

// New creates a new slog.Logger with a JSONHandler writing to stdout.
func New() *slog.Logger {
	return slog.New(slog.NewJSONHandler(os.Stdout, nil))
}
Step 2: Create the middleware
Now, create internal/middleware/logger.go. This file will contain our middleware logic. We'll also define a custom context key to safely store and retrieve values from the context.
// internal/middleware/logger.go
package middleware

import (
	"context"
	"log/slog"
	"net/http"
	"time"

	"github.com/google/uuid"
)

// Define a custom type for our context key to avoid collisions.
type contextKey string

const (
	// The key for the request-scoped logger in the context.
	loggerKey contextKey = "logger"
	// The key for the correlation ID in the context.
	correlationIDKey contextKey = "correlation_id"
	// The header name for the correlation ID.
	correlationHeader = "X-Correlation-ID"
)

// RequestID adds a correlation ID to each request.
func RequestID(next http.Handler) http.Handler {
	return http.HandlerFunc(func(w http.ResponseWriter, r *http.Request) {
		// Get correlation ID from header or generate a new one.
		correlationID := r.Header.Get(correlationHeader)
		if correlationID == "" {
			correlationID = uuid.New().String()
		}

		// Add the correlation ID to the response headers.
		w.Header().Set(correlationHeader, correlationID)

		// Create a new context with the correlation ID and attach it to the request.
		ctx := context.WithValue(r.Context(), correlationIDKey, correlationID)
		r = r.WithContext(ctx)

		next.ServeHTTP(w, r)
	})
}

// Logger initializes a request-scoped logger.
func Logger(baseLogger *slog.Logger) func(http.Handler) http.Handler {
	return func(next http.Handler) http.Handler {
		return http.HandlerFunc(func(w http.ResponseWriter, r *http.Request) {
			start := time.Now()

			// Retrieve correlation ID from context.
			correlationID, _ := r.Context().Value(correlationIDKey).(string)

			// Create a child logger with request-specific attributes.
			requestLogger := baseLogger.With(
				slog.String("correlation_id", correlationID),
			)

			// Add the request-scoped logger to the context.
			ctx := context.WithValue(r.Context(), loggerKey, requestLogger)
			r = r.WithContext(ctx)

			// We will log the request completion in another middleware
			// or by wrapping the ResponseWriter, but for now let's log the start.
			requestLogger.Info("request started",
				slog.String("method", r.Method),
				slog.String("path", r.URL.Path),
				slog.String("remote_addr", r.RemoteAddr),
			)

			// Defer logging the end of the request.
			defer func() {
				requestLogger.Info("request completed",
					slog.Duration("duration", time.Since(start)),
				)
			}()

			next.ServeHTTP(w, r)
		})
	}
}

// FromContext retrieves the request-scoped logger from the context.
// If no logger is found, it returns a default disabled logger.
func FromContext(ctx context.Context) *slog.Logger {
	if logger, ok := ctx.Value(loggerKey).(*slog.Logger); ok {
		return logger
	}
	// Return a logger that does nothing if one isn't found.
	return slog.New(slog.NewJSONHandler(os.Stderr, &slog.HandlerOptions{Level: slog.Level(100)}))
}
Note: You will need to add the github.com/google/uuid dependency by running go get github.com/google/uuid.
Step 3: Update main.go
Finally, wire up your new logger and middleware in cmd/api/main.go.
package main

import (
	"context"
	"errors"
	"log"
	"net/http"
	"os"
	"os/signal"
	"syscall"
	"time"

	"your.module/path/internal/log" // <-- Import your log package
	"your.module/path/internal/middleware" // <-- Import your middleware
)

func main() {
	// 1. Initialize the base logger.
	baseLogger := log.New()

	// ... other initializations (router, db, etc.) ...
	// This is your chi router instance.
	mux := http.NewServeMux() // Replace with your chi router

	mux.HandleFunc("/", func(w http.ResponseWriter, r *http.Request) {
		// Example of using the request-scoped logger inside a handler.
		logger := middleware.FromContext(r.Context())
		logger.Info("Hello from the handler!")
		w.Write([]byte("Hello, World!"))
	})

	// 2. Chain the middleware. Note the order.
	// Logger middleware needs to run after RequestID to access the ID.
	var handler http.Handler = mux
	handler = middleware.Logger(baseLogger)(handler)
	handler = middleware.RequestID(handler)

	server := &http.Server{
		Addr:    ":8080",
		Handler: handler, // <-- Use the wrapped handler
	}

	// Graceful shutdown logic from previous lesson...
	// (The rest of your main function remains the same)
}
Now, when you run your application and make a request (e.g., curl -v localhost:8080), you will see structured JSON logs in your console, and each log line from a single request will share the same correlation_id.
Conclusion
Excellent work. You've now implemented a core component of any modern, observable service. Your API now produces structured, machine-readable logs that are automatically correlated per-request. This is invaluable for debugging, monitoring, and tracing application behavior in a distributed environment.
Key Takeaways:
- Structured Logging is King:
slogwithJSONHandlerprovides a powerful, standard way to create logs that are easy for both humans and machines to parse. - Safety First: Always use the strongly-typed
slog.Attrhelpers (slog.String,slog.Int, etc.) to avoid runtime errors and ensure log integrity. - Middleware for Cross-Cutting Concerns: Logging is a perfect example of a cross-cutting concern that is best handled in middleware to keep your business logic clean.
- Tracing with
contextand Child Loggers: The pattern of generating a request ID, placing it in the context, and usinglogger.With()to create a request-scoped logger is a powerful technique for tracing the flow of execution.
Next Up
Our server is now more robust and observable. The next logical step is to ensure it's also correct. In the next lesson, we will dive into writing table-driven unit tests for our business logic. You'll also learn how to write isolated tests for your repository implementations.