Welcome to your first lesson. We're kicking off your journey to monetizing your 3D modeling skills by diving into the core of professional digital sculpting: precise brush control. While you're already proficient with Nomad Sculpt, this lesson will elevate your technique by focusing on the advanced settings that distinguish high-quality, marketable models from amateur ones.
Today, you will learn to utilize advanced brush settings, specifically alpha modifications and falloff curves. Mastering these will give you the fine-grained control needed to create intricate details, realistic textures, and clean, professional forms—all essential for producing assets that people will want to buy or commission. This is the foundational skill upon which we will build your entire sculpting workflow.
The Anatomy of a Brush Stroke
At its core, a brush stroke in Nomad Sculpt is defined by two primary components: what shape or texture you're applying, and how its intensity changes across the brush area. These are controlled by the Alpha and Falloff settings, respectively.
- Alpha: This is a grayscale image that acts as a stencil or a height map for your brush. Pure white areas of the alpha apply the brush effect at full strength, while pure black areas have no effect. Grayscale values in between correspond to varying levels of intensity. The alpha determines the what—the texture of dragon scales, the pattern of a screw head, the grit of worn stone.
- Falloff: This is a curve that dictates the brush's strength from its center to its edge. It defines the "profile" or cross-section of your brush tip, controlling whether your stroke has a sharp, crisp edge or a soft, feathered one. The falloff determines the how—the gentle slope of a cheekbone versus the hard edge of a mechanical panel.
Given your background in electrical engineering, you can think of this in terms of signal modulation. The alpha is like a carrier signal—the fundamental pattern or information. The falloff curve is like an envelope or a window function applied to that signal, shaping its amplitude and smoothing its transitions. Just as a window function prevents spectral leakage by tapering a signal, a falloff curve prevents harsh, unnatural edges in your sculpt.

To get a feel for how these settings are organized in the Nomad Sculpt interface, let's start with the official documentation.
This is the main documentation for all brush stroke settings in Nomad. It provides a high-level overview of the five key menus that control brush behavior.
Read the short overview section. Pay attention to the descriptions for Alpha and Falloff, as these are our focus for today.
Now, let's see these concepts in action. The first part of the following video provides an excellent visual demonstration of what alphas are and how the falloff curve directly impacts the shape of the extrusion.
Nomad Sculpt Beginner Tutorial - Sculpting a Coin using Alphas and Brushes
This tutorial by Q Quantillion starts with a clear, practical explanation of alphas and falloffs.
Watch from the beginning until the end of the first concept. The creator does a great job showing the direct link between the shape of the falloff curve and the resulting 3D form, comparing a soft falloff to a hard, linear one.
Mastering Alphas: The "What" of Your Brush
An alpha gives your brush its character. While Nomad comes with a set of default alphas, the real power for creating unique, high-value models comes from using custom ones—a topic we'll explore in depth when we cover AI-generated textures. For now, let's focus on how to manipulate any alpha for precise results.
The key settings for alpha modification are found in the Alpha tab of the Stroke menu.
This section of the manual details the specific parameters you can adjust for your alphas.
Read the Alpha section. Focus on understanding the purpose of: Invert pixels: To switch between pushing in (subtracting) and pulling out (adding). Scaling: To control how a square/rectangular texture fits inside the circular brush. Tiling: To create repeating patterns. Mid value: This is a crucial setting. It allows a single alpha to both add and subtract from the surface, based on a 50% gray value. This is perfect for complex surface details where you have both peaks and valleys.
A critical factor for getting clean results from an alpha is having sufficient mesh resolution. If your mesh doesn't have enough polygons, the detail from the alpha will appear blurry or jagged. This is a common issue that can frustrate new artists. The following clip demonstrates this principle clearly.
Nomad Sculpt Beginner Tutorial - Sculpting a Coin using Alphas and Brushes
This clip from the same tutorial shows the dramatic difference in detail when applying an alpha to a low-resolution versus a high-resolution mesh.
Watch the section from this timestamp. Notice how the pattern becomes crisp and clear only after the mesh is subdivided. This reinforces the importance of managing your mesh resolution, a topic we'll cover in its own lesson later.
Sculpting with Falloff Curves: The "How" of Your Brush
If the alpha is the brush's "what," the falloff is its "how." The falloff curve gives you ultimate control over the feel of your brush. A soft, rounded curve is great for organic forms, while a sharp, linear curve is ideal for hard-surface details.
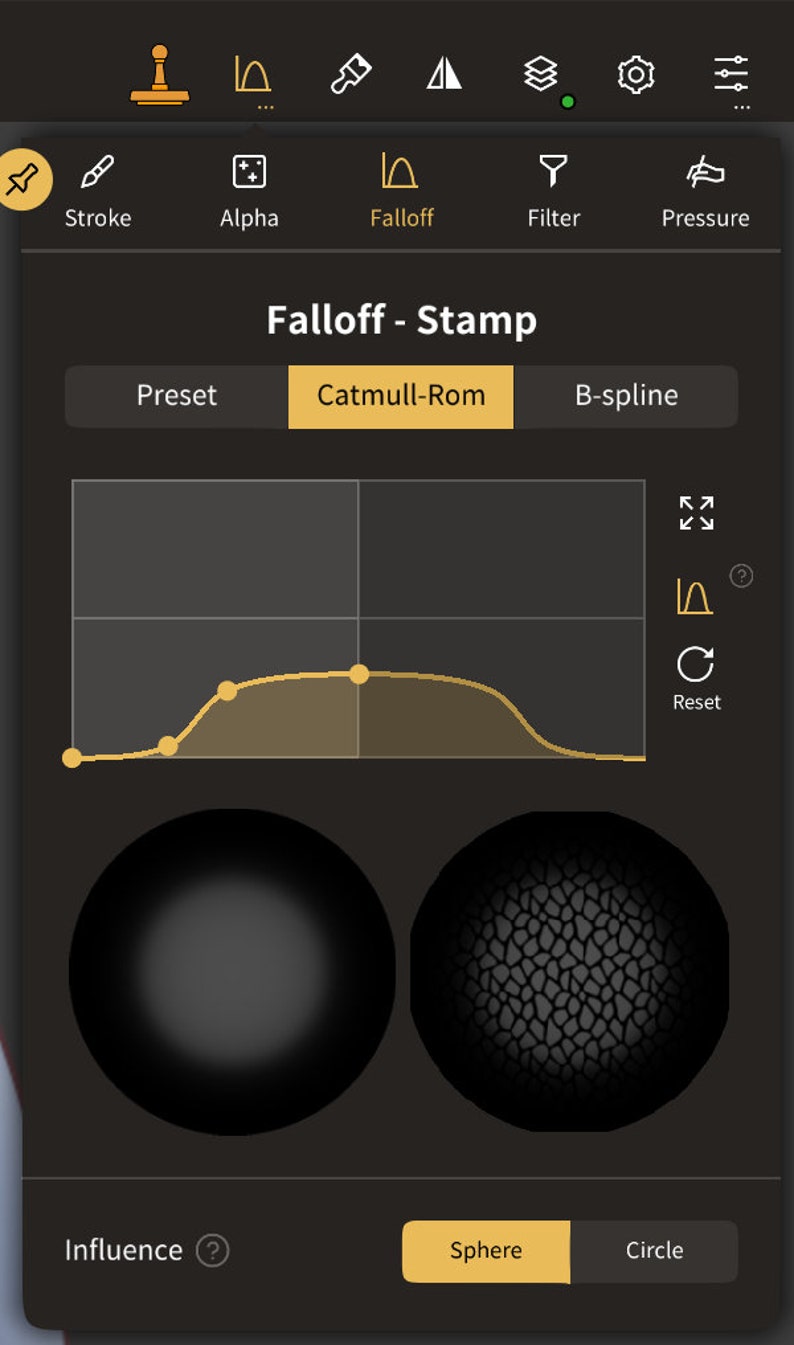
The ability to create custom falloff curves is what truly unlocks professional-level control.
Let's return to the documentation to understand how to create and edit these curves.
Read the Falloff section. Pay close attention to the difference between Catmull-Rom (where points are on the curve for precise control) and B-spline (where points influence the curve for smoother shapes). Experimenting with these two modes is key.
Practical Application: Creating and Saving a Custom Brush
Theory is useful, but the best way to learn is by doing. Let's combine these concepts to create a new, custom brush from scratch. This is a vital skill for developing an efficient workflow. By creating a library of your own specialized brushes, you can execute complex tasks quickly and consistently.
The following video from SouthernGFX is a concise and professional guide to creating and saving your own brushes. We'll watch it in segments to focus on the key steps.
NOMAD SCULPT – Make your own brushes
This tutorial walks through the process of creating a custom 'scales' brush.
First, watch how to clone an existing brush and apply a custom alpha. The 'Lock + radius' stroke type shown here is excellent for stamping details. Watch from the start of the process. Next, see how a simple adjustment to the falloff curve makes the brush more 'aggressive' and sharp. This directly applies what we just learned about custom curves. Watch this short segment from here. Finally, and most importantly, learn how to save your new brush so that all your custom settings—the alpha, falloff, and stroke type—are retained for future use. Watch from this timestamp.
As a practical exercise, I encourage you to open Nomad Sculpt now and follow along with the video. Create your own custom brush using an existing alpha. Try cloning the Clay tool, assigning an alpha, adjusting the falloff curve to be sharper, and then saving it. This simple exercise will solidify everything we've covered.
Conclusion
In this lesson, you've taken the first major step toward professional-grade sculpting. You now understand the fundamental principles of brush control in Nomad Sculpt and how to manipulate them for precise results.
Here are the key takeaways:
- Alphas define the shape or texture of your brush stroke, acting like a stencil.
- Falloff curves define the intensity profile of your brush from center to edge, controlling the hardness or softness of the stroke.
- Combining custom alphas with custom falloff curves allows for nearly infinite variation and control.
- You can create and save your own brushes to build a personalized toolkit, which is essential for an efficient and profitable workflow.
Now that you can control the fine details of your brush strokes, our next lesson will focus on controlling the larger forms of your model. We will explore how to employ masking, splitting, and extraction techniques to create complex multi-part models like armor and accessories. This will move you closer to creating the kind of intricate, high-value assets you aim to sell.