Welcome to your first lesson in mastering your Mac! We're starting right at the beginning by exploring the main screen and learning how to navigate it. The goal of this session is to get you comfortable with the fundamental parts of the macOS interface: the desktop, the menu bar, and the Dock. By the end, you'll be able to use these elements, along with the powerful Spotlight search tool, to find and open any application, file, or feature you need.
This lesson is designed to be very hands-on, so you'll be trying things out on your own Mac as we go. Let's begin by getting oriented with the basic layout of your screen.
The Lay of the Land
When you turn on your Mac, the first thing you see is the desktop. Think of it as your main workspace. It's composed of three key areas that you will use constantly.
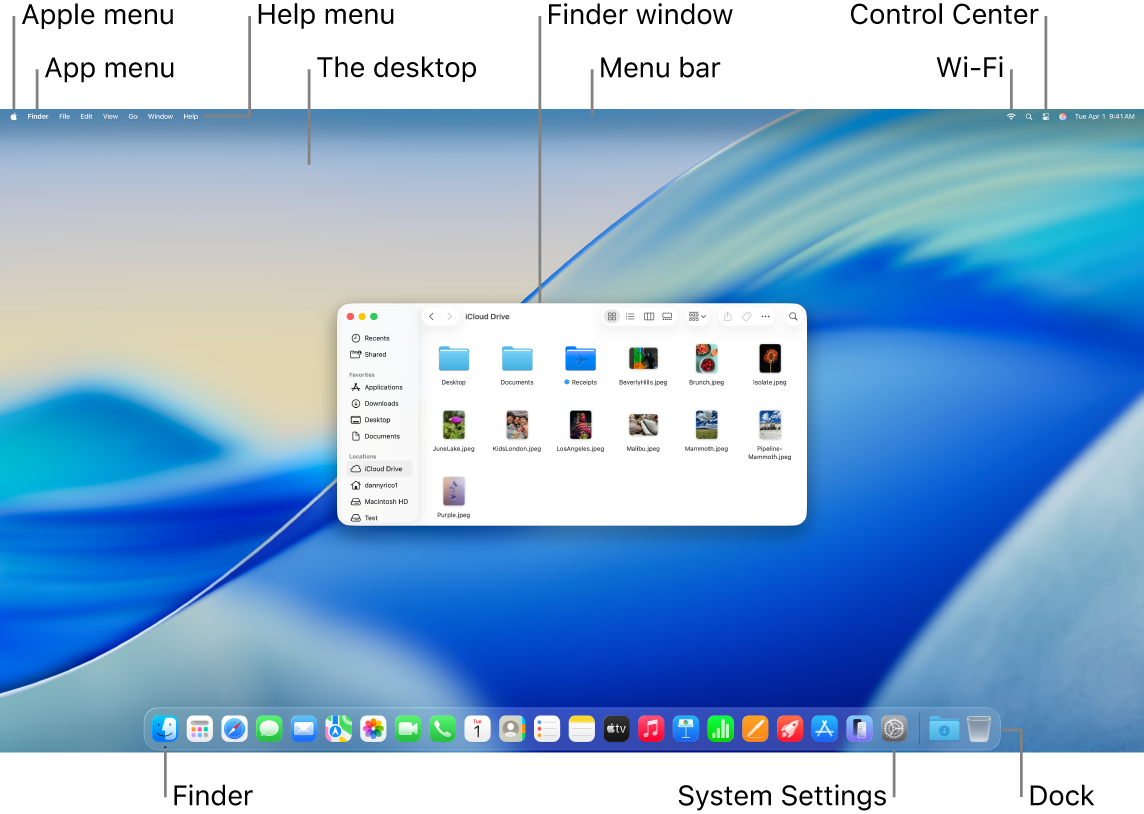
- The Desktop: This is the large background area where you can place files, folders, and windows. You can customize the background image, which is called the wallpaper.
- The Menu Bar: This is the thin strip running across the very top of your screen. It contains menus and controls that change depending on what you're doing.
- The Dock: This is the bar of icons at the bottom of the screen. It provides quick access to your most frequently used and currently open applications.
We will now look at each of these areas, starting from the top with the menu bar.
The Menu Bar: Your Dynamic Command Center
The menu bar is more than just a simple bar; it's a dynamic tool that adapts to your workflow. It can be broken down into a few distinct parts.
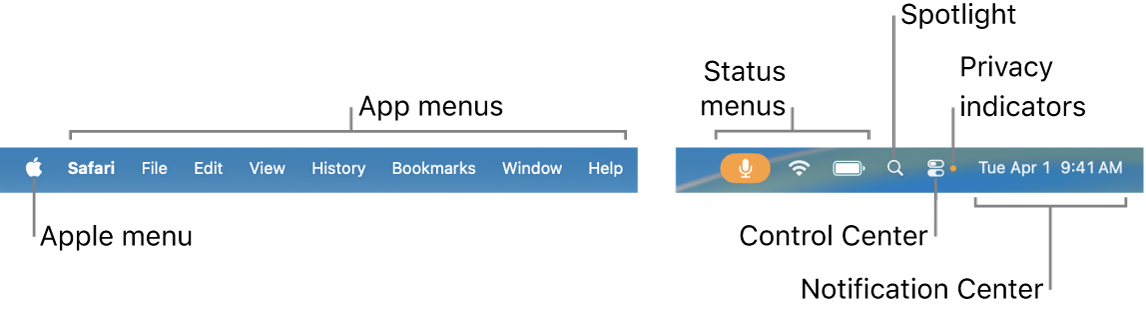
- The Apple Menu (): On the far left, the Apple icon is always there. Clicking it gives you access to fundamental system functions like
System Settings,Restart, andShut Down. - App Menus: Next to the Apple menu, you'll see a set of menus (like
File,Edit,View). These menus are not static; they change to show the commands for the application you are currently using. If you click on your desktop, they will show options for "Finder," the Mac's file manager, which we'll explore in a later lesson. If you click on a web browser, they will change to show browser-related options. - Status Menus: On the right side, you'll find icons that show the status of your Mac—like your Wi-Fi connection, battery level, and the current time and date. This area also contains an important tool we'll look at next: Spotlight.
Spotlight: Find Anything, Instantly
One of the most useful tools on your Mac is Spotlight. It's a universal search feature that lets you instantly find applications, files, settings, and more, just by typing what you're looking for. It's often the fastest way to get things done.
You can open Spotlight by clicking the magnifying glass icon (🔍) in the menu bar or by pressing the Command (⌘) and Space keys on your keyboard at the same time.
For a guided walkthrough of how to use Spotlight, please read the following short guide from Apple's support website.
Search for anything with Spotlight on Mac
This article explains how to open Spotlight and use its results. Focus on the different ways to start a search and how to open an item once you've found it.
First, read the section "Search for something" to learn how to open the Spotlight search bar. Next, read the first point under the heading "Use Spotlight search results" to see how to open an item from the search list.
Practice: Let's try it out.
- Open Spotlight using the keyboard shortcut:
Command(⌘) +Space. - In the search bar that appears, start typing the name of an application, for example,
SafariorNotes. - You'll see the results appear instantly. Press the
Enterkey or double-click the application in the list to open it.
As you get more comfortable with your Mac, you will likely find yourself using Spotlight constantly.
The Dock: Your App and File Shortcut Bar
The Dock at the bottom of your screen is your primary hub for launching applications and accessing files. It shows your favorite apps, apps that are currently running, and any windows you've minimized.
The following video provides an excellent and concise overview of how to use the Dock. We'll watch a few key segments to learn the essentials.
Master the Mac Dock In 5 Minutes
This video from MacMost demonstrates the key functions of the Dock. We'll focus on how to launch, add, and organize applications and files.
First, watch this short segment to understand the Dock's primary purpose and how to launch an app from it. Next, learn how to rearrange and remove icons. Remember, removing an app from the Dock doesn't delete it from your computer. Then, see how easy it is to add new apps to the Dock, either by launching them first or dragging them from the Applications folder. Finally, watch this part to see how you can also add files and folders to the right side of the Dock for quick access.
Practice: Now it's your turn to customize your Dock.
- Launch an App: Click on an app icon in your Dock (like Mail, Safari, or System Settings) to open it. You'll see a small dot appear below the icon, indicating the app is running.
- Remove an App: Find an app in the Dock that you don't use often. Click and drag its icon up and away from the Dock until the word "Remove" appears, then let go.
- Add an App: Use Spotlight (
Command+Space) to search for the app you just removed. Once you find it in the search results, drag its icon from the results list down into the Dock and release it. Now you have a shortcut to it again!
Putting It All Together
You now know how to use the menu bar, Spotlight, and the Dock. Let's combine these skills in a final task to solidify your understanding.
- Use Spotlight to find and open the TextEdit application (a simple text editor included with every Mac).
- Look at the menu bar at the top. Notice it now says "TextEdit" and shows menus like
FileandEditthat are specific to this app. - Look at the Dock. The TextEdit icon is there with a dot underneath it, showing it's open.
- Right-click (or use two fingers to click on a trackpad) on the TextEdit icon in the Dock. From the menu that appears, select Options, then Keep in Dock.
- Now, quit the application. You can do this by right-clicking the Dock icon again and selecting Quit, or by clicking "TextEdit" in the menu bar and choosing "Quit TextEdit".
- The dot under the icon will disappear, but the icon itself will remain in your Dock for easy access next time.
Excellent! You've successfully used the core components of the Mac interface to manage an application.
Conclusion
In this introductory lesson, we've covered the essential navigation tools for your Mac. Here are the key takeaways:
- The desktop, menu bar, and Dock are the three main areas of your screen.
- The menu bar at the top changes based on the application you are using.
- The Dock at the bottom is a customizable shortcut bar for your favorite and running apps.
- Spotlight search (
Command+Space) is the fastest way to find and open almost anything on your Mac.
Now that you're familiar with finding your way around and opening applications, our next lesson will focus on managing them. We'll cover how to work with multiple windows, switch between open apps, and close them properly—all crucial skills for efficient multitasking.