Welcome to your first lesson on Go! As an experienced developer, you're used to diving into new ecosystems. This course is designed to get you productive in Go quickly, bypassing the basics of programming and focusing on what makes Go unique. Our goal is to equip you to build robust backend services, and we'll start that journey today.
This lesson addresses the first and most fundamental step: setting up a Go project. You'll learn how to initialize a project, understand Go's approach to code organization through modules, and use the core Go toolchain commands—go run and go build—to compile and execute your first program. This is the foundation upon which all your future Go applications will be built.
The Go Philosophy: Packages and Modules
Before we write any code, let's talk about how Go organizes it. Coming from Python and TypeScript, you're familiar with concepts like modules, packages, and dependency management files (pyproject.toml or package.json). Go has a similar, but distinct, system.
- Packages: A package is a collection of source files in the same directory that are compiled together. You can think of it as a namespace. All files in a directory must belong to the same package. The package
mainis special; it tells the Go compiler that this is an executable program with amain()function as its entry point. Other packages are libraries intended to be imported. - Modules: A module is a collection of related Go packages that are versioned together as a single unit. A module is defined by a
go.modfile at its root. This file is central to managing a Go project; it declares the module's path (its unique name), the version of Go it's built with, and the list of its dependencies.
To get a more formal understanding of this structure, the following reading provides a good overview.
All Go: Building and Testing - Andy Pearce
This article by Andy Pearce gives a clear explanation of Go's code structure.
In the section "Physical Code Layout," focus on the first two subsections. First, read the part about Packages to understand their role. Then, read the introduction to Modules, paying close attention to the purpose of the go.mod file.
Initializing Your First Project
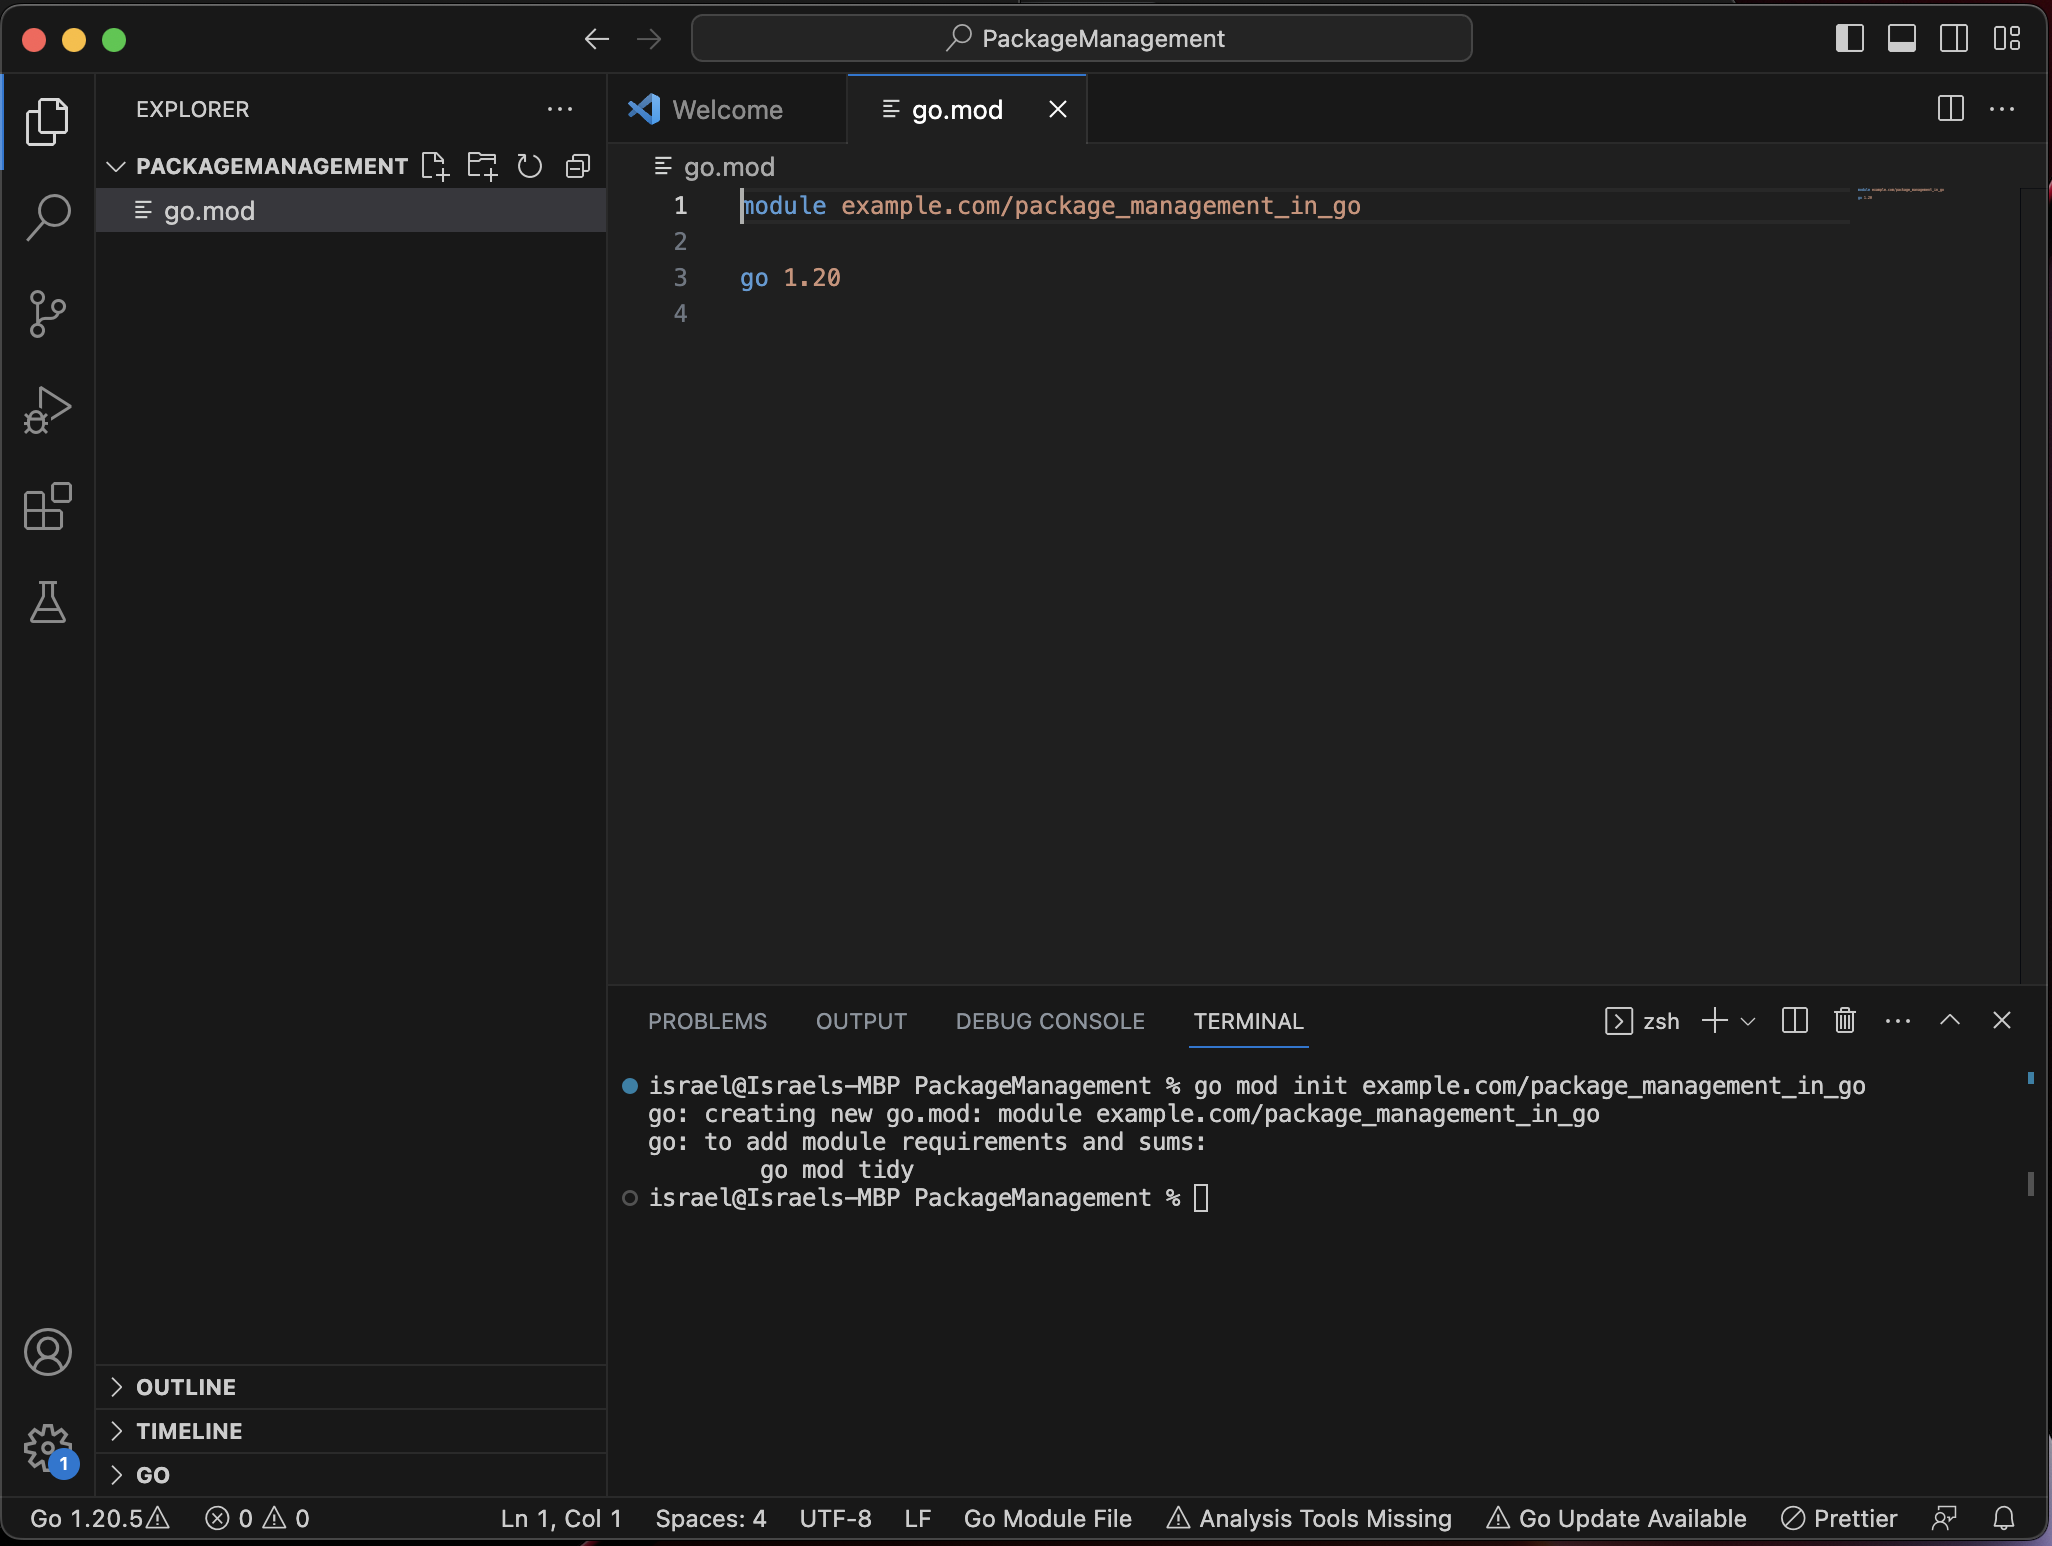
Now, let's get hands-on. The first command you'll use in any new Go project is go mod init. This command initializes a new module, creating the go.mod file.
One of the most important "Go-isms" to learn early is the convention for naming your module. While you can give it a simple name like my-project, the standard and correct way is to use a path that is globally unique, typically based on a URL where the code is hosted. For a project you plan to host on GitHub, the path would be github.com/<username>/<repository-name>.
This convention is not just for style; it's crucial for Go's tooling to locate and manage dependencies correctly, especially when you want to share your code or use commands like go install.
The following short video explains perfectly why this is so important.
Learn the CORRECT way to `go mod init`
In this video, "Boldly Go" channel host Tim explains the common pitfalls of go mod init and why a full module path is essential.
Watch the entire video, but pay special attention to these three arguments: The core argument for why a full path is necessary if you intend to create a shareable library. The demonstration of how an incomplete path breaks the go install command. The explanation of potential conflicts with Go's standard library if you use a short name.
From "Hello, World" to a Running Binary
Let's put this knowledge into practice.
- Create a new directory for your project, for example,
hello-go. - Navigate into it with your terminal.
- Run
go mod init github.com/your-username/hello-go(substituting your own username). This creates thego.modfile.
-
Now, create a file named
main.goand add the following code:package main import "fmt" func main() { fmt.Println("Hello, Go!") }
Now that you have a complete, albeit simple, Go module, let's explore how to run and build it. The Go toolchain provides two primary commands for this: go run and go build.
go run: This command compiles and runs your program in one step. It's perfect for development and quick tests. It creates a temporary binary, executes it, and then discards it. This is analogous to usingts-nodeor simplypython my_script.py.go build: This command compiles your program into a single, executable binary file. This binary is self-contained and can be deployed and run on any machine with the same operating system and architecture, without needing the Go runtime installed. This is one of Go's most powerful features, simplifying deployment significantly.
The following guide from DigitalOcean walks through these commands.
How To Build and Install Go Programs
This tutorial provides a step-by-step guide to building and running a Go program.
Follow these sections in order: Review Step 1. You've already created the "Hello, World!" program, but this section shows how to execute it with go run. Read through Step 2 as a quick refresher on go mod init. Carefully study Step 3 to understand how go build works and how the resulting binary is named by default. Finally, read Step 4 to learn how to customize the name and output directory of your binary using the -o flag. For example, go build -o bin/myapp.
After following the reading, you should be able to:
- Run your program directly using
go run . - Build an executable using
go build .and then run it (./hello-goon Linux/macOS). - Build the executable into a specific directory, like
bin/, usinggo build -o bin/hello-go.
The Go Toolchain: More Than Just Building
The go command is a rich command-line tool with many subcommands that help with formatting, testing, and dependency management. You've just used mod init, run, and build, but there are many others.
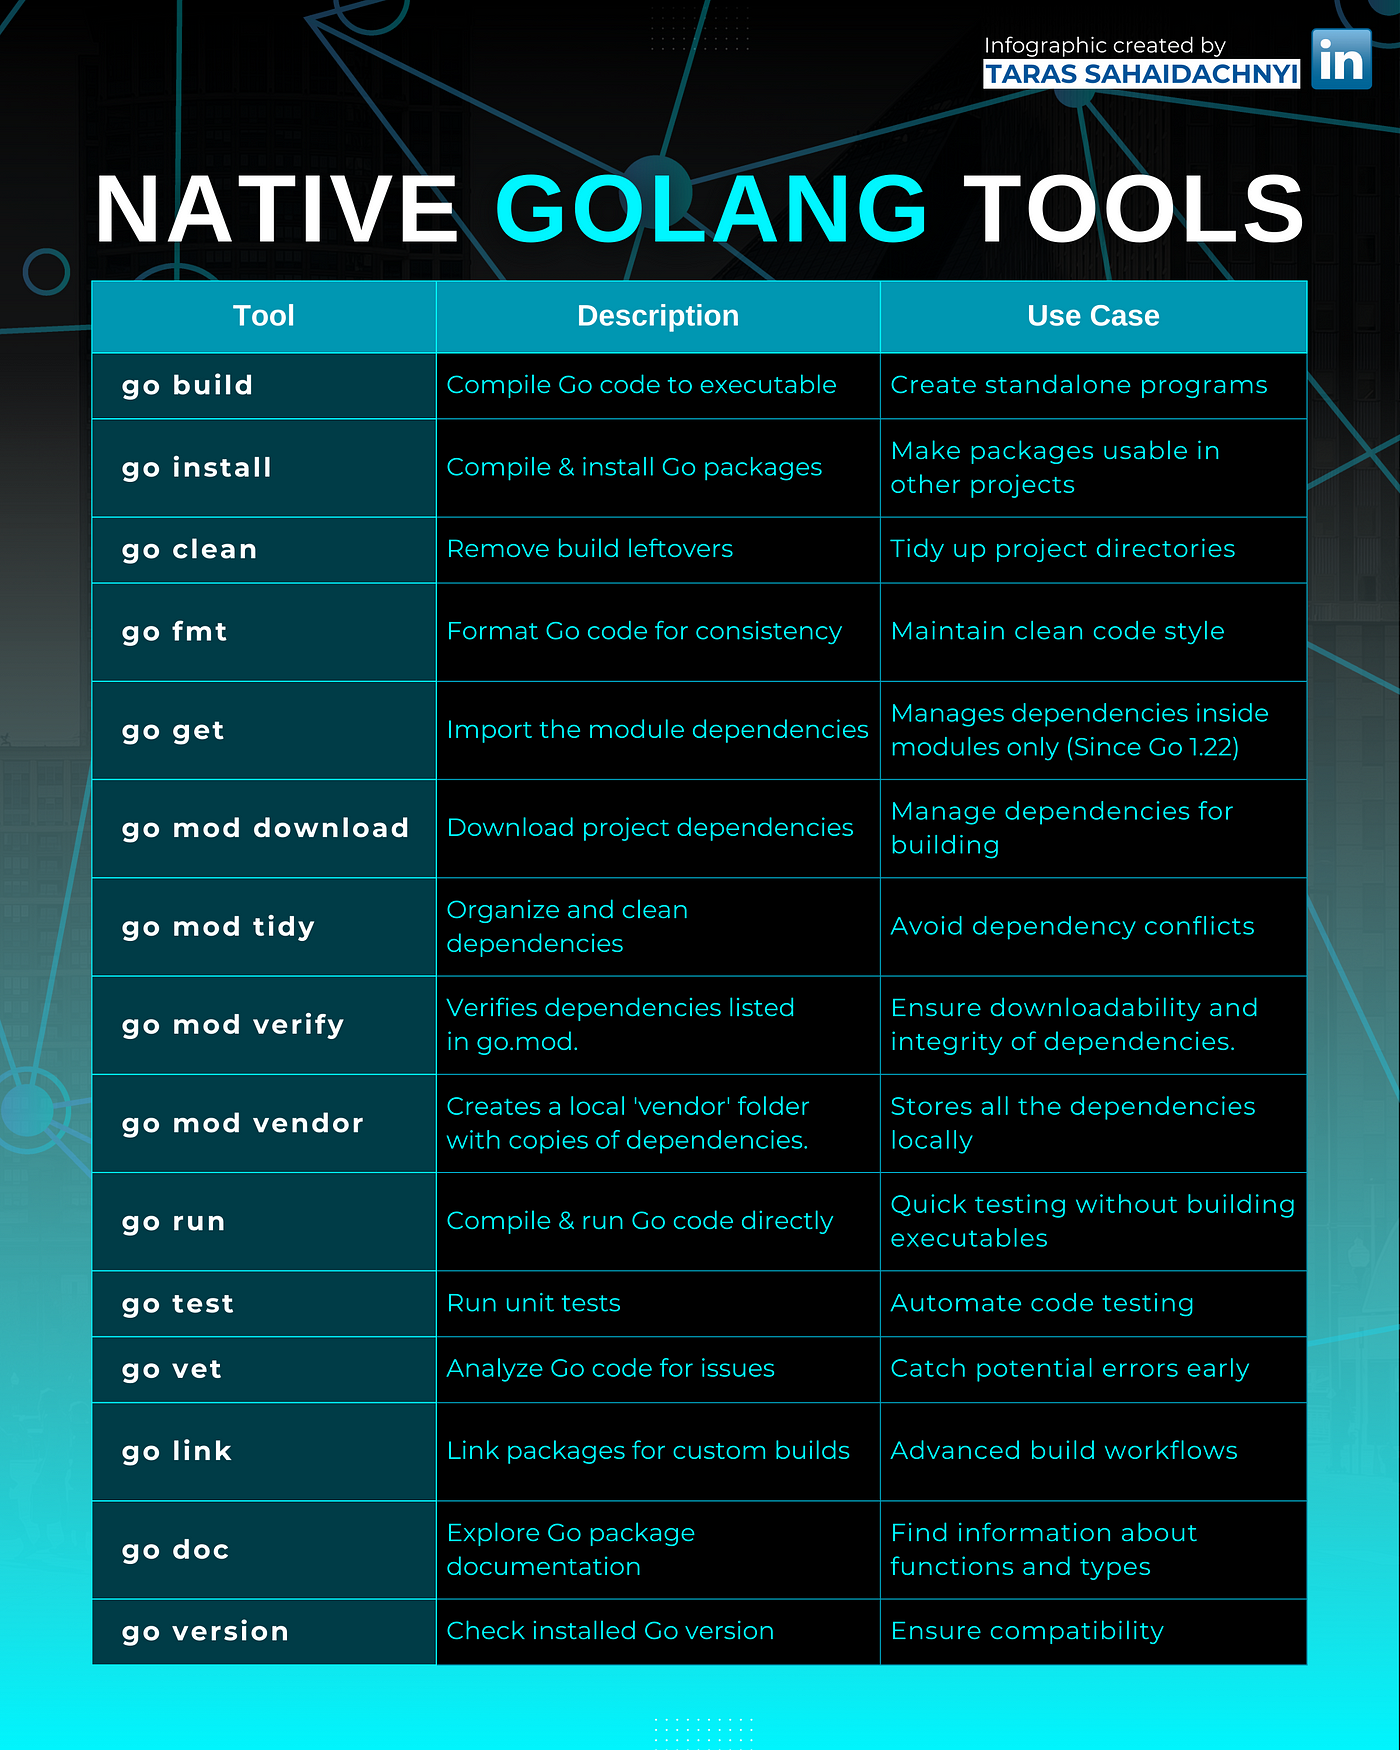
Two particularly important commands for maintaining code quality are:
go fmt: Automatically reformats your code according to Go's standard style. Consistent formatting is a hallmark of Go projects. It's common to run this before every commit.go vet: A static analyzer that reports suspicious constructs in your code, helping you catch potential bugs early.
You might also see go install. It's similar to go build, but it places the final binary in a central location ($GOPATH/bin), making the command available system-wide. This is useful for command-line tools you create, but less so for backend services you intend to deploy.
The following reading clarifies the distinction between run, build, and install.
How To Build and Install Go Programs
This article you read earlier also contains a great summary of the key commands.
In the section "Understanding go run, go build, and go install," study the summary table and the accompanying text. This will solidify your understanding of when to use each command.
Conclusion
Congratulations on completing your first lesson! You've taken a significant step into the Go ecosystem.
Here are the key takeaways:
- Go projects are organized into modules, defined by a
go.modfile. - Always use a full, unique path like
github.com/user/repowhen runninggo mod init. - Use
go runfor quick development cycles. - Use
go buildto create a single, self-contained, distributable binary for your application. The-oflag gives you control over the output location and name. - The Go toolchain provides a rich set of commands, like
go fmtandgo vet, to maintain high-quality code.
In our next lesson, we will begin writing more substantial code. We'll cover how Go handles data by exploring its static type system and looking at variable and constant declarations.