In our last lesson, we dissected the binary structure of a .class file, identifying its core components like the magic number, constant pool, and the tables for fields and methods. You now have a map of the file, but the most interesting part—the executable code—remains encoded. Today, we'll bring that code to life.
Our goal is to use javap, the Java disassembler, to translate the binary bytecode from a method's Code attribute into a human-readable format. We will then learn to interpret these instructions, understanding how the JVM executes your logic on its stack-based architecture. This skill demystifies what the compiler produces and is a powerful tool for deep debugging and performance analysis.
Getting Started with javap
The Java Development Kit (JDK) includes a powerful command-line tool called javap specifically for this purpose. It reads a .class file and prints a representation of its contents, including the bytecode instructions for its methods.
To understand javap's role and its most essential features, please start by reading the introductory sections of this guide.
javap Guide: Master the Java Class File Disassembler with Examples
This article from Cleverence provides a practical introduction to the javap tool, explaining what it is, why it's useful, and how to use its most common options.
First, read the section What is javap to understand its purpose. Next, read through invoking javap to see the basic command structure. Finally, focus on the section Core options and flags. Pay close attention to the descriptions of -c, -v, -p, and -l, as we will be using these throughout the lesson.
As you can see, javap -c is the key to viewing the bytecode. Let's create a simple class to experiment with. Save the following code as Calculator.java, and compile it using javac Calculator.java.
// Calculator.java
public class Calculator {
    public int add(int a, int b) {
        return a + b;
    }
}
Now, from your terminal, run javap -c Calculator.class. You should see output similar to this:
Compiled from "Calculator.java"
public class Calculator {
  public Calculator();
    Code:
       0: aload_0
       1: invokespecial #1                  // Method java/lang/Object."<init>":()V
       4: return

  public int add(int, int);
    Code:
       0: iload_1
       1: iload_2
       2: iadd
       3: ireturn
}
What do these instructions mean? To decipher them, we first need to understand the environment in which they run: the JVM's execution engine.
The JVM as a Stack-Based Machine
Unlike most physical CPUs that are register-based (like the x86 architecture you might be familiar with from C and systems programming), the JVM is a stack-based machine. When a method is invoked, the JVM creates a frame for it. Each frame contains two primary components for our purposes:
- Local Variable Array: An indexed array that holds all local variables and method parameters for the current method. For instance methods (non-static), the reference to the current object (
this) is implicitly passed as the first local variable at index 0. - Operand Stack: A Last-In-First-Out (LIFO) stack where the actual work happens. Bytecode instructions push values onto this stack, pop them off to perform computations, and then push the results back on.
This architecture simplifies the compiler's job and makes the bytecode portable across different hardware, as it doesn't need to know about the specific register set of the underlying CPU. The following article section gives a good overview of this model.
Advanced Java Bytecode Tutorial | JRebel by Perforce
This section of the JRebel tutorial explains the core execution model of the JVM, detailing the roles of the method frame, operand stack, and local variable array.
Please read the section titled Understanding Frames and Stacks. The diagrams provide a helpful visualization of the concepts.
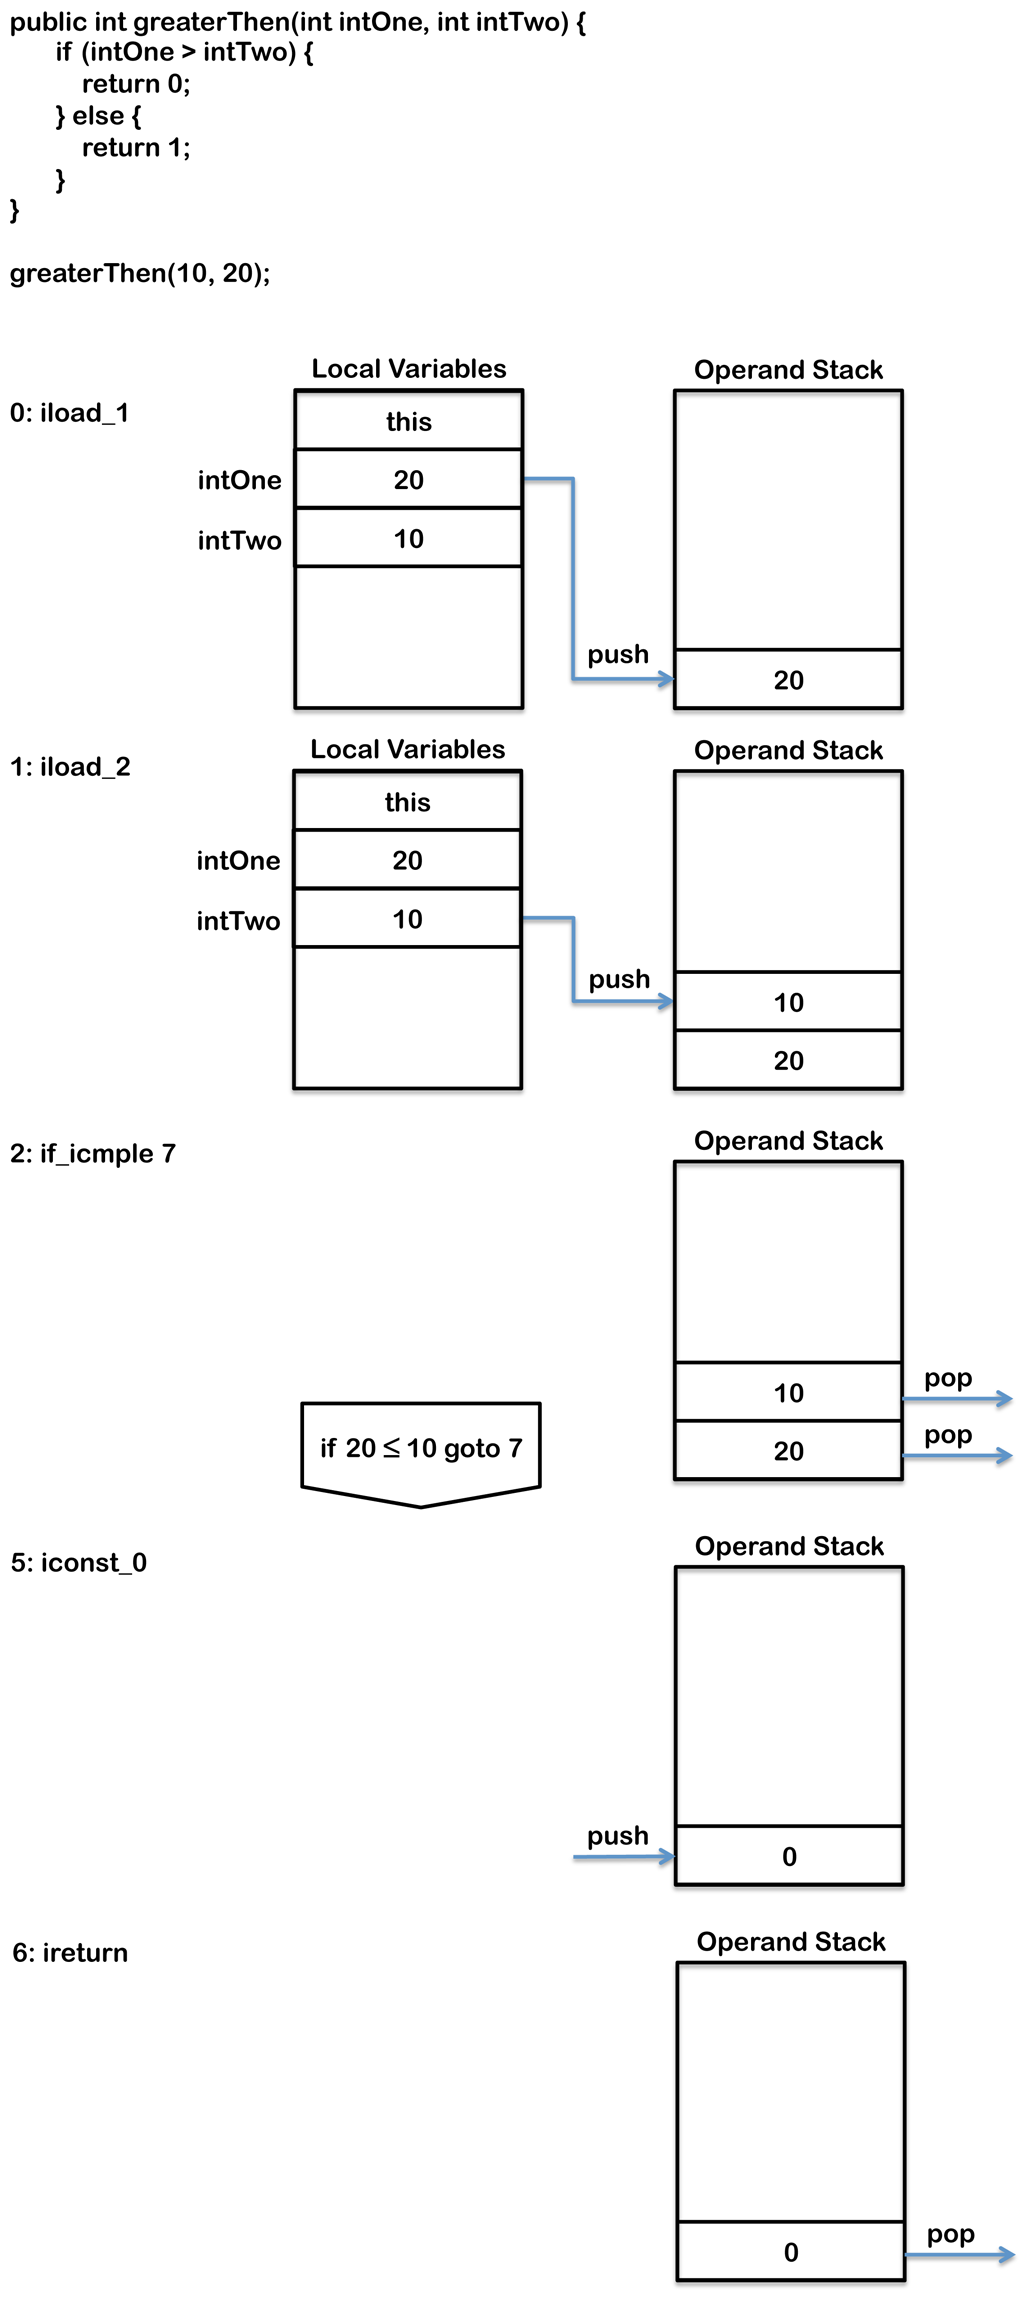
The interaction between the local variable array and the operand stack is the heart of bytecode execution. An instruction might load a value from a local variable onto the stack, another instruction might perform a calculation using values on the stack, and a third might store the result from the stack back into a local variable.
This image vividly illustrates this process for a simple if-else statement.
Interpreting Common Bytecode Instructions
Now, let's return to our Calculator.java example and interpret the add method's bytecode.
public int add(int, int);
  Code:
     0: iload_1
     1: iload_2
     2: iadd
     3: ireturn
Instruction mnemonics often have a prefix indicating the data type they operate on: i for integer, a for object reference (address), d for double, l for long, etc.
-
iload_1: Theiloadinstruction loads an integer from the local variable array onto the operand stack. The_1is a shorthand for index 1.- For this instance method, local variable 0 holds
this. - Parameter
ais in local variable 1. - Parameter
bis in local variable 2. - So,
iload_1pushes the value ofaonto the stack.
- For this instance method, local variable 0 holds
-
iload_2: This pushes the value ofb(from local variable 2) onto the stack. The stack now containsbon top, withabeneath it. -
iadd: This instruction pops the top two integers from the operand stack, adds them, and pushes the result back onto the stack. The stack now contains a single value: the sum ofaandb. -
ireturn: This returns the top integer from the operand stack as the result of the method call.
This simple example covers some of the most fundamental instruction categories. The following video provides a more detailed crash course, walking through several examples, including a for loop that demonstrates control flow.
This "Java Bytecode Crash Course" from Oracle Developers gives an excellent, step-by-step walkthrough of how to read javap output and trace the execution of common Java constructs.
Please watch the following segments: For Loop Example: This section explains a simple integer for loop, introducing instructions like iconst, istore, iload, bipush, comparison (if_icmpgt), increment (iinc), and branching (goto). Argument Passing and Invocation: This part shows how method arguments are handled as local variables and how a basic method call is structured. Method Invocation Types: Here, the speaker explains the crucial differences between invokevirtual, invokestatic, and invokespecial. Object Creation and Fields: This covers the standard new/dup/invokespecial pattern for object instantiation and introduces getfield/putfield for field access.
Key Instruction Families
As you saw in the video, we can group most instructions into a few key families. Let's summarize the most common ones you'll encounter.
1. Loads and Stores
These instructions move data between the local variable array and the operand stack.
_load_<n>: Push a value from local variablenonto the stack (e.g.,iload_1,aload_0)._store_<n>: Pop a value from the stack and store it in local variablen(e.g.,istore_2,astore_1).
2. Constants
These instructions push constant values onto the operand stack.
_const_<i>: Push a common constant value (e.g.,iconst_0pushes integer 0,aconst_nullpushesnull).bipush <byte>: Push a single byte value, sign-extended to an integer.ldc: "Load constant" from the constant pool. Used forStringliterals and larger numeric constants.
3. Method Invocation
These instructions call methods. The object reference (this) and all arguments must be pushed onto the stack in order before the instruction is executed.
invokevirtual: Used for standard instance methods. This is the most common call type and uses dynamic dispatch based on the object's actual runtime type.invokespecial: A "special" invocation used for constructors (<init>),privatemethods, andsupercalls, all of which are resolved at compile time (statically linked).invokestatic: Used forstaticmethods. Nothisobject reference is required.invokeinterface: Used for methods on an interface reference.
4. Object Creation
The new keyword in Java translates to a standard three-instruction pattern:
new <class>: Allocates memory for a new object of<class>on the heap and pushes a reference to it onto the stack. The object is uninitialized.dup: Duplicates the reference on top of the stack. This is necessary because the constructor call will consume one reference, and you still need a reference to the initialized object afterward.invokespecial <init>: Calls the constructor (<init>) on the object reference. This initializes the object.
5. Control Flow
These instructions alter the program counter, implementing loops and conditionals.
if_ <cond> <target>: Conditional branches. They pop one or two values from the stack, compare them, and jump to the<target>offset if the condition is met (e.g.,if_icmpeqfor "if integer comparison equals").goto <target>: An unconditional jump to a target offset._return: Returns from a method.ireturnreturns an int,areturnreturns a reference, andreturnis for void methods.
Finally, remember that the disassembled text from javap is just a representation of the raw, numeric bytecode.

Conclusion
In this lesson, we transitioned from the static structure of a .class file to the dynamic execution of its bytecode. You learned how to use javap to reveal the low-level instructions that the Java compiler generates from your source code.
Here are the key takeaways:
javap -cis the primary tool for disassembling Java bytecode.- The JVM is a stack machine that uses an operand stack for computations and a local variable array for storage within each method's frame.
- Bytecode instructions can be grouped into families: loading/storing data, pushing constants, arithmetic, object creation (
new/dup/invokespecial), method invocation (invokevirtual,invokespecial, etc.), and control flow (goto,if_...). - Instruction prefixes like
i,a,d,ldenote the type of data they operate on (integer, reference, double, long).
You now have the foundational knowledge to read and understand the assembly language of the JVM. In our next lesson, we will explore a more advanced topic: how the JVM uses a special structure called the exception table in the bytecode to efficiently handle try-catch blocks.