Welcome back! In our last lesson, you designed a high-impact promotional web banner, focusing on visual hierarchy and a clear call-to-action. That was a fantastic exercise in creating a persuasive digital asset. But a design inside Figma is like a business plan that's never presented—its value is only realized when it's delivered to the outside world.
Today, we'll master that delivery process. The learning outcome for this lesson is to export assets from Figma in appropriate formats (PNG, JPG, SVG) and resolutions for web and social media. This is a fundamental technical skill that every freelance designer needs to get paid. You'll learn not just how to click the export button, but why you choose specific settings to ensure your designs look sharp, professional, and load quickly on any device.
1. Choosing the Right Tool for the Job: File Formats
Before we export anything, we need to understand the different types of files we can create. Just as in accounting you'd use a spreadsheet for raw data and a PDF for a final report, in design, each file format has a specific purpose. The three most common formats you'll use for web and social media are PNG, JPG, and SVG.
The official Figma documentation provides a clear and concise breakdown of the primary export formats. This will serve as our foundational knowledge.
As you read, focus on the descriptions for PNG, JPG, and SVG. For each format, ask yourself: Does it support transparency? How does it handle compression (quality vs. file size)? What is its ideal use case (photographs, logos, graphics with text)?
Let's distill the key differences:
-
JPG (Joint Photographic Group):
- Best for: Complex images like photographs and gradients.
- Key Feature: Uses "lossy" compression, which significantly reduces file size but can degrade quality, especially around sharp edges and text. It does not support transparency.
- Analogy: Think of it like summarizing a detailed financial report. You get the main points across (smaller file), but some of the finer details are lost.
-
PNG (Portable Network Graphics):
- Best for: Graphics with solid colors, text, logos, or any design that requires a transparent background.
- Key Feature: Uses "lossless" compression, which preserves all image data, resulting in crisp, clean lines. This comes at the cost of a larger file size. It does support transparency.
- Analogy: This is like an audited financial statement. Every number is precise and accounted for (perfect quality), but the document is larger and more data-heavy.
-
SVG (Scalable Vector Graphics):
- Best for: Logos, icons, and simple illustrations that need to be scaled to any size without losing quality.
- Key Feature: Unlike JPG and PNG (which are raster/pixel-based), SVG is vector-based. It's essentially code that draws the image. This means it's infinitely scalable and usually has a very small file size.
- Analogy: This is the underlying formula in a spreadsheet cell. It doesn't matter how much you zoom in or out; the formula itself remains perfect and can be recalculated for any context.
For most of the social media and web banner work you'll do, you will be deciding between PNG (for graphics-heavy designs) and JPG (for photo-heavy designs).
2. Resolution Matters: The 1x vs. 2x Rule
Have you ever seen an image on a website that looked slightly blurry or fuzzy, especially on a new phone or high-end laptop? This is often a problem of resolution.
Modern screens (like Apple's Retina displays) have a very high pixel density. They pack twice (or even three times) the number of physical pixels into the same amount of space. If you export an image at its "standard" size (1x), these high-density screens have to stretch the image to fill the space, causing blurriness.
To solve this, we export our assets at a higher scale, most commonly 2x.
How to Export High Quality Images From Figma (Quick Figma Tutorial)
This short tutorial, "How to Export High Quality Images From Figma," provides a perfect visual demonstration of why scaling is so important.
Watch the entire video. The side-by-side comparison at the end makes the difference between a 1x and a 2x/3x export crystal clear. Default Export: See the standard, low-quality result. Increasing Quality: Notice how simply changing the setting to 2x or 3x prepares the image for high-resolution screens. Side-by-Side: This visual proof is undeniable. One looks amateur; the other looks professional.
The rule of thumb for any asset that will be viewed on a screen is to export at 2x resolution. This creates an image that is twice the dimensions of your frame (e.g., a 300x250px frame exported at 2x becomes a 600x500px image file), providing enough pixel data for it to look crisp on any modern device.
3. The Export Workflow in Figma
Now let's apply this in Figma. We'll use the promotional banner you designed in the previous lesson.
The process of exporting in Figma is managed from the Export section in the right sidebar. It's a simple but powerful tool.
How to Export Figma Designs Like a Pro
The video "Your Figma Export Settings Are Wrong" by Sam Anthony provides an excellent walkthrough of the export panel and its main features.
Focus on these key segments to understand the mechanics: Using Frames: This reinforces why it's crucial to have your entire design contained within a single frame for clean exporting. Scale Settings: A great explanation of the 1x, 2x options and how to specify custom widths (w) or heights (h). Suffixes: Learn how to use the suffix field to automatically add text to your filenames (e.g., @2x), which is great for organization. File Formats: This recaps the use cases for PNG, JPG, and SVG directly within the Figma context.
Practice Exercise: Exporting Your Banner
Let's get hands-on. Open the Figma file with the 300x250px banner you designed previously.
- Select the Frame: Click on the name of the frame that contains your banner design in the Layers panel on the left.
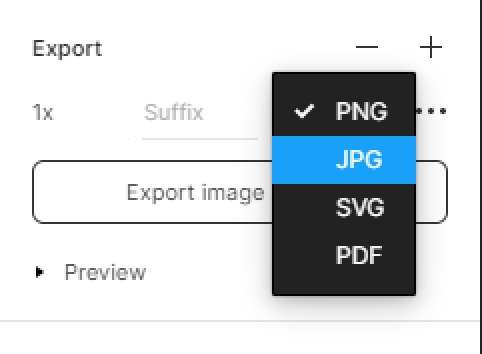
- Add Export Setting 1 (Low-Res JPG):
- In the right sidebar, scroll down and click the
+icon next to Export. - Leave the scale at
1x. - Select
JPGfrom the format dropdown. - Click the Export [Frame Name] button and save the file to your computer.
- In the right sidebar, scroll down and click the
- Add Export Setting 2 (High-Res PNG):
- With the same frame selected, click the
+icon next to Export again to add a second setting. - Change the scale to
2x. - Make sure the format is
PNG. - In the Suffix field, type
@2x. Your file will now automatically be named[Frame Name]@2x.png. - Click the Export [Frame Name] button.
- With the same frame selected, click the
Now, locate both files on your computer. Compare them:
- File Size: Notice that the
2xPNG is significantly larger than the1xJPG. - Quality: Open both images and zoom in. You'll see the
2xPNG maintains its sharpness, while the1xJPG will look pixelated and blurry. This is the difference between a professional and an amateur handoff.

4. A Freelancer's Guide to Perfect Instagram Exports
Your goal is to start earning quickly, and designing social media graphics is a fantastic way to do that. However, social media platforms, especially Instagram, are notorious for aggressively compressing images, which can ruin your beautiful designs.
There's a specific workflow you can use to "trick" the algorithm and ensure your posts are always crystal clear.
Unlock Sharp Visuals: Best Figma to Instagram Export Settings for ...
This article from Usevisuals is a goldmine of practical, actionable advice for a freelance designer. It moves beyond the basics and gives you a professional-grade workflow for a common client request.
Read the following sections to build your pro checklist: "Why Your Instagram Posts Look Blurry": Understand the enemy—Instagram's compression algorithm. "The Great Debate: PNG vs JPG for Social Media": Confirms that for most graphic-heavy posts, PNG is the superior choice to upload. "Optimal Figma to Instagram Export Settings": This is the core of the lesson. Pay close attention to the 2x Export Rule and the recommended frame dimensions (e.g., 1080 x 1350px). "Advanced Image Compression Techniques": This introduces a crucial second step: using a tool like TinyPNG to reduce file size after exporting from Figma. "Technical Checklist": This provides a perfect summary of the entire process.
Your Instagram Export Checklist:
Based on that article, here is the definitive workflow for delivering sharp, high-quality Instagram graphics to a client:
- Use the Right Frame Size: Start with a frame of 1080px wide. For a portrait post that takes up more screen space, use 1080 x 1350px.
- Export as a
2xPNG: In the Figma export settings, choosePNGand2x. This will produce a high-resolution file of 2160 x 2700px. This gives Instagram plenty of data to work with, preventing it from having to stretch a smaller image. - Compress the Exported File: The
2xPNG will be a large file. Before uploading it to Instagram, run it through a smart compression tool like TinyPNG or ImageOptim. These tools cleverly reduce the file size without any visible loss of quality. - Upload the Right Way: Ensure the "Upload at highest quality" setting is enabled in your Instagram app (Settings > Account > Data Usage).
This two-step process (high-res export from Figma, then smart compression) gives you the best of both worlds: a high-resolution source file that also has a small file size. This is the secret to bypassing Instagram's destructive compression.
Conclusion
Congratulations! You've just mastered a critical technical skill that bridges the gap between design and delivery. Knowing how to export assets correctly is a non-negotiable part of being a professional designer. It ensures the quality of your work is preserved and that you're handing off polished, ready-to-use files to clients and developers.
Key Takeaways:
- Choose Formats Wisely: Use JPG for photos, PNG for graphics with transparency or sharp text, and SVG for scalable logos and icons.
- Embrace the
2xRule: For crisp visuals on modern screens, always export raster assets (PNG,JPG) at2xresolution. - Optimize for the Platform: For platforms like Instagram, follow a specific workflow: design at 1080px width, export at
2xas a PNG, and then use a tool like TinyPNG to compress the file before uploading. - Organization is Key: Use the
Suffixfield in Figma to keep your exported files organized (e.g.,_website@2x,_instagram).
Preview of the Next Lesson:
Now that you can create and export individual assets, our next step is to think about consistency and scalability. In the next lesson, we'll learn how to prepare a 'mini' style guide for a digital asset project. This involves documenting the colors, typography, and spacing you've used, creating a valuable reference for you and your future clients to ensure brand consistency across all designs.