Introduction
In our last lesson, you took the first step in defining your product's structure by conducting a card sorting exercise. You transformed a chaotic list of content items into logical, user-centered groups. This process gave you the raw materials for a well-organized website, but now we need the architectural blueprint.
This lesson is about creating that blueprint: the sitemap. We'll move from the conceptual groups you identified to a concrete, visual diagram that maps out the entire structure of a digital product. Think of this as translating your categorized list of accounts into a formal organizational chart for your website or app. For a freelancer, a clear sitemap is an indispensable tool. It aligns the client, the designer, and the developer on a single vision, preventing misunderstandings and costly rework down the line.
By the end of this lesson, you will be able to take the output from your card sort and build a formal sitemap that clearly represents the information architecture of a multi-page product.
What is a Sitemap?
Before we build one, it's crucial to understand what a sitemap is in the context of UX design. You might have heard the term used for SEO (XML sitemaps) or as a page on a website that lists all other pages (HTML sitemaps). For our purposes, a UX sitemap is a hierarchical diagram that visually represents the structure of a website or application. It shows all the pages or screens and how they relate to one another.
To get a clear overview of these distinctions and focus on the sitemap we care about as designers, watch the beginning of this video.
How to create a sitemap (for any website) in 2024
This video from Flux Academy clearly defines the different types of sitemaps and focuses on the one that is essential for design and strategy.
Watch from the beginning to the introduction. Pay attention to the three types of sitemaps mentioned and note that our focus is on the third type: the organizational diagram used by design teams.
A sitemap is a key deliverable of Information Architecture (IA), but it's not the same thing. IA is the broad discipline of organizing and labeling content, while the sitemap is the tangible diagram that documents that organization.
To solidify this distinction, let's quickly consult a resource from Figma's library.
What Is Information Architecture?
This article clearly separates the concept of Information Architecture from the sitemap deliverable.
Read the sections titled "Information architecture vs. sitemaps" and "Sitemaps" under the "Information architecture examples" heading. The key takeaway is that the sitemap is one component of a broader IA strategy, visually capturing the product's organization and navigation systems.
Here is an example of what a final sitemap might look like. Notice the clear hierarchy and how pages branch out from main sections.
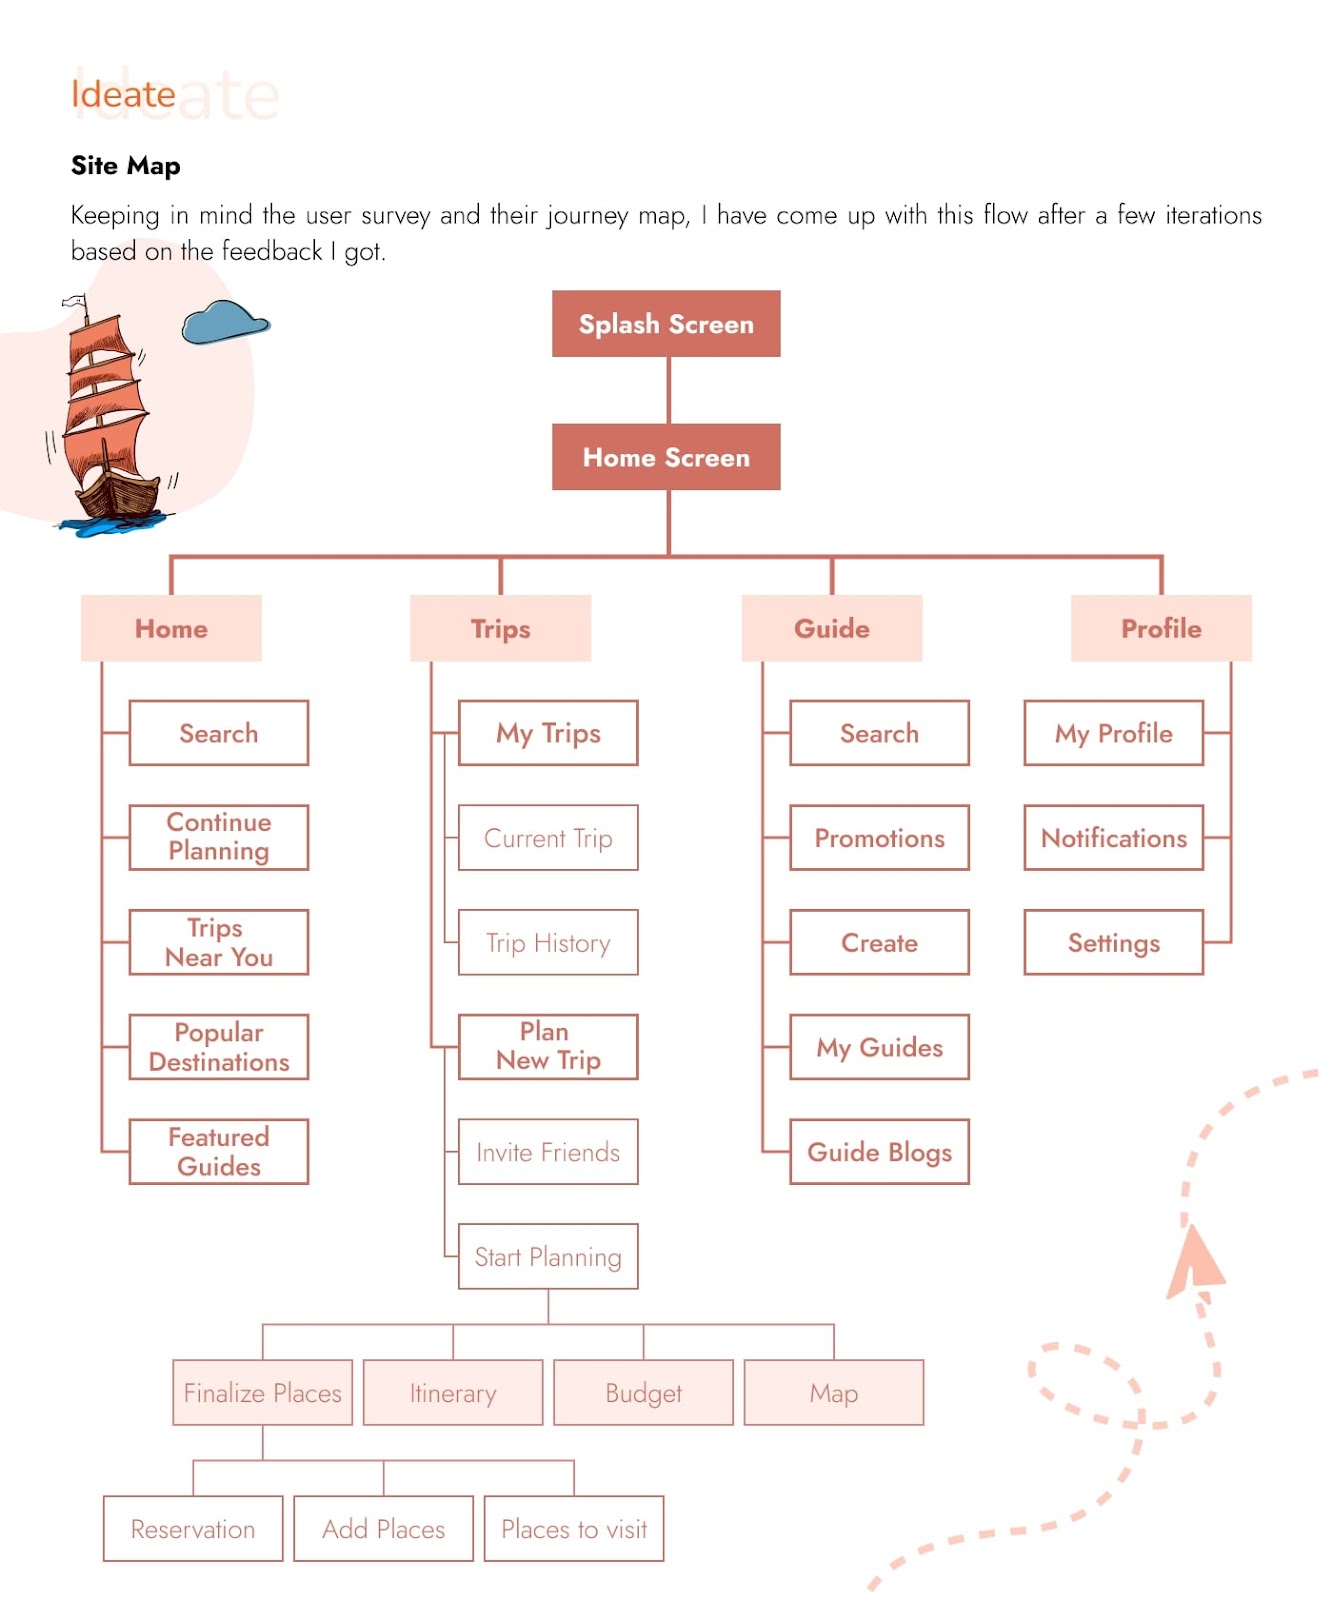
How to Create a Sitemap: A Step-by-Step Guide
Creating a sitemap is a logical process that translates research and strategy into a structural plan. It builds directly on the work you've already done.
Step 1: Gather Your Inputs
A sitemap isn't created in a vacuum. It synthesizes several key pieces of information:
- User Research: The primary input is the set of categories you created during your card sorting exercise from the last lesson.
- Business Goals: What does the client want users to do? The sitemap should prioritize pathways to these goals (e.g., "Contact Us," "Request a Quote").
- Content Inventory: A list of all existing or planned pages/features.
- Competitor Analysis: How do similar websites or apps structure their content? This can reveal established user expectations.
This video from Flux Academy walks through this initial information-gathering phase.
How to create a sitemap (for any website) in 2024
This video demonstrates how to start building a sitemap by combining a raw list of pages with client goals and competitor research.
Watch these three segments: Initial draft: See how to start with a basic structure for common pages. Using client goals: Understand how to use the client's primary goals and desired calls-to-action to inform the structure. Competitor research: Learn how to analyze competitor navigations and footers to identify common patterns and categories.
Step 2: Define the Hierarchy and Structure
This is the core of building a sitemap. You'll arrange your pages into a tree-like structure, defining parent-child relationships.
- Top-Level (Level 1): These are your main navigation items, typically derived from the category labels you created in the open card sort.
- Second-Level (Level 2): These are the sub-pages that fall under each top-level category.
- Lower Levels (Level 3+): These are pages deeper in the hierarchy, like a specific product detail page within a sub-category.
A key principle here is to limit the number of top-level items. Too many choices can overwhelm the user. Aiming for 5-7 main categories is a good rule of thumb.
How to create a sitemap (for any website) in 2024
Let's revisit the Flux Academy video to understand the principle of limiting choice in your sitemap's top level.
Watch the section from on refining the sitemap. The speaker explains the importance of limiting top-level categories to avoid overwhelming users, a concept rooted in psychological principles like Hick's Law (which we will cover in a later module).
Step 3: Visualize the Sitemap
Once you have the structure defined, it's time to draw it. You can do this easily in FigJam using shapes, connectors, and text.
A best practice is to use a numbering system to clearly indicate hierarchy and make it easy to reference specific pages when discussing with clients or developers. This is similar to how you might use account codes in a financial chart of accounts.
- 1.0 Homepage
- 2.0 About Us
- 3.0 Services
- 3.1 Service A
- 3.2 Service B
- 4.0 Contact
The following resource provides an excellent, concise written guide to this entire process.
How to create a UX sitemap: A step-by-step guide with ...
This LogRocket blog post offers a clear, sequential guide that consolidates the steps we've discussed.
Read the entire section "Step-by-step guide to creating a UX sitemap." It covers identifying content, structuring it, linking pages, and visualizing the final sitemap, providing a great summary of the workflow. You can skim the part on choosing a tool, as we will be using FigJam.
Your Turn: Create a Sitemap in FigJam
Now, let's apply these steps and build on the work from our last lesson.
Scenario: You have completed the open card sort for the bespoke gifting boutique. You have a set of user-defined categories for their website content. Your next task is to present a formal sitemap to the client that visualizes your proposed website structure.
Task (approx. 25 minutes):
- Open Your Previous Work: Navigate to the FigJam file where you completed the card sorting exercise in the last lesson.
- Create a New Section: Create a new area on your board titled "Website Sitemap".
- Establish Level 1: Review the category labels you created for your card groups. These will become your primary (Level 1) pages. Create a shape (e.g., a rectangle) for each one, including a "Homepage".
- Add Lower Levels: For each Level 1 page, add the corresponding cards from your sort as Level 2 (or even Level 3) pages below it.
- Example: If you had a group labeled "Gifts by Occasion" containing "Wedding Gifts" and "Birthday Gifts", your sitemap would show "3.0 Gifts by Occasion" with "3.1 Wedding Gifts" and "3.2 Birthday Gifts" branching off from it.
- Structure and Connect:
- Arrange your shapes in a clear top-down hierarchy.
- Use connectors to show the relationships between parent and child pages.
- Apply a numbering system (e.g., 1.0, 2.0, 2.1, etc.) to each page for clarity.
- Review and Refine: Look at your final sitemap. Does it feel logical? Are there too many items in the main navigation? Does it provide clear paths to important pages like "Contact Us" or "My Account"? Make any adjustments needed.
This exercise will give you a finished, client-ready deliverable and solidify your understanding of how research flows directly into design structure.
Conclusion
In this lesson, you've learned how to translate user-centered content groups into a structured, professional sitemap. This is a fundamental skill in IA, moving you from abstract ideas to a concrete plan that guides the entire design and development process. By creating a sitemap, you ensure that the product's structure is not based on guesswork, but on a logical foundation derived from user research and business goals.
Key Takeaways:
- A UX sitemap is a hierarchical diagram that serves as a blueprint for a website or app's structure.
- It is created by synthesizing user research (like card sorting), business objectives, and content requirements.
- The process involves defining a hierarchy (Levels 1, 2, 3...), arranging pages logically, and visualizing the structure in a tool like FigJam.
- Using a numbering system and limiting top-level choices are best practices for creating clear and effective sitemaps.
Preview of the Next Lesson:
With a sitemap in hand, we have defined the "what" and "where" of our content. The next logical question is how users will move between these pages. In the next lesson, we will explore different navigation structures (e.g., hierarchical, flat, hub-and-spoke) and learn how to select and justify the most appropriate one for your product based on your sitemap and user goals.