Hello! Welcome back to our course on building a life simulation game engine in Rust.
In the last lesson, we defined the basic data structures for our game: a Character struct, a LifeStage enum, and used a Vec<Character> to manage a list of characters. You might recall we used an ampersand (&) when iterating through our vector (for character in &characters). I mentioned this was related to Rust's ownership system, and today we'll demystify it completely.
This lesson tackles one of Rust's most distinctive features: the ownership and borrowing system. This is how Rust guarantees memory safety (preventing crashes and security vulnerabilities) without needing a garbage collector like C# or Java. Understanding these rules is the key to writing effective Rust code.
Our goal is to learn these rules not just in theory, but by applying them to a practical game development task: modeling an inventory system where items can be transferred from one character to another.
1. The "Why" of Ownership: Managing Memory
Every program has to manage its memory. Languages like C# and Java use a "garbage collector" that runs in the background to clean up memory that's no longer in use. This is convenient but can introduce performance overhead. Languages like C++ give you full control, but this power comes with the risk of memory-related bugs, like using memory after it has been freed.
Rust takes a third approach: memory is managed through a system of ownership with a set of rules that the compiler checks at compile time. If the rules are violated, the program won't even compile.
To understand these rules, we first need to briefly revisit how data is stored.
Understanding Ownership in Rust
This video from 'Let's Get Rusty' provides a fantastic explanation of why ownership exists and the difference between stack and heap memory, which is fundamental to understanding Rust's ownership model.
Please watch these two introductory segments: What is Ownership? (0:29 - 4:39): This explains the trade-offs between garbage collection, manual memory management, and Rust's ownership model. The Stack and the Heap (4:39 - 6:55): This is a quick but crucial overview of how stack and heap memory work. Data's location determines how Rust handles it.
In short:
- Stack: Fast, organized, for data with a known, fixed size.
- Heap: Less organized, for data that can grow or change size at runtime (like a
Stringor aVec).
This distinction is the key to the first major concept: moving.
2. The Rules of Ownership and Moving
Rust's ownership system is governed by three simple rules:
- Each value in Rust has a variable that’s called its owner.
- There can only be one owner at a time.
- When the owner goes out of scope, the value is dropped (and its memory is freed).
When we assign a heap-allocated value (like a String) from one variable to another, Rust doesn't copy the data. Instead, it moves the ownership. The original variable is then invalidated.

Let's see what this means in practice.
Understanding Ownership in Rust
This segment from 'Let's Get Rusty' demonstrates exactly how ownership is transferred through 'moves' and why some types 'copy' instead.
Watch the section on Ownership Rules (6:55 - 10:27). Pay close attention to the s1 and s2 String example. The compiler error you see is the ownership system in action. Also, note the explanation of the Copy trait for simple types like integers.
Hands-on: Building an Inventory
Let's apply this by creating Item and Inventory structs in our game_engine_core project. Open src/main.rs.
-
Define the
ItemandInventoryStructsFirst, let's define what an item is. For now, it just needs a name. We'll also define an
Inventoryto hold a collection of these items. Add these structs above yourmainfunction.#[derive(Debug, Clone)] // We'll discuss Clone later, but it's useful for items. struct Item { name: String, } #[derive(Debug)] struct Inventory { items: Vec<Item>, } // You can remove the Character and LifeStage structs for this lesson to keep things clean. -
See the Move in Action
Now, let's create an item and add it to an inventory. Replace the code in your
mainfunction with this:fn main() { // Create a new inventory for a character. let mut inventory = Inventory { items: Vec::new() }; // Create an item. let sword = Item { name: String::from("Iron Sword") }; // Add the item to the inventory. // The .push() method takes ownership of the value being added. inventory.items.push(sword); // Try to use the 'sword' variable after it has been moved. // Uncomment the line below and see the compiler error. // println!("The sword is: {:?}", sword); println!("Inventory contents: {:?}", inventory); }Run
cargo checkwith theprintln!line uncommented. You will get aborrow of moved valueerror. This is becauseinventory.items.push(sword)moved theswordinto the vector. Theswordvariable inmainno longer owns the data, and the compiler prevents you from using it. This is Rust's memory safety guarantee at work!
3. Borrowing: Access Without Taking Ownership
Moving is great for transferring data, but what if we just want to read data without taking ownership? This is where borrowing comes in. When you borrow, you create a reference to the data.
There are two kinds of references (and borrows):
- Immutable Reference (
&T): Allows you to read the data. You can have as many immutable references as you want simultaneously. - Mutable Reference (
&mut T): Allows you to change the data. You can only have one mutable reference to a particular piece of data in a particular scope. While a mutable reference exists, you cannot have any immutable references.
These rules prevent "data races" (e.g., one part of your code trying to read data while another part is writing to it), and they are checked at compile time.
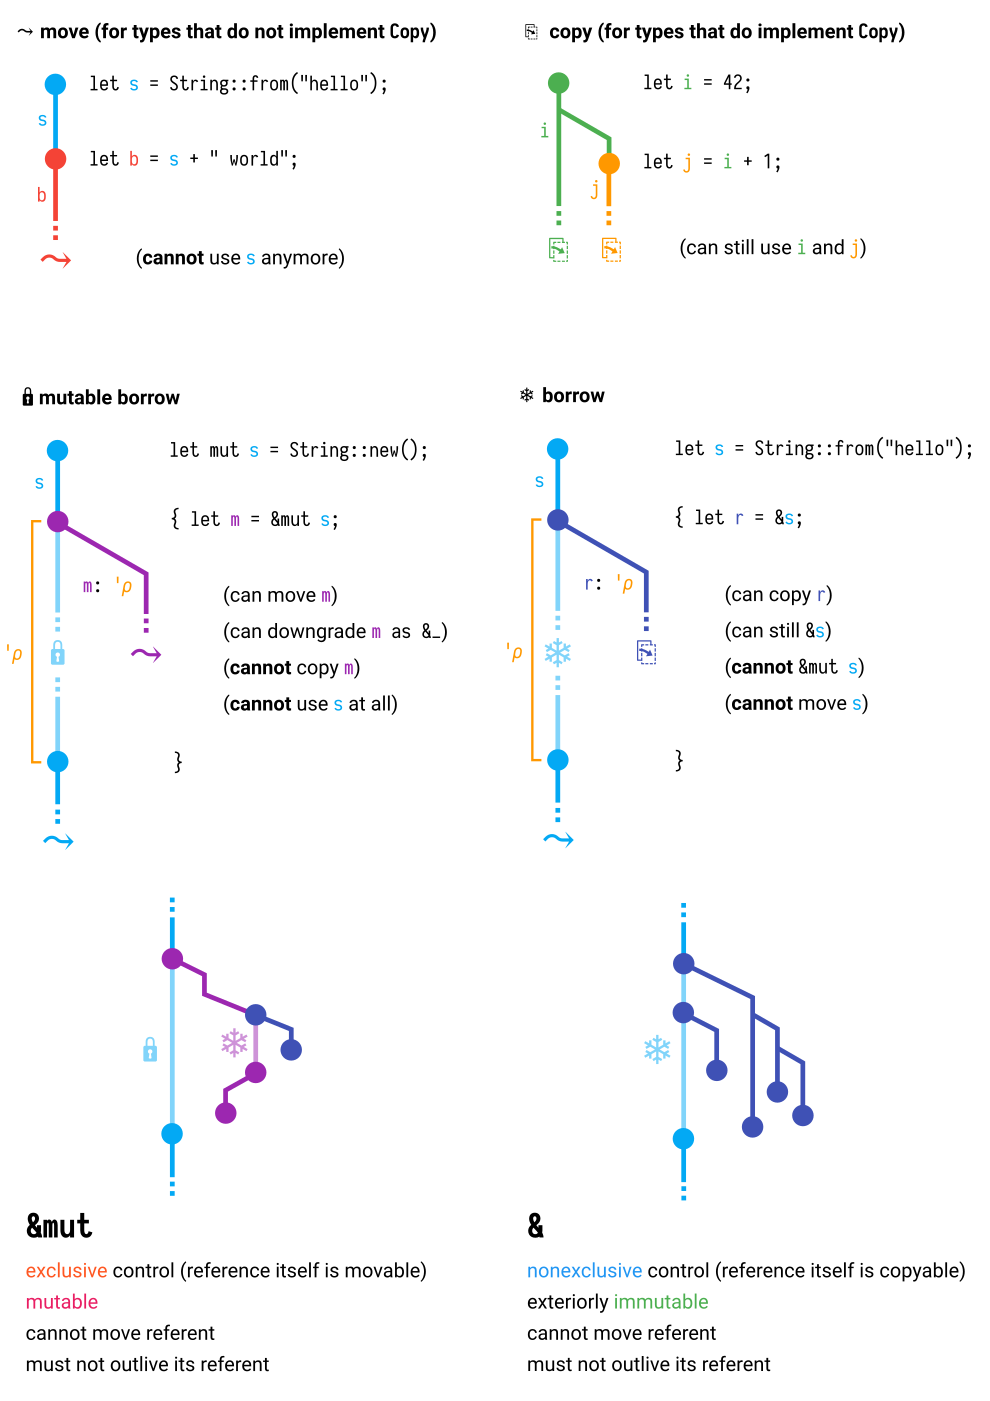
Rust Mutability, Moving and Borrowing
This article, 'Rust Mutability, Moving and Borrowing,' provides an excellent, no-nonsense textual breakdown of these concepts. It's a great companion to the videos.
Please read the following sections: What the hell is a 'move?': This section reinforces the concept of moving ownership, using a Player struct as a great example. What on earth is a 'borrow?': Read through both the 'Immutable Borrows' and 'Mutable Borrows' subsections. This clearly explains the syntax (& and &mut) and the rules governing them.
4. Applying Borrows and Moves: Transferring Items
Now we can build the core feature for this lesson: transferring an item between two inventories. This will require both moving (to take the item out of one inventory and place it in another) and mutable borrowing (to modify both inventories).
Let's organize our code by implementing methods for the Inventory struct. This is similar to defining methods for a class in other languages.
-
Create an
implBlockIn Rust, you define methods in an
impl(implementation) block.impl Inventory { // A function to create a new, empty inventory. pub fn new() -> Self { Self { items: Vec::new() } } // A method to add an item. // It takes a mutable borrow of the inventory (`&mut self`) // and takes ownership of the item (`item: Item`). pub fn add_item(&mut self, item: Item) { self.items.push(item); } // A method to print the inventory's contents. // It only needs to read the data, so it takes an immutable borrow (`&self`). pub fn print_contents(&self) { println!("Inventory contains: {:?}", self.items); } }selfis Rust's version ofthisorselfin other languages.&selfis a method that immutably borrows the struct instance.&mut selfis a method that mutably borrows the struct instance.self(by itself) is a method that takes ownership of the instance (moves it).
-
Implement the Transfer Logic
Now for the main event. Let's add a method to transfer an item. We need to find the item in the source inventory, remove it, and add it to the destination inventory.
impl Inventory {
    // ... (other methods from above)

    // Transfers an item to another inventory.
    // Takes a mutable borrow of the source (`&mut self`) and destination inventories.
    pub fn transfer_item_to(&mut self, other_inventory: &mut Inventory, item_name: &str) -> Result<(), String> {
        // Find the index of the item to transfer.
        let item_index = self.items.iter().position(|item| item.name == item_name);

        if let Some(index) = item_index {
            // Remove the item from the source inventory. This returns the owned Item.
            let item_to_transfer = self.items.remove(index);
            println!("Transferring {}...", item_to_transfer.name);

            // Add the owned Item to the other inventory. This moves the item.
            other_inventory.add_item(item_to_transfer);

            Ok(()) // Indicate success
        } else {
            Err(format!("Item '{}' not found in source inventory.", item_name))
        }
    }
}
This method is a perfect illustration of the ownership system in action:
- We mutably borrow
selfandother_inventorybecause we need to modify both. self.items.remove(index)takes theItemout of the source vector, giving us ownership of it.other_inventory.add_item(item_to_transfer)then takes ownership of thatItemand moves it into the destination vector.
- We mutably borrow
-
Use the Methods in
mainLet's update our
mainfunction to use this new functionality.fn main() { let mut player_inventory = Inventory::new(); player_inventory.add_item(Item { name: String::from("Health Potion") }); player_inventory.add_item(Item { name: String::from("Iron Sword") }); let mut chest_inventory = Inventory::new(); chest_inventory.add_item(Item { name: String::from("Gold Coins") }); println!("-- Before Transfer --"); print!("Player "); player_inventory.print_contents(); print!("Chest "); chest_inventory.print_contents(); // Transfer the "Iron Sword" from the player to the chest. if let Err(e) = player_inventory.transfer_item_to(&mut chest_inventory, "Iron Sword") { println!("Transfer failed: {}", e); } println!("\n-- After Transfer --"); print!("Player "); player_inventory.print_contents(); print!("Chest "); chest_inventory.print_contents(); }
Run the code with cargo run. You should see the "Iron Sword" move from the player's inventory to the chest's inventory, demonstrating a complete, safe transfer of ownership.
Conclusion
Congratulations! You've just navigated one of the steepest parts of Rust's learning curve. While it might feel strict at first, the ownership system is what empowers you to write incredibly fast and safe code without the headaches of manual memory management or the overhead of a garbage collector.
Key Takeaways:
- Ownership: Every value has one owner. When the owner goes out of scope, the value is dropped.
- Move vs. Copy: Heap-allocated types (like
String,Vec) are moved by default, transferring ownership and invalidating the original variable. Stack-allocated types with theCopytrait (likei32,bool) are copied. - Borrowing (
&T): You can have many immutable references to data, allowing you to read it without taking ownership. - Mutable Borrowing (
&mut T): You can have only one mutable reference at a time, allowing you to modify data safely. - Methods: Methods on structs use
&self(immutable borrow),&mut self(mutable borrow), orself(move/take ownership) to interact with the instance they are called on.
You've successfully applied these rules to a practical game system. This foundation is crucial as we start building more complex interactions in our engine.
In our next lesson, we will learn how to save and load our data. We'll explore the serde crate, a powerful library for serializing our Character and Inventory structs into JSON files and deserializing them back into our game.