Hello! Welcome to the first lesson of our course. We're about to take the first and most crucial step in building our life simulation game: setting up a professional development environment for Rust.
In this lesson, you will set up all the necessary tools to write, compile, and manage the Rust code that will power our game's core logic. We'll install the Rust toolchain itself, configure a code editor for a smooth development experience, and then use Rust's build tool, Cargo, to create and run our very first project. By the end of this session, you'll have a fully functional Rust setup, ready for the exciting work ahead.
Given your background as a Computer Science student, you're likely familiar with concepts like compilers, package managers, and IDEs. We'll leverage that knowledge to focus on what's specific to the Rust ecosystem. Let's get started.
1. Installing the Rust Toolchain
The standard way to install and manage Rust versions is through a command-line tool called rustup. It not only installs the Rust compiler (rustc) but also bundles several other essential tools, most notably Cargo, which is Rust's package manager and build system. Cargo will be central to our entire development workflow, handling everything from creating projects to managing dependencies.
To begin, please follow the official installation instructions.
Getting started - Rust Programming Language
This is the official guide from the Rust language website. It provides the most direct and up-to-date instructions for installing Rust on your operating system.
Please read the 'Installing Rust' section. Use the command provided for your specific OS (macOS/Linux/WSL or Windows) to run the installer. The guide also mentions the C++ build tools dependency for Windows, which is important.
Once you've completed the installation, you can verify that Rust is correctly set up. Open a new terminal or command prompt and run the following commands:
rustc --version
cargo --version
You should see the version numbers for the Rust compiler and Cargo printed to the console. If you encounter any issues, restarting your terminal or your computer often resolves path-related problems after a new installation.
2. Configuring Your Development Environment
A well-configured editor is essential for productivity. Since you have experience with Unity, you've worked with powerful IDEs. For Rust, we'll use Visual Studio Code (VS Code), a versatile and highly popular editor with excellent Rust support through extensions.
The most critical extension is rust-analyzer. It's a language server that provides real-time feedback, code completion, error checking, and navigation—features you'd expect from a modern IDE.
The following video gives a concise overview of installing VS Code and the essential extensions for a productive Rust setup.
Ultimate VS Code setup for Rust development (2025)
This video from the 'Let's Get Rusty' channel provides a quick, visual guide to setting up VS Code for Rust development.
Watch the segment from 01:48 to 04:12. This part covers installing VS Code and the three must-have extensions: rust-analyzer, CodeLLDB for debugging, and Even Better TOML for syntax highlighting in our project's configuration files.
For a more detailed, step-by-step written guide that covers not just installation but also configuration for debugging and formatting, the following article is an excellent resource. It aligns well with a hands-on approach to creating a polished development environment.
Rust #1: Creating your development environment
This DEV Community article by cthutu provides a comprehensive walkthrough of the entire setup process, from installation to configuring VS Code for a seamless workflow.
Read the section titled 'The Editor' and its subsections. This guide will walk you through installing the recommended extensions and, importantly, configuring settings like 'Format On Save', which automatically formats your code using rustfmt every time you save.
By following these guides, you'll have an editor that not only highlights syntax but actively helps you write correct and idiomatic Rust code from day one.
3. Creating Your First Project with Cargo
Now that your environment is ready, let's put it to use. We'll use Cargo to create a new "Hello, world!" project. This is the standard way to start any new Rust application or library.
In your terminal, navigate to the directory where you want to store your projects and run the following command:
cargo new game_engine_core
This command does two things:
- It creates a new directory named
game_engine_core. - It generates a barebones "Hello, world!" project inside it with the correct directory structure.
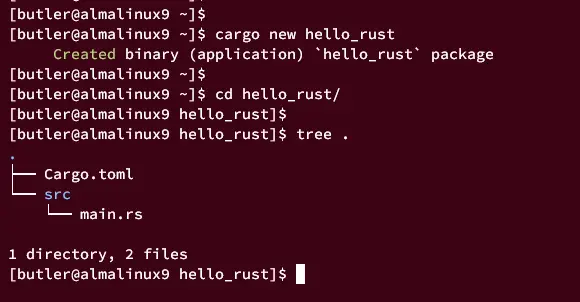
Let's examine the structure:
Cargo.toml: This is the manifest file for your project. It's written in the TOML (Tom's Obvious, Minimal Language) format. It contains metadata like the project's name, version, and author, and it's where we will list all external libraries (called "crates" in Rust) that our project depends on. For now, it will be very simple.src/main.rs: This is the root source file for a binary application, and it contains themainfunction, which is the entry point of the program.
Now, open the game_engine_core folder in VS Code. You should see the file structure. Open src/main.rs, and you'll find the classic "Hello, world!" program already written for you.
Building and Running the Project
Cargo provides a few simple commands to compile and run your project. With your terminal's current directory inside game_engine_core, try these commands:
-
cargo check: This command quickly checks your code for errors without producing an executable. It's much faster than a full compilation and is extremely useful for verifying your code as you write it. -
cargo build: This compiles your project. The resulting executable file is placed in thetarget/debug/directory. You'll notice atargetfolder appears in your project; this is where Cargo places all intermediate build files and final artifacts. -
cargo run: This is the command you'll use most often. It compiles your project (if necessary) and then runs the resulting executable.
Go ahead and run:
cargo run
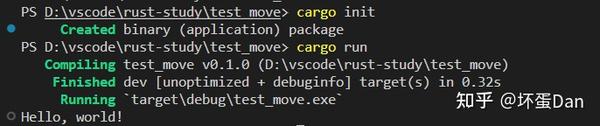
You should see Hello, world! printed to your terminal. Congratulations, you've successfully set up your Rust environment and compiled your first program!
Conclusion
In this lesson, we laid the essential groundwork for our project. You have successfully:
- Installed the Rust toolchain, including the compiler (
rustc) and package manager (cargo), usingrustup. - Configured VS Code with the
rust-analyzerextension to create a powerful and supportive editing environment. - Used Cargo to create a new binary project and learned the basic commands (
check,build,run) to manage it.
You are now fully equipped to start writing the core logic of our game engine.
In the next lesson, "Implement basic Rust data structures using structs, enums, and vectors for game data," we will move beyond "Hello, world!" and start defining the fundamental data structures that will represent the characters and objects in our game world.