Welcome back! In the previous lesson, we explored how to make your code more resilient using Python's exception handling with try...except blocks. We discussed how this is vital for building reliable automation, and I specifically mentioned that file operations are a classic scenario where things can go wrong.
This lesson builds directly on that foundation. As a test automation professional, you'll frequently need to interact with external files—perhaps to read test data like user credentials from a text file, or to write detailed logs of your test execution. This lesson covers the final core Python skill in this module: reading from and writing to text files. You will learn how to open, read, write, and append to files safely and efficiently, which is an essential capability for creating data-driven tests and comprehensive reporting in your future Playwright projects.
The Basics of File Handling
At its core, file handling in Python revolves around the built-in open() function. This function takes a file path as its primary argument and a "mode" that specifies what you intend to do with the file.
The most common modes you'll encounter are:
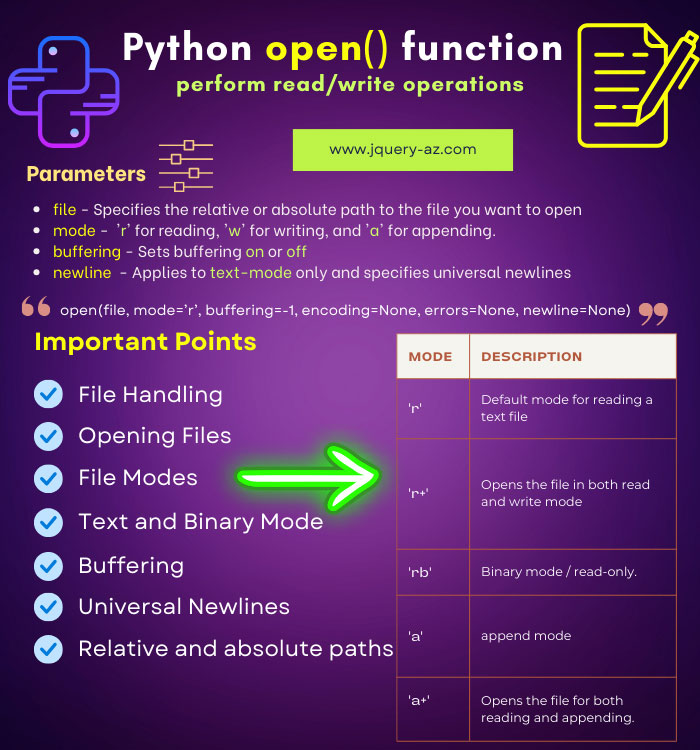
'r'(Read): Opens a file for reading. This is the default mode. If the file doesn't exist, it will raise aFileNotFoundError—a perfect use case for thetry...exceptblock you just learned!'w'(Write): Opens a file for writing. If the file exists, its contents will be completely erased. If it doesn't exist, a new file will be created.'a'(Append): Opens a file for appending. New data is written to the end of the file. If the file doesn't exist, it will be created.
This infographic provides a great visual summary of the open() function and its common modes.
Opening and Closing Files: The Safe Way
Whenever you open a file, you create a connection to it that consumes system resources. It is crucial to close that connection when you're done. While you can do this manually with a try...finally block to ensure the file's .close() method is always called, Python offers a much cleaner and safer syntax: the with statement.
The with open(...) structure is known as a context manager. It automatically handles closing the file for you, even if errors occur within the block. This is the universally recommended approach for file I/O in Python.
The following video from techTFQ provides a clear demonstration of both the older method and the recommended with statement.
How to Read and Write Files in Python | File Handling Tutorial in Python
This video starts by showing the traditional open/read/close pattern and then introduces the with statement as the superior, safer alternative.
Watch the initial segment from the beginning to understand the basic mechanics of opening, reading, and manually closing a file. Pay close attention to the next part, from using a context manager. The presenter clearly explains why the with statement is safer because it automatically handles closing the file, preventing resource leaks.
Reading Data from a File
Once a file is open for reading, Python provides several ways to get its content. Your choice depends on whether you need all the content at once or want to process it line by line.
The "Reading and Writing Files in Python (Guide)" from Real Python is an excellent resource that covers these methods in detail.
Reading and Writing Files in Python (Guide)
This article thoroughly explains the with statement and then dives into the different methods for reading and writing files.
First, read the section Opening and Closing a File. This reinforces the importance of the with statement. Next, read the section Reading and Writing Opened Files. Focus on the three main ways to read content: .read(): To get the entire file content as a single string. .readlines(): To get all lines as a list of strings. Iterating over the file object (for line in reader:): The most efficient method for large files.
Let's recap what you just read:
file.read(): Good for small files where you need the entire content at once. Be cautious, as this can consume a lot of memory for large files.file.readlines(): Reads all lines into a Python list. This is useful if you need to access lines by their index or perform list operations, but like.read(), it loads the whole file into memory.for line in file:: This is generally the best practice. It reads the file one line at a time, making it highly memory-efficient, especially for log files or large data sets that you'll encounter in testing.
Notice that when you read lines from a file, they often include the newline character (\n) at the end. You can remove this (and other surrounding whitespace) using the .strip() string method, which is a very common operation.
Writing and Appending to Files
Writing to files follows a similar pattern using the with statement, but with the mode set to 'w' (write) or 'a' (append).
- Write Mode (
'w'): Use this when you want to create a new file or completely replace the content of an existing one. A great example in testing is generating a fresh report file at the start of a test run. - Append Mode (
'a'): Use this when you want to add to an existing file without deleting its current content. This is perfect for logging, where you add new entries to a log file as tests execute.
The video from Dave Gray clearly demonstrates writing, appending, and the critical difference between them.
Python File Handling for Beginners
This video walks through how to use the append and write modes, highlighting the overwriting behavior of 'w'.
First, watch the segment on appending to files. Notice how the new name is added to the end of the existing file. Next, watch the demonstration of the write mode. See how it completely replaces the file's original content. This is a crucial distinction to understand.
When writing, remember two key rules:
- The
.write()method only accepts strings. You must convert numbers or other data types to a string usingstr()before writing. - Python does not automatically add newlines. If you want each piece of data on a new line, you must explicitly add the
\ncharacter to your string.
Let's Practice: Creating a Test Log
This exercise simulates a common QA task: running a series of "tests" and logging their results to a file. We will read test case names from one file and write their outcomes to a log file.
Your Task:
- Create a file named
test_cases.txtin the same directory as your Python script. Add the following content to it:Login_TC01 Dashboard_TC02 Payment_TC03 Logout_TC04 - Write a Python script that performs the following steps:
- Overwrite/Create Log: Open a file named
test_run.login write mode ('w'). Write a header line like--- Test Run Started ---and a newline character. This ensures you start with a fresh log each time. - Read Test Cases: Open
test_cases.txtin read mode ('r'). Use aforloop to iterate through each line (each test case). - Append Results: Inside the loop, for each test case you read:
- Remove any leading/trailing whitespace from the test case name using
.strip(). - Open
test_run.login append mode ('a'). - Write the result to the log file. Let's pretend every other test fails. You can use a simple condition. For example, if the test case name contains "01" or "03", log it as "PASSED"; otherwise, log it as "FAILED".
- The log entry should look like:
[RESULT] Test Case: Login_TC01 - PASSED\n.
- Remove any leading/trailing whitespace from the test case name using
- Append Footer: After the loop finishes, open
test_run.logone last time in append mode and write a footer:--- Test Run Finished ---.
- Overwrite/Create Log: Open a file named
Here is some starter code to guide you:
import time # We'll use this to add a timestamp

log_file = 'test_run.log'
test_data_file = 'test_cases.txt'


# 1. Start with a fresh log file
with open(log_file, 'w') as writer:
    timestamp = time.ctime()
    writer.write(f'--- Test Run Started at {timestamp} ---\n')


# 2. Read test cases and log results
with open(test_data_file, 'r') as reader:
    for test_case in reader:


        # Clean up the test case name
        test_case_name = test_case.strip()


        # Determine the result (simple logic for practice)
        if "01" in test_case_name or "03" in test_case_name:
            result = "PASSED"
        else:
            result = "FAILED"


        # 3. Append the result to the log file
        with open(log_file, 'a') as appender:
            log_entry = f'[RESULT] Test Case: {test_case_name} - {result}\n'
            appender.write(log_entry)


# 4. Add a footer to the log file
with open(log_file, 'a') as appender:
    appender.write('--- Test Run Finished ---\n')

print(f"Test execution finished. Check the '{log_file}' file for results.")


# Optional: Print the content of the log file to the console
with open(log_file, 'r') as f:
    print("\n--- Log File Content ---")
    print(f.read())
After running your script, the test_run.log file should contain content similar to this (the timestamp will vary):
--- Test Run Started at [Your Timestamp] ---
[RESULT] Test Case: Login_TC01 - PASSED
[RESULT] Test Case: Dashboard_TC02 - FAILED
[RESULT] Test Case: Payment_TC03 - PASSED
[RESULT] Test Case: Logout_TC04 - FAILED
--- Test Run Finished ---
Conclusion
You have now mastered the fundamentals of file input and output in Python, completing the final core topic in our Python fundamentals module. This skill is indispensable for building sophisticated automation frameworks.
Here are the key takeaways from this lesson:
- Always use
with open(...) as file:to ensure files are closed automatically and safely. - Understand the critical difference between file modes:
'r'(read),'w'(write/overwrite), and'a'(append). - For reading, iterating line by line with
for line in file:is the most memory-efficient approach for large files. - When writing, remember to convert all data to strings and manually add newline characters (
\n) for formatting.
With this lesson, you've completed your foundational Python training. You now have the essential tools—variables, data structures, conditional logic, loops, functions, error handling, and file I/O—to start building real applications.
In the next module, we will transition from writing simple scripts to designing more structured and scalable code. We will begin exploring Object-Oriented Programming (OOP), learning how to use classes and objects to create reusable blueprints for the pages and components of the applications you will test with Playwright. This is the first step toward building a professional-grade test automation framework.