Hello! Welcome to the final lesson of our Go crash course module.
In our last session, we explored the defer statement, a simple yet powerful tool for ensuring resource cleanup. You learned how it guarantees execution, its LIFO (Last-In, First-Out) order, and how to use it correctly to prevent resource leaks—a critical skill for writing robust backend systems.
Today, we'll build on that foundation by covering a topic essential for any serious software development: unit testing. In a large open-source project like the Redis operator, a strong test suite is the backbone that allows developers to add features and fix bugs with confidence. This lesson will equip you to write and run a basic unit test using Go's built-in testing package.
By the end of this lesson, you will have all the fundamental Go skills needed to start dissecting the Redis operator's codebase.
1. The Anatomy of a Go Test
Go has a lightweight, convention-based testing framework built right into its toolchain. There's no need for external libraries to get started. The core conventions are simple and, given your experience, will feel straightforward.
Let's start with the official Go documentation, which lays out the fundamental rules.
The official Go tutorial 'Add a test' provides a concise introduction to the core conventions of Go's testing framework.
Please read the first three parts of this short tutorial. Focus on: The naming convention for test files (_test.go). The required signature for a test function (func TestName(t *testing.T)). The command used to run tests (go test).
To summarize the key points from that reading:
- Test Files: Must be in the same package (directory) as the code they are testing and have a name ending in
_test.go. The Go toolchain automatically ignores these files during a normal build but includes them when you rungo test. - Test Functions: Must begin with the word
Test, followed by a capitalized name (e.g.,TestMyFunction). They must accept exactly one argument:t *testing.T. - The
*testing.TParameter: This is your "toolkit" for the test. You use it to signal failures, log information, and control test execution.
The *testing.T type provides several methods for reporting the status of a test.
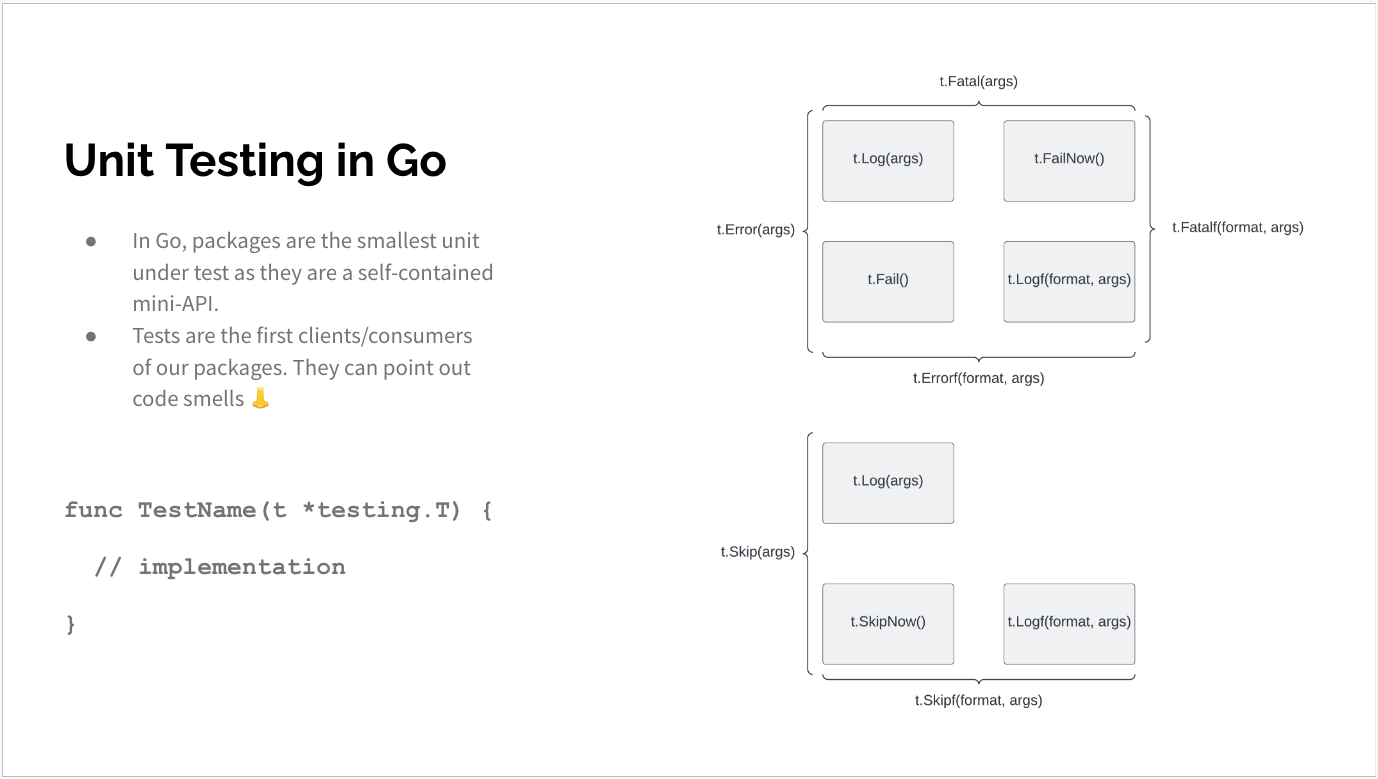
The most common methods you'll use are for reporting failures. It's crucial to understand the difference between a regular failure and a fatal one.
Unit Testing in Go - A Beginner's Guide
This article from freeCodeCamp provides a clear explanation of the difference between t.Errorf and t.Fatalf.
Please read the section titled 't.Errorf vs t.Fatalf'. It's a short but important section that explains the control flow difference between these two functions.
In short:
t.Errorf(...): Reports that the test has failed but allows the test function to continue executing. This is useful if you want to report multiple independent failures within a single test.t.Fatalf(...): Reports the failure and immediately stops the execution of the current test function. This is appropriate when a failure makes the rest of the test meaningless, like if a prerequisite setup step fails.
2. Table-Driven Tests: The Idiomatic Approach
While you can write a separate Test... function for every single scenario, you would quickly find yourself with a lot of repetitive code. In Go, the idiomatic solution is the table-driven test. This pattern involves defining a slice of test cases (the "table") and then iterating over them in a single test function.
This approach keeps your tests DRY (Don't Repeat Yourself), organized, and easy to extend with new cases.

A key feature used with table-driven tests is t.Run(), which allows you to create named subtests. This is incredibly useful because when a test fails, Go will report the exact name of the failing subtest, pinpointing which case failed.
Let's watch a quick video that demonstrates this concept.
The 'Table driven tests in Go' video from Ardan Labs, a well-respected name in the Go community, gives a concise explanation of subtests.
Watch from the beginning until 03:38. The video first introduces the concept of a table-driven test and then shows how using t.Run() to create subtests makes test output much more informative.
3. Putting It All Together: A Complete Workflow
Now, let's walk through the entire process of writing and running a table-driven test. The following video demonstrates this workflow, from structuring the code to running the test and even checking for test coverage.
A hands-on guide for proper Unit Testing in Go!
The video 'A hands-on guide for proper Unit Testing in Go!' by Flo Woelki provides an excellent, practical walkthrough of creating a table-driven unit test.
Please watch from 03:57 to 12:05. This segment covers: The given-when-then principle for structuring tests. Creating an anonymous struct to define test cases. Looping over the test cases (without t.Run in this example, but the principle is the same). Using t.Errorf to compare the actual result with the expected result. Running the test with go test.
Let's formalize the pattern you just saw. Here's a typical structure for a table-driven test that you might write. This example also incorporates error checking, connecting back to our previous lessons.
Assume we have this function to test in a file named calculator.go:
// calculator.go
package main

import "errors"

// Add returns the sum of two integers. It returns an error
// if either input is negative.
func Add(a, b int) (int, error) {
	if a < 0 || b < 0 {
		return 0, errors.New("inputs cannot be negative")
	}
	return a + b, nil
}
Now, here is the corresponding test file, calculator_test.go:
// calculator_test.go
package main

import "testing"

func TestAdd(t *testing.T) {
	// 1. Define the test cases table
	testCases := []struct {
		name      string // Name of the test case
		a, b      int    // Input values
		wantSum   int    // Expected result
		wantErr   bool   // Whether we expect an error
	}{
		{
			name:    "Two positive numbers",
			a:       5,
			b:       10,
			wantSum: 15,
			wantErr: false,
		},
		{
			name:    "One number and zero",
			a:       7,
			b:       0,
			wantSum: 7,
			wantErr: false,
		},
		{
			name:      "A negative number",
			a:       -1,
			b:       5,
			wantSum:   0, // We don't care about the sum when an error is expected
			wantErr:   true,
		},
	}

	// 2. Loop over the test cases
	for _, tc := range testCases {
		// 3. Run each case as a subtest
		t.Run(tc.name, func(t *testing.T) {
			// Call the function under test
			gotSum, err := Add(tc.a, tc.b)

			// 4. Check for errors
			if tc.wantErr {
				// We expected an error, so fail if we didn't get one
				if err == nil {
					t.Errorf("Add(%d, %d) expected an error, but got nil", tc.a, tc.b)
				}
			} else {
				// We did not expect an error, so fail if we got one
				if err != nil {
					t.Errorf("Add(%d, %d) returned unexpected error: %v", tc.a, tc.b, err)
				}
				// Also check if the sum is correct
				if gotSum != tc.wantSum {
					t.Errorf("Add(%d, %d) = %d; want %d", tc.a, tc.b, gotSum, tc.wantSum)
				}
			}
		})
	}
}
To run this test, you would navigate to the directory and run:go test -v
The -v flag provides verbose output, showing the name of each subtest as it runs.
4. Measuring Test Coverage
How do you know if your tests are comprehensive enough? One useful metric is test coverage, which measures the percentage of your code that is executed by your tests. Go has built-in tooling for this.
A hands-on guide for proper Unit Testing in Go!
Let's return to the Flo Woelki video to see how to generate and view a coverage report.
Watch from 14:59 to 16:24. This short clip demonstrates the two commands you need to know: go test -coverprofile=cover.out to generate the coverage data. go tool cover -html=cover.out to view the data as an interactive HTML report.
Viewing the HTML coverage report is a great way to spot functions, or even specific if branches, that you forgot to test. Achieving 100% coverage isn't always the goal, but striving for high coverage on critical logic is a best practice you will see in the Redis operator project.
Conclusion
Congratulations on completing the Go crash course module! You've moved from basic syntax to writing idiomatic, production-quality unit tests. This is a crucial skill for contributing to any serious open-source Go project.
Key Takeaways:
- Convention over Configuration: Go tests live in
_test.gofiles, and test functions are namedTest...(t *testing.T). - Run Tests Simply: The
go testcommand is all you need. Usego test -vfor detailed output. - Embrace Table-Driven Tests: Use a slice of structs for test cases and
t.Run()to create named, isolated subtests. This is the idiomatic Go way. - Test for Errors: A comprehensive test checks both successful return values and expected error conditions.
Errorfvs.Fatalf: UseErrorfto report a failure and continue; useFatalfwhen a failure makes the rest of the test pointless.- Measure Coverage: Use
go test -cover...andgo tool cover -html...to find untested parts of your code.
You now have a strong enough foundation in Go to tackle the next phase of our course.
In the next lesson, we will begin the Concurrency and Kubernetes Operator Foundations module. We'll start with goroutines and channels, the heart of Go's famous concurrency model. These are the fundamental building blocks that power the asynchronous, event-driven reconciliation loops in Kubernetes operators.