Welcome back! In our last lesson, we tackled the classic "Two Sum" problem, leveraging a HashMap to achieve an optimal O(n) solution. We saw how choosing the right data structure is critical for performance. Today, we're moving from structures that rely on indices or keys to one based on connections: the singly linked list.
Implementing a linked list from scratch is a fundamental skill tested in many software engineering interviews. It demonstrates your understanding of pointers (or references in Java), memory management, and object-oriented design. This lesson will guide you through building your own singly linked list in Java, covering the essential operations of traversal, insertion, and deletion. This knowledge is not just theoretical; it's a cornerstone for more complex data structures and algorithms you'll face later.
1. The Concept of a Linked List
Unlike an array, which stores elements in a contiguous block of memory, a linked list is a collection of objects called nodes that can be scattered anywhere in memory. Each node contains two key pieces of information:
- The actual data (the value it holds).
- A reference (or "pointer") to the next node in the sequence.
The list is accessed through a reference to the very first node, called the head. The last node in the sequence points to null, signaling the end of the list.

To get a clear understanding of why linked lists are useful and how they differ from arrays, let's start with a conceptual overview.
Linked List Tutorial - Singly + Doubly + Circular (Theory + Code + Implementation)
This video from Kunal Kushwaha's channel provides an excellent introduction to the theory behind linked lists, contrasting them with arrays and defining the Node structure.
Watch the initial segment from the introduction. Pay close attention to the discussion of arrays' limitations and how the node-based structure of a linked list overcomes them. The explanation of the Node class, with its value and next components, is foundational for everything that follows.
2. Building the Core Structure in Java
Now, let's translate this concept into Java code. We'll create two classes:
Node: A private inner class that represents a single element. Making it private encapsulates the node's implementation within the linked list itself.SinglyLinkedList: The main class that will manage the collection of nodes and contain the logic for our operations.
Our SinglyLinkedList class will maintain a few crucial fields: head, tail, and size. Keeping references to both the head and tail allows for efficient O(1) insertions at both ends.
Linked List Tutorial - Singly + Doubly + Circular (Theory + Code + Implementation)
Kunal Kushwaha demonstrates how to set up the basic class structure in Java.
Watch this segment from setting up the classes. Observe how he defines the private class Node and the SinglyLinkedList class with its head, tail, and size instance variables. This setup is a standard and robust way to begin your implementation.
Here's a summary of the structure we will implement. Note that we'll be building instance methods within the SinglyLinkedList class, which is a more object-oriented approach than using static helper methods.
public class SinglyLinkedList {

    private Node head;
    private Node tail;
    private int size;

    public SinglyLinkedList() {
        this.size = 0;
    }

    // Our insertion, deletion, and traversal methods will go here.

    private class Node {
        private int value;
        private Node next;

        public Node(int value) {
            this.value = value;
        }

        public Node(int value, Node next) {
            this.value = value;
            this.next = next;
        }
    }
}
3. Traversal: Visiting Each Node
The most basic operation is traversal—visiting each node in order from head to tail. This is necessary for printing the list, searching for a value, or performing any operation that requires inspecting the elements.
A critical rule when traversing is to never move the head reference itself. The head is the permanent entry point to your list. If you reassign it, you lose the beginning of your list. Instead, we use a temporary reference variable (e.g., temp or current) that starts at the head and advances through the list.
Linked List Tutorial - Singly + Doubly + Circular (Theory + Code + Implementation)
This part of the video explains the logic for displaying the list and emphasizes the important concept of using a temporary node for traversal.
Watch from the display method. The explanation of why you should not modify the head pointer directly is a key takeaway for handling linked lists correctly.
Here is the implementation of our display method:
public void display() {
    Node temp = head;
    while (temp != null) {
        System.out.print(temp.value + " -> ");
        temp = temp.next; // Move to the next node
    }
    System.out.println("END");
}
4. Insertion Operations
Let's implement the three main ways to insert a node: at the beginning, at the end, and at a specific index.
Insertion at the Beginning (O(1))
This is the most straightforward insertion.
- Create a new
Node. - Set the
nextreference of the new node to the currenthead. - Update the
headto point to the new node. - If the list was empty, the new node is also the
tail.
Linked List Tutorial - Singly + Doubly + Circular (Theory + Code + Implementation)
This segment walks through the logic and code for inserting a node at the front of the list.
Watch the detailed explanation from inserting at the first position. Notice how it handles both an empty list and a list that already has elements.
Insertion at the End (O(1))
Thanks to our tail reference, adding to the end is also an O(1) operation. Without a tail reference, we would have to traverse the entire list (O(n)) to find the last node.
- Create a new
Node. - Set the
nextreference of the currenttailto the new node. - Update the
tailto point to the new node. - If the list was empty, this is the same as inserting at the beginning.
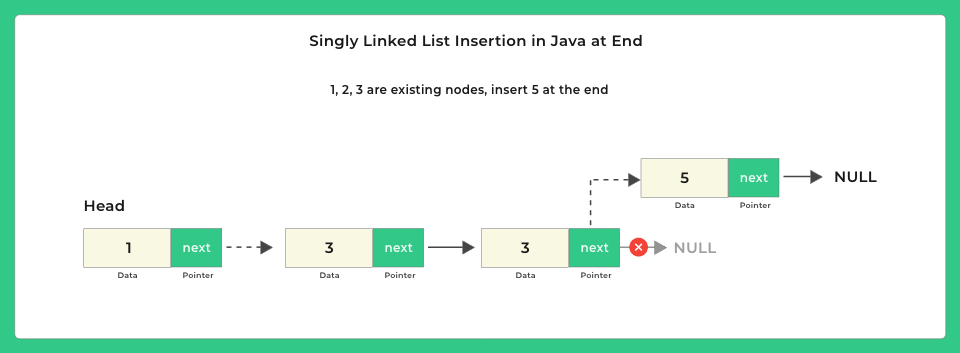
Linked List Tutorial - Singly + Doubly + Circular (Theory + Code + Implementation)
Here, the video covers how to efficiently add a node to the end of the list using the tail pointer.
Focus on the explanation from inserting at the last position. The video highlights the benefit of maintaining a tail pointer for constant-time insertions.
Insertion at a Specific Index (O(n))
To insert at an index, we must first traverse the list to find the node before the desired insertion point.
- Handle edge cases: if
indexis 0, callinsertFirst. Ifindexissize, callinsertLast. - Traverse to the node at
index - 1. - Create the new
Node. - Set the new node's
nextto the(index-1)node'snext. - Update the
(index-1)node'snextto point to the new node.
Linked List Tutorial - Singly + Doubly + Circular (Theory + Code + Implementation)
This segment explains the logic for inserting a node at an arbitrary position.
Watch from inserting at a specific index. Visualizing the pointer reassignments on paper, as shown in the video, is a very effective way to understand this operation.
5. Deletion Operations
Now for the removal operations. Similar to insertion, we'll cover deletion from the beginning, end, and a specific index.
Deletion from the Beginning (O(1))
This is a simple pointer update.
- If the list is empty, there's nothing to do.
- Move the
headreference tohead.next. - If the list becomes empty after deletion, update
tailtonull. - Decrement the size.
Linked List Tutorial - Singly + Doubly + Circular (Theory + Code + Implementation)
This part of the video quickly covers the simple logic for removing the first node.
Watch the implementation from deleting the first element.
Deletion from the End (O(n))
This is a classic interview question for singly linked lists. Because we can only move forward, we cannot simply update the tail. We must traverse from the head to find the second-to-last node.
- Handle edge cases (list is empty or has only one element).
- Traverse the list to find the node at
size - 2. - Set this node as the new
tail. - Set the new
tail'snextreference tonull. - Decrement the size.
Linked List Tutorial - Singly + Doubly + Circular (Theory + Code + Implementation)
This segment explains why deleting the last element in a singly linked list is an O(n) operation and how to implement it.
Watch the walkthrough from deleting the last element. Understanding the need to find the second-to-last node is key here.
Deletion at a Specific Index (O(n))
Similar to insertion at an index, this requires traversing to the node before the one you want to delete.
- Handle edge cases: if
indexis 0, calldeleteFirst. Ifindexissize - 1, calldeleteLast. - Traverse to the node at
index - 1(let's call itprev). - Update
prev.nextto beprev.next.next, which effectively "skips" the node atindex, removing it from the chain.
Linked List Tutorial - Singly + Doubly + Circular (Theory + Code + Implementation)
This final implementation segment shows how to remove a node from any given position.
Watch the logic from deleting from an index. The core idea is to "bypass" the node you want to remove by changing the next pointer of the preceding node.
6. Complexity Analysis
Understanding the performance of these operations is vital for interviews. Let's summarize the time and space complexity.
Singly Linked List | Insert, Delete, Complexity Analysis
This video provides a concise summary of the time and space complexity for all the operations we've discussed.
Watch the segment from the complexity analysis. It clearly lays out the performance characteristics of each operation, which you should commit to memory.
Here is a summary table for quick reference:
| Operation | Time Complexity | Space Complexity | Notes |
|---|---|---|---|
| Access (by index) | O(n) | O(1) | Must traverse from the head. |
| Search (by value) | O(n) | O(1) | Must traverse from the head. |
| Insertion (Head) | O(1) | O(1) | A simple pointer update. |
| Insertion (Tail) | O(1) | O(1) | Efficient due to maintaining a tail pointer. O(n) without it. |
| Insertion (Index) | O(n) | O(1) | Requires traversal to the node before the index. |
| Deletion (Head) | O(1) | O(1) | A simple pointer update. |
| Deletion (Tail) | O(n) | O(1) | Requires traversal to find the second-to-last node. |
| Deletion (Index) | O(n) | O(1) | Requires traversal to the node before the index. |
Conclusion
In this lesson, you've built a complete singly linked list from the ground up, a significant step in mastering fundamental data structures. You now understand not just the "what" but the "how" and "why" behind its implementation.
Key Takeaways:
- A singly linked list is a dynamic data structure composed of nodes, where each node points to the next.
- We implemented the three core operations: traversal, insertion, and deletion.
- Maintaining a
tailpointer is a crucial optimization, allowing for O(1) insertions at the end. - Operations at the head are very efficient (O(1)), while operations involving the tail or a specific index are typically O(n) due to the need for traversal.
You now have a solid foundation with this new data structure. In our next lesson, we will build directly on what you've created today by tackling another common interview problem: reversing a singly linked list.