Hello! Welcome to the final lesson of your course, "I want to master Data Science step by step."
In our last lesson, you crafted a non-technical summary of your project findings, translating complex analysis into an actionable business narrative. Your end-to-end project is now complete—from data cleaning and exploratory analysis to model building, interpretation, and presentation.
Today, we'll cover the final, essential professional practice: putting your project under version control. This lesson addresses the learning outcome: Use basic git commands for version control of the project code.
Version control is the system that professionals use to track changes, collaborate on code, and maintain a project's history. By the end of this lesson, you will understand the fundamental concepts of Git and GitHub and be able to use the core commands to manage your own data science projects. This skill is not just a technicality; it's a cornerstone of modern software and data science development and is critical for building your professional portfolio.
1. What are Version Control, Git, and GitHub?
Before we dive into commands, it's important to understand the "what" and the "why." At its core, version control solves the problem of managing changes in a project over time. Think about file names like project_final.py, project_final_v2.py, and project_final_for_real_this_time.py. Version control provides a structured, sane alternative.
- Git is a version control system. It's a tool that runs on your local computer and is responsible for tracking every change you make to your project files.
- GitHub is a repository hosting service. It's a website where you can store your Git repositories remotely (in the cloud). This allows you to back up your code, collaborate with others, and showcase your work.
Let's watch a brief video that clarifies the distinction and explains why these tools are so important in data science.
git for Data Science Made Simple... (Hopefully)
In this video, Ken Jee provides a clear, high-level explanation of what Git and GitHub are and why they are essential for data scientists, especially for collaboration and building a portfolio.
Watch from the beginning until 2:28. Focus on the distinction between Git (local) and GitHub (remote) and the reasons why version control is critical for data science projects.
The Basic Git Workflow
The process of moving your code from your computer to GitHub involves a few key stages. This diagram illustrates the journey of your code.
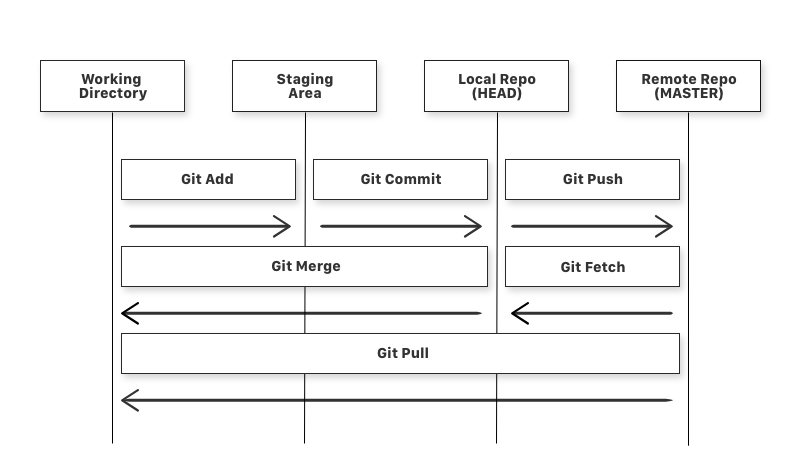
Understanding these four areas is key to making sense of the commands you're about to learn.
2. Setting Up Your Environment
Before you can use Git, you need to do a one-time setup: install the Git tool and configure it with your identity.
Part 1-Git And Github Series- Introduction, Installation Of Git And Understanding Basic Commands
This video by Krish Naik will walk you through the entire setup process. We'll watch the first part, which covers installation and configuration.
Follow along from 01:21 to 06:57. The video will guide you through: Downloading and installing Git for your operating system. Verifying the installation in your command line/terminal using git --version. Configuring your user name and email using git config --global. This is essential, as it attaches your identity to every change you make. Make sure to use the same email you use for your GitHub account.
If you don't have a GitHub account yet, you can create a free one at github.com.
3. Your Turn: Putting Your Project on GitHub
Now for the hands-on part. You will take the end-to-end project you've been working on and create a new repository for it on GitHub. We will initialize a local Git repository, add your project files, and "push" them to the remote repository on GitHub.
Follow these steps, using the video from Krish Naik as a guide.
Step 1: Create a New Repository on GitHub
First, go to your GitHub profile and create a new, empty repository.
The article "Comprehensive Guide to GitHub for Data Scientists" explains this process clearly.
Comprehensive Guide to GitHub for Data Scientists
This article walks you through creating a repository on GitHub's website. We'll use this method to set up the remote repository first.
Read the section 'Create Repository'. Follow the instructions to create a new public repository. Name it something like salary-prediction-project. Importantly, do not initialize it with a README, .gitignore, or license file for now. We will create these locally.
After creating the repository, GitHub will show you a page with a URL that ends in .git. Keep this URL handy; you'll need it soon.
Step 2: Initialize a Local Repository and Make Your First Commit
Now, open your command line or terminal and navigate to the root folder of your salary prediction project (the one you organized in the previous module).
We will now follow the core workflow: init, add, commit.
Part 1-Git And Github Series- Introduction, Installation Of Git And Understanding Basic Commands
Let's return to Krish Naik's video. It demonstrates the fundamental command sequence for getting your local code into a Git repository.
Watch from 03:55 to 10:13. Use the commands shown in the video, but apply them to your own project folder. git init: Run this in your project's root directory. This command creates a new, hidden .git sub-directory, turning your project folder into a local Git repository. git status: Run this command. You'll see all your project files listed as 'untracked'. This command is your best friend—use it often to see the state of your repository. git add .: This command adds all files in the current directory to the Staging Area. The . is a shortcut for 'all files'. git commit -m "Initial commit": This takes a snapshot of the files in the staging area and saves it to your local repository history. The -m flag lets you add a descriptive message.
At this point, you have a local Git repository with one commit (a snapshot) of your entire project. The changes exist only on your computer.
Step 3: Connect to GitHub and Push Your Code
The final step is to connect your local repository to the remote one you created on GitHub and push your commit.
Part 1-Git And Github Series- Introduction, Installation Of Git And Understanding Basic Commands
The last part of this sequence from Krish Naik's video shows how to link to a remote repository and push your code.
Watch from 10:13 to 13:40. Follow these final commands: git branch -M main: By default, Git might name your primary branch master. This command renames it to main, which is the current standard. git remote add origin <Your-GitHub-Repo-URL>: This command links your local repository to the remote one on GitHub. Replace <Your-GitHub-Repo-URL> with the URL you copied from GitHub in Step 1. git push -u origin main: This 'pushes' your 'main' branch with all its commits from your local machine to 'origin' (which is the nickname for your GitHub repo). The -u flag sets it as the default, so next time you can just use git push.
When you run git push, you will likely be prompted for your GitHub username and password. For the password, you need to use a Personal Access Token (PAT), not your actual GitHub password. If you need help creating one, refer to section 12.7.1, "Generating a GitHub personal access token," in the "Data Science" book resource.
Now, refresh your GitHub repository page in your browser. You should see all of your project files there!
4. Working with Existing Projects: clone and pull
So far, you've started a project locally and pushed it to GitHub. But often, you'll start by working on a project that already exists on GitHub.
-
git clone <URL>: This command is used to download an existing repository from GitHub to your computer. It creates a local copy that is already connected to the remote repository. -
git pull: If you are working with others (or on multiple computers), the remote repository might have changes that your local copy doesn't.git pullfetches those changes from GitHub and merges them into your local repository. It's good practice to rungit pullbefore you start a new work session.
Let's see this in action.
Part 1-Git And Github Series- Introduction, Installation Of Git And Understanding Basic Commands
The final segment of Krish Naik's tutorial demonstrates how to clone a repository and push a subsequent change, which covers the daily workflow you might encounter.
Watch from 16:52 to 19:55. This section shows you how to git clone a repository. He then makes a new change, uses git add and git commit, and finally git push to upload the new commit. This demonstrates the full, repeating cycle of a typical workflow.
Conclusion
Congratulations on completing not just this lesson, but the entire course! You've journeyed from foundational statistics all the way to building, interpreting, and now version-controlling a complete data science project. This is a massive achievement.
Key Takeaways from this Lesson:
- Git is for local tracking, GitHub is for remote hosting and collaboration. They are two parts of the same ecosystem.
- The core workflow for adding new work is a three-step process:
git addto stage your changes.git committo save a snapshot to your local repository.git pushto upload those changes to GitHub.
git statusis the most important command for understanding what's happening in your repository.git cloneis used to start working on a project that already exists on GitHub, andgit pullis used to get the latest updates.
What's Next?
You have successfully built a strong, practical foundation in data science. You started with theory and have now moved into hands-on application—exactly your goal. The path to mastery is a long one, built on continuous learning and practice.
Here are some suggestions for your next steps:
- Build Your Portfolio: You now have the skills to tackle projects on your own. Find datasets that interest you, apply the workflow you've learned, and host them on your GitHub profile. This portfolio is your single most valuable asset in a job search.
- Deepen Your Knowledge: You've worked with fundamental models. Now is a great time to explore more advanced areas you were interested in, such as Deep Learning (e.g., with TensorFlow or PyTorch) or Natural Language Processing (NLP).
- Contribute to Open Source: Find a data science library you enjoy using and look for ways to contribute. This is an excellent way to learn from experienced developers and make a real-world impact.
Thank you for your dedication throughout this course. Keep learning, keep building, and good luck on your data science journey