Hello! Welcome to the fourth lesson in our "Python for DevOps Automation" module.
In our last lesson, you mastered reading, writing, and manipulating JSON and YAML files. This skill is about to become even more powerful. Many of the command-line tools you use daily—aws, kubectl, terraform, git—can output structured data like JSON. To leverage this in your automation scripts, you need a way to run these tools from within Python.
Today's lesson focuses on exactly that. We will explore Python's subprocess module, which acts as the bridge between your scripts and the underlying operating system shell.
Our learning outcome is to use the subprocess module to execute and capture output from external shell commands. This will enable you to create scripts that orchestrate other tools, a core competency for any DevOps engineer.
1. Understanding Processes and I/O Streams
Before we write any code, let's quickly review a fundamental concept. When you run a command in your terminal, the operating system creates a new process. This process has three standard communication channels, or "streams":
- Standard Input (stdin): Where the process receives input (e.g., from your keyboard or from another command's output).
- Standard Output (stdout): Where the process sends its normal output.
- Standard Error (stderr): Where the process sends error messages.
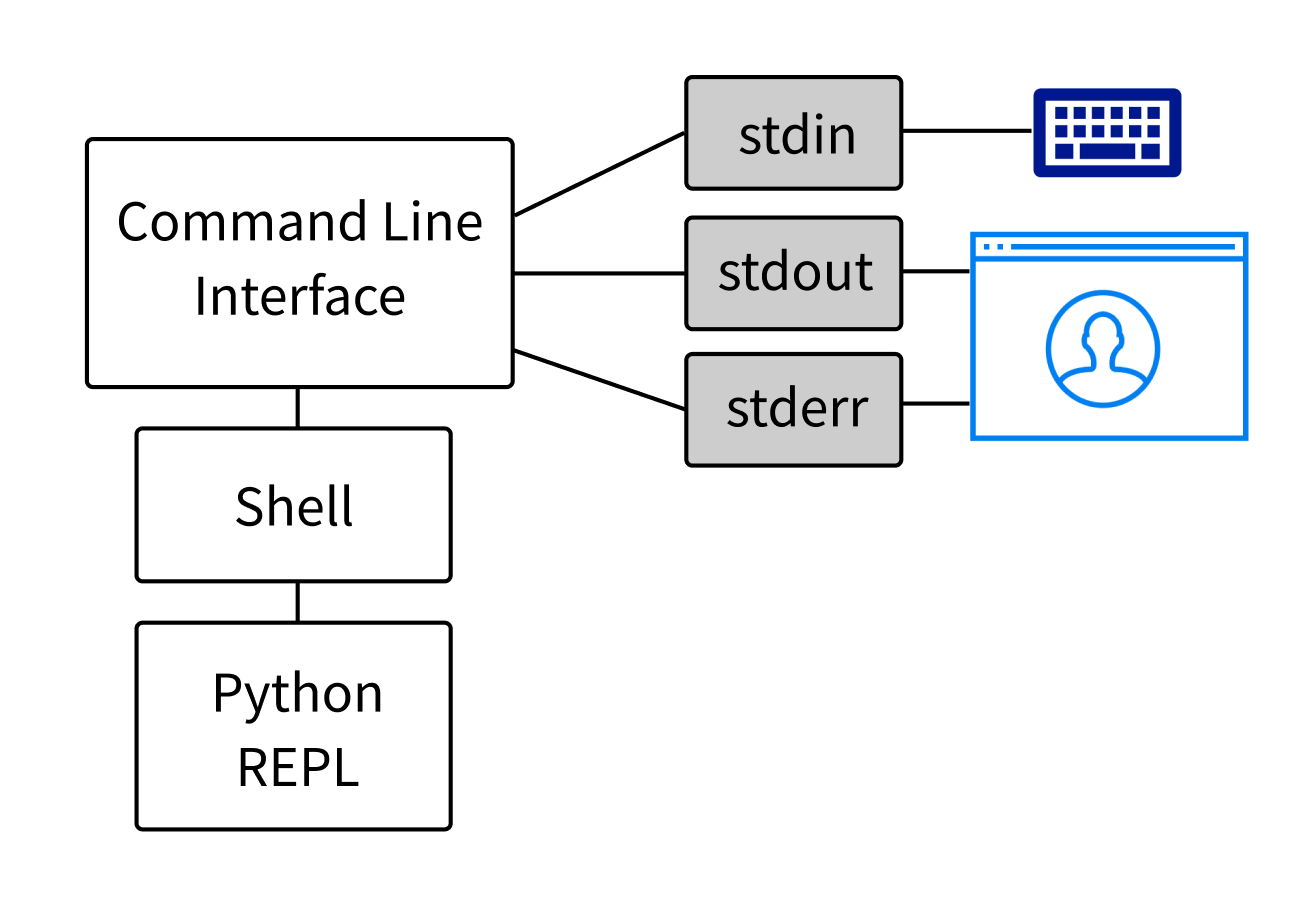
Our goal is to use Python to launch a command, capture what it sends to stdout and stderr, and check its final status.
2. Executing Commands with subprocess.run()
The modern and recommended way to execute external commands is with the subprocess.run() function. It's versatile, secure, and handles the most common use cases cleanly.
To explore this function, we'll watch a detailed tutorial from Corey Schafer. It's an excellent step-by-step guide.
Python Tutorial: Calling External Commands Using the Subprocess Module
This video, 'Calling External Commands Using the Subprocess Module', is a comprehensive walkthrough. We'll start with the basics of running a command and capturing its output.
Please watch the first two sections of the video: Basic Execution (00:29 - 03:10): Focus on how to pass a command and its arguments as a list (e.g., ['ls', '-la']). Pay attention to the shell=True argument and the security warning associated with it. We will revisit this critical point later. Capturing Output (03:14 - 06:25): This section is key. Understand the purpose of capture_output=True to get the command's output into your script, and text=True to automatically decode it into a readable string.
The CompletedProcess Object
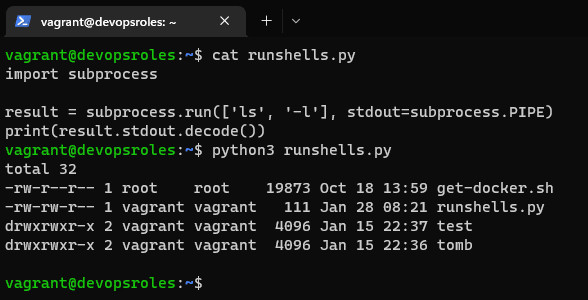
As the video showed, subprocess.run() returns a CompletedProcess object. This object contains a wealth of information about the command that was executed. The most important attributes for us are:
returncode: The exit code of the process. By convention,0means success, and any non-zero value indicates an error.stdout: The captured standard output of the command (as a string iftext=True).stderr: The captured standard error of the command (as a string iftext=True).args: The list of arguments used to launch the process.
Here's what that looks like in practice:
3. Robust Error Handling
In DevOps automation, it's not enough for scripts to work when things go right; they must also behave predictably when things go wrong. A command might fail because a file doesn't exist, a service is down, or the arguments are incorrect.
You have two primary ways to handle this.
Method 1: Manually Checking the Return Code
You can write a simple if statement to check if the returncode is non-zero. This gives you fine-grained control over the error logic.
import subprocess

result = subprocess.run(['ls', 'non_existent_directory'], capture_output=True, text=True)

if result.returncode != 0:
    print(f"Command failed with return code {result.returncode}")
    print(f"Error output:\n{result.stderr}")
else:
    print(f"Command succeeded:\n{result.stdout}")
Method 2: Using check=True for Automatic Exceptions
A more "Pythonic" approach is to add the check=True argument to your subprocess.run() call. If the command returns a non-zero exit code, Python will automatically raise a CalledProcessError exception. You can then catch this exception using a try...except block. This is often cleaner as it separates your success logic from your error-handling logic.
Let's continue with the video to see this in action.
Python Tutorial: Calling External Commands Using the Subprocess Module
We'll now watch the next segment of the same Corey Schafer video, which focuses on handling errors.
Watch the segment on Handling Command Failures (07:20 - 13:01). Pay close attention to how check=True changes the program's flow when an error occurs. Also, note the quick mention of redirecting stderr to DEVNULL to ignore errors, which can sometimes be useful.
For a quick text-based reference on all the error handling strategies, including TimeoutExpired and FileNotFoundError, check out the "Error Handling" section of this article.
How to Execute System Commands from Python - OneUptime
The article 'How to Execute System Commands from Python' from OneUptime provides excellent, concise code snippets for various error-handling scenarios.
Read the Error Handling section. Focus on the examples for check=True with try...except, handling timeouts, and handling missing commands.
4. Piping Commands and the shell=True Security Risk
You're used to piping commands together in Bash, like ls -la | grep .py. You might be tempted to do this in Python by passing the entire string to subprocess.run with the shell=True argument.
While this works, it comes with a major security risk: shell injection. If any part of the command string comes from user input (or any external, un-sanitized source), a malicious actor could inject additional commands.
Given your interest in cybersecurity, this is a vital concept. Avoid shell=True whenever possible, especially with external input.
The safe way to replicate a shell pipe is to run two separate subprocess commands and feed the stdout of the first process into the stdin of the second.
This final clip from the video demonstrates this exact pattern.
Python Tutorial: Calling External Commands Using the Subprocess Module
Let's see how to safely pipe the output of one command to another without using shell=True.
Watch the final segment on Piping Output (13:01 - 18:02). The example uses cat and grep. Focus on how the stdout from the first completed process (p1.stdout) is passed as the input argument to the second subprocess.run call.
5. Your Turn: Analyzing Kubernetes Pods
Let's apply these concepts to a real-world DevOps task. You'll write a script that checks the status of Kubernetes pods by running kubectl, capturing its JSON output, and parsing it—a perfect combination of this lesson and the previous one.
Scenario:
You need a quick way to identify any pods in your default Kubernetes namespace that are not in the Running state. This could be useful for health checks or alerting.
Task:
-
Set up your environment: Make sure you have
kubectlinstalled and configured to connect to a Kubernetes cluster (like Minikube, Docker Desktop's cluster, or a cloud-based one). -
Write the Python script (
check_pods.py):
Your script should perform the following actions:- Import the
subprocessandjsonmodules. - Define the
kubectlcommand as a list of strings:['kubectl', 'get', 'pods', '-o', 'json']. - Use a
try...exceptblock to handle potential errors. - Inside the
tryblock, execute the command usingsubprocess.run(). Be sure to use:capture_output=Truetext=Truecheck=True
- Load the captured
stdoutstring into a Python object usingjson.loads(). - Iterate through the list of pods (which you'll find in the
itemskey of the top-level JSON object). - For each pod, check its status (
pod['status']['phase']). If the phase is not'Running', print the pod's name (pod['metadata']['name']) and its status. - In the
exceptblock, catchsubprocess.CalledProcessErrorand print a user-friendly error message, including thestderrfrom the exception object (e.stderr). Also, catchFileNotFoundErrorin casekubectlisn't installed.
- Import the
Example Output (if a pod is failing):
Found non-running pods:
- Pod 'my-app-12345-abcde' is in state: CrashLoopBackOff
Example Output (if kubectl fails):
Error executing kubectl: The connection to the server localhost:8080 was refused - did you specify the right host or port?
This exercise perfectly simulates how you can build value-added automation around existing command-line tools.
Conclusion
Fantastic! You can now confidently execute external commands from your Python scripts, capture their output, and handle errors gracefully. This is a superpower for automation, allowing you to glue together various tools into a cohesive workflow.
Key Takeaways:
subprocess.run()is the recommended function for executing synchronous commands.- Always pass commands as a list of strings to avoid security risks.
- Use
capture_output=Trueandtext=Trueto get decodedstdoutandstderr. - The
CompletedProcessobject gives you access toreturncode,stdout, andstderr. - Implement robust error handling by either checking
returncodemanually or usingcheck=Truewith atry...exceptblock. - Avoid
shell=Truewith any external or user-provided input to prevent command injection vulnerabilities.
In our next lesson, we will build directly on this foundation. You'll learn how to develop a reusable command-line interface (CLI) tool for an automation task using argparse. This will allow you to turn your scripts into professional, user-friendly tools that accept their own flags and arguments.