Welcome to the first lesson of your journey to becoming a Design Engineer. In your work as a UI/UX designer, you excel at creating visual structure and hierarchy in Figma, using frames, auto-layout, and components to organize information logically for the user. This lesson introduces the foundational step of translating that logical structure into code using Semantic HTML.
Today, you will learn to identify and use core HTML elements like <header>, <nav>, <main>, <section>, and <footer>. Think of these not as styling tools, but as containers that give meaning to your content, much like naming your layers and components in Figma to describe their purpose. Mastering this will allow you to build webpages that are not only readable to other developers but are also accessible to users with disabilities and optimized for search engines—a key aspect of the "User & Product Thinking" skill we're developing.
From Visual Structure to Semantic Structure
Before writing a single line of code, a design engineer analyzes the design to understand its underlying structure. This is a process you are already familiar with from your UX work. Instead of thinking about pixels and colors, we'll start by identifying the logical regions of a page.
A great article on this process is "A Step-By-Step Process for Turning Designs Into Code" from CSS-Tricks. While we won't read it all now, its core idea is vital for us. The author breaks down a design by identifying its structure first.
A Step-By-Step Process for Turning Designs Into Code | CSS-Tricks
This reading introduces the idea of analyzing a design's structure before coding. It directly parallels how you might break down a UI into its core components.
Focus on the section titled "Structural ideas." Notice how the author identifies the top-level structure (Header, Main Content, Footer) before diving into the smaller details. This analytical pass is the bridge between your Figma design and your HTML code. It also introduces the concept of the accessibility tree, which is how assistive technologies like screen readers understand your page's layout.
This "structural pass" is exactly what semantic HTML elements are designed for. They allow us to label the different regions of our page according to their meaning, or semantics.
What is Semantic HTML?
At its core, HTML uses "tags" to structure content. Some tags are non-semantic; they don't describe their content. The most common are <div> and <span>. Think of them as unnamed, generic frames in Figma. They are useful for grouping things for styling purposes, but they offer no clue as to what they contain.
Semantic tags, on the other hand, clearly define their content's purpose.

Using semantic tags has three main benefits:
- Accessibility: Screen readers use these tags as "landmarks" to help users navigate a page. A user can ask their screen reader to jump directly to the
<main>content or the<nav>, bypassing repetitive headers. - SEO: Search engines like Google use this structure to better understand your content, which can improve your site's ranking.
- Readability: Your code becomes easier for you and other developers to read and maintain.
To get a clear overview of why this matters, let's watch a short segment from a video by web development expert Kevin Powell.
HTML & CSS for Absolute Beginners: Semantic HTML
This video explains the importance of semantic HTML for accessibility and SEO in a very beginner-friendly way.
Watch the first few minutes, from the beginning to the explanation of why semantics matter. Pay close attention to his analogy of navigating an office building—it's a powerful way to understand the role of landmarks in user experience.
The Core Structural Elements
Now, let's meet the primary set of semantic tags you'll use to define the layout of almost any webpage. The following diagram shows a common arrangement.
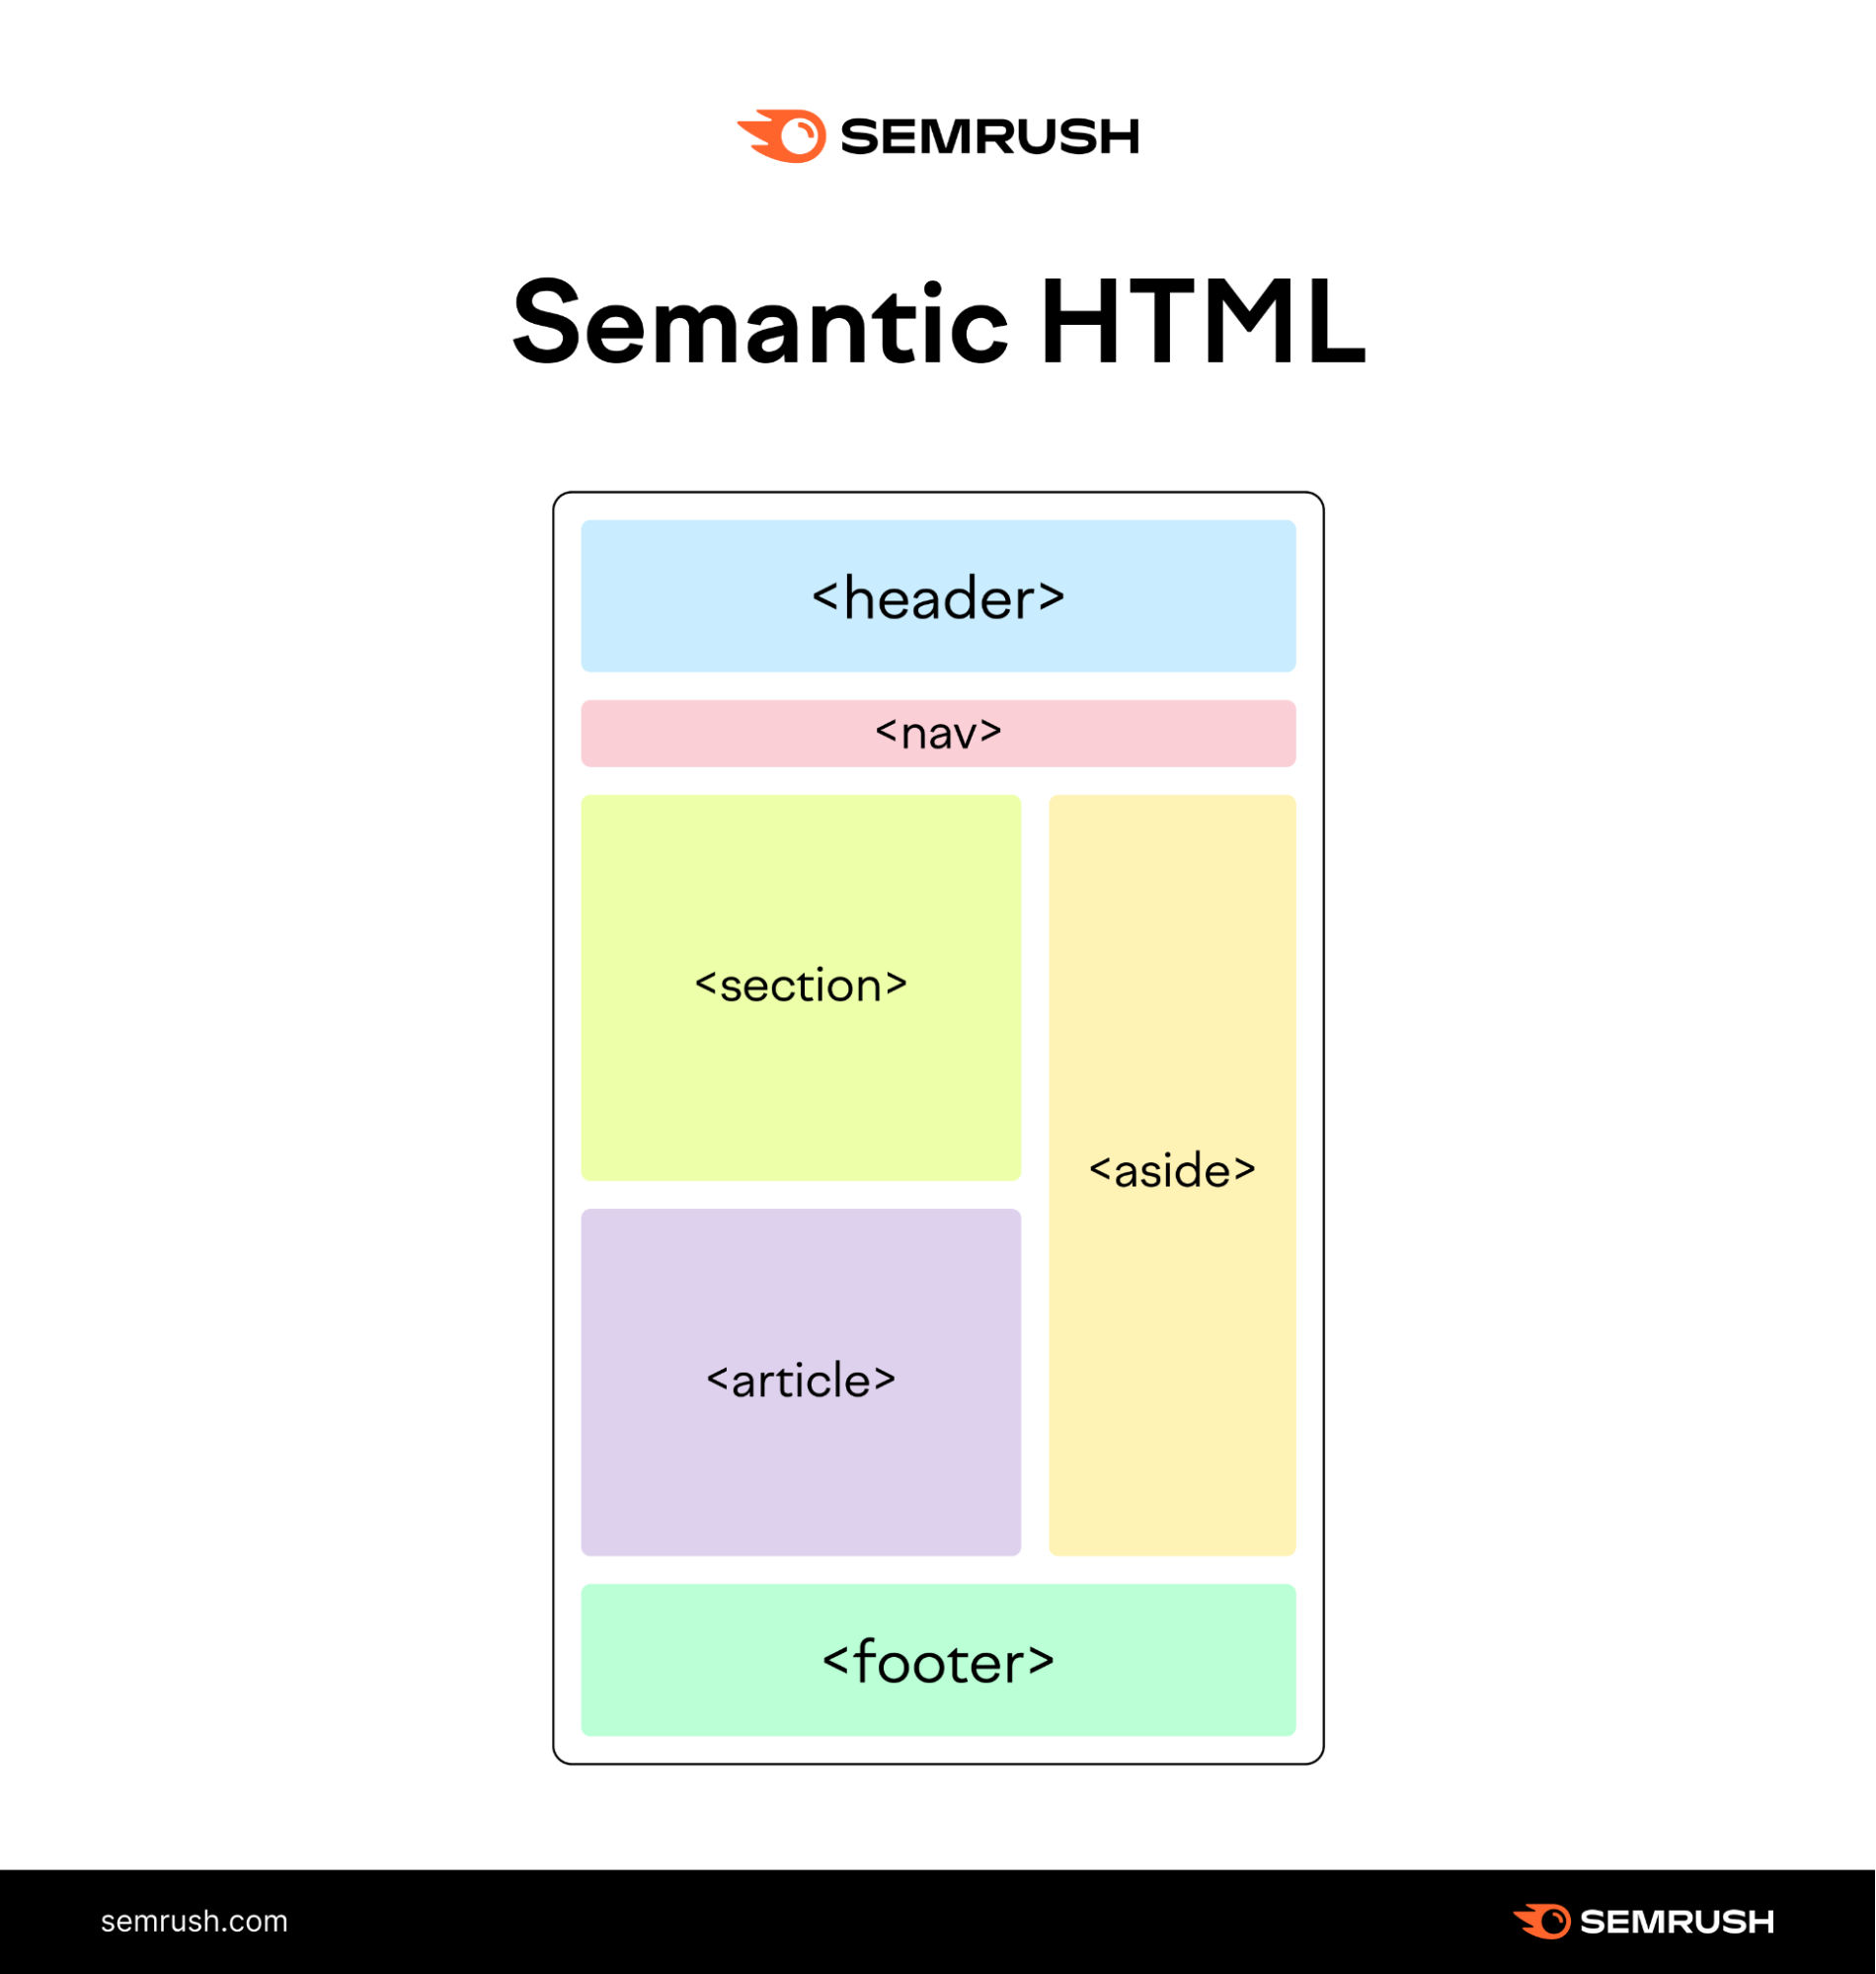
Here are the key players and their roles:
<header>: Contains introductory content for a page or a section. This is usually where you'll find the site logo, the main title, and the primary navigation.<nav>: Specifically designed to wrap a block of major navigation links.<main>: This is for the central, unique content of your page. It's a critical landmark for accessibility, and there should only be one<main>element per page.<footer>: Found at the bottom of a page or section, it typically contains copyright information, contact details, and secondary links.<section>: Groups together a single part of a page that has a common theme. Think of it as a chapter. For example, on a landing page, "About Us," "Our Services," and "Testimonials" could all be separate<section>s.<article>: Represents a complete, self-contained piece of content that could, in principle, be distributed and reused independently. The most classic example is a blog post, a news story, or a forum post.
article vs. section: What's the Difference?
The distinction between <article> and <section> can be tricky for beginners.
- Use
<article>when the content makes sense on its own (like a blog post you could share in an RSS feed). - Use
<section>to group related content together as part of a larger whole. A homepage might have<section>s for "New Products" and "Customer Reviews." Inside the "New Products" section, each product could be an<article>.
Let's see how an expert, Dave Gray, clarifies this.
Semantic HTML Tags | HTML5 Semantic Elements Tutorial
This video provides a clear discussion on the difference between <article> and <section> and shows how they can be nested.
Watch the segment from Article vs. Section. He explains the nuance and then demonstrates how you can nest <section> elements inside an <article> to further organize content, all while maintaining the proper heading hierarchy.
Putting It All Together: A Practical Walkthrough
Now it's time to see how these elements are used to structure a real document. The following reading from Noble Desktop provides a complete, hands-on exercise where you'll take an unstructured document and add the correct semantic tags.
HTML Semantic Elements | Free HTML & CSS Tutorial
This tutorial is a step-by-step guide to applying the semantic elements we've just discussed. Following along will solidify your understanding.
We will work through this article in parts. First, read the brief introductions in the overview and The Header. This sets the stage. Next, read the sections on Nav and Article Elements. These define the navigation and main content blocks. Continue with the explanations for the Aside and Footer elements, which cover complementary content and page-end information. Read about the <section> element and the crucial distinction between Section Vs. Article. Finally, read about The Main Element. This explains the role of the primary content container. As you read, try to visualize how these tags would map to a design you've created in Figma. The <header> is your top navigation bar component, the <article> is your blog post card, and the <footer> is your standard footer component.
Your Turn: Structure a Portfolio Page
Let's apply what you've learned. You don't need to write any code in an editor yet. Just think through the structure and write it down as plain text.
Imagine you are building the homepage of your new portfolio website. The page has the following parts:
- A header with your logo and navigation links ("Home," "About," "Contact").
- A main area that includes:
- A "hero" section with a welcome message.
- A "Projects" section that will showcase your work.
- An "About Me" section with a brief bio.
- A footer with your social media links and a copyright notice.
Task: How would you structure this page using the semantic elements <header>, <nav>, <main>, <section>, and <footer>? Write out the tag structure, nesting them appropriately. Don't worry about the actual content (text, images, etc.) for now—just the structural "skeleton."
Take a few minutes to sketch this out. When you're ready, you can compare your structure to the solution below.
View a possible solution
<header>
  <!-- Logo would go here -->
  <nav>
    <!-- Navigation links for Home, About, Contact -->
  </nav>
</header>

<main>
  <section>
    <!-- Hero section content -->
  </section>

  <section>
    <!-- "Projects" section content -->
    <!-- You might even use <article> for each project inside this section! -->
  </section>

  <section>
    <!-- "About Me" section content -->
  </section>
</main>

<footer>
  <!-- Social media links and copyright notice -->
</footer>
Conclusion
In this lesson, you took the first critical step from design thinking to engineering thinking. You learned that semantic HTML is the foundation for creating well-structured, accessible, and maintainable websites. By using tags like <header>, <main>, <nav>, and <footer>, you provide essential context that browsers, search engines, and assistive technologies rely on to interpret your content.
Key Takeaways:
- Structure First: Always analyze a design's logical structure before writing code.
- Semantics is about Meaning: Use HTML tags that describe the purpose of your content, not just its appearance.
- The Core Four: Most pages can be laid out with a combination of
<header>,<main>,<footer>, and<nav>. - Group with Purpose: Use
<section>for thematic groupings and<article>for self-contained, distributable content. - Accessibility is Not an Afterthought: Proper semantic structure is the first and most important step in building accessible websites.
In our next lesson, we will start filling in our structural "skeleton." You'll learn how to add the most common types of content to a page: text, lists, images, and links.