Hello! Welcome back to the course.
In our last lesson, we mastered async/await, a powerful syntax for writing clean, readable asynchronous code. We saw how it simplifies promise handling by allowing us to "pause" a function and wait for a result, all while using standard try...catch blocks for error handling.
Today, we'll put that knowledge to immediate use. We're going to learn one of the most fundamental skills for a web developer: fetching data from external APIs. This lesson focuses on using the built-in fetch() API to make GET requests and process the JSON data that comes back. This is how web applications get everything from weather updates and stock prices to user profiles and news articles.
What is an API and Why Do We Fetch?
In web development, an API (Application Programming Interface) is often a set of rules and protocols that allows one piece of software to interact with another. A REST API is a common type that allows us to request data from a server over the web using standard HTTP methods.
The fetch() function is the modern JavaScript tool for making these requests. It's built into all modern browsers, and it's based on Promises, making it a perfect fit for the async/await syntax you just learned.
Making a Basic GET Request
The simplest fetch call takes one argument: the URL of the API endpoint you want to get data from.
However, fetch has a two-step process for getting data, which can be tricky at first.
- Calling
fetch()starts the request and returns a Promise. - When that Promise resolves, it gives you a
Responseobject, not the final data. This object contains metadata about the response, like the HTTP status and headers. - To get the actual data, you need to call a method on the
Responseobject, such as.json(), to parse the response body. This method also returns a Promise!
Let's watch a short video that introduces fetch and demonstrates this two-step process with async/await.
Fetch API - JavaScript Tutorial for beginners
This clip from the 'Fetch API' tutorial by ColorCode clearly explains the basic request/response model and shows how to get JSON data from the response.
Please watch from the beginning until 8:20. Pay close attention to how await is used twice: once for fetch() and a second time for response.json().
As you saw, the Response object gives you a lot of information.
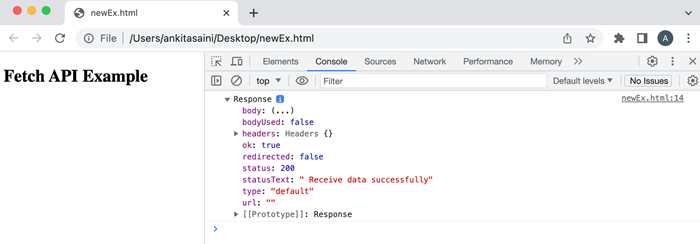
The entire process is beautifully illustrated by the diagram below. The key takeaway is the two-promise chain: one for the network request itself, and a second for parsing the body of the response.

Putting it all together, the standard async/await pattern for fetching JSON looks like this:
async function getSomeData(url) {
  // We'll add error handling in the next section
  const response = await fetch(url);
  const data = await response.json();
  console.log(data);
}
The Most Important Part: Handling Errors Correctly
Here's a critical detail about fetch() that trips up many developers: fetch() only rejects its promise if there is a network failure.
- If you lose your internet connection, the promise will
reject, and yourcatchblock will run. - However, if the server responds with an error code like
404 Not Foundor500 Internal Server Error, thefetch()promise will resolve successfully.
This means you are responsible for checking the HTTP status of the response to see if the request was actually successful. The easiest way to do this is with the response.ok property, which is true for any successful status code (in the 200-299 range).
Let's dive into the MDN documentation, the definitive source for web APIs, to formalize this concept.
Using the Fetch API - MDN Web Docs
The article 'Using the Fetch API' from MDN Web Docs is an essential read. We'll focus on the sections that explain how to handle the response and check its status.
Read the section titled 'Handling the response'. Pay special attention to the subsections 'Checking response status' and 'Reading the response body'. This will solidify the pattern for robust error checking.
Based on this, our robust pattern for fetching data becomes:
async function getSomeData(url) {
  try {
    const response = await fetch(url);

    // Check if the response was successful
    if (!response.ok) {
      // If not, throw an error with the status
      throw new Error(`HTTP error! Status: ${response.status}`);
    }

    const data = await response.json();
    console.log(data);

  } catch (error) {
    // This will catch network errors and the error we threw above
    console.error("Could not fetch data:", error);
  }
}

// Example of a bad request that our code will handle
getSomeData('https://pokeapi.co/api/v2/pokemon/this-does-not-exist');
Test your understanding!
Consider the robust getSomeData function above. What would be logged to the console in the following two scenarios?
- Your computer is disconnected from the internet when you call
getSomeData('https://pokeapi.co/api/v2/pokemon/ditto'). - Your computer is connected to the internet, but you call
getSomeData('https://pokeapi.co/api/v2/pokemon/spongebob').
Show answer
-
Scenario 1 (No Internet): The
fetch()call itself will fail due to a network error. The promise will reject, and thecatchblock will execute. The console will log something like:Could not fetch data: TypeError: Failed to fetch. -
Scenario 2 (Bad URL): The
fetch()call will succeed because it successfully connects to the server. However, the server will respond with a404 Not Foundstatus. Ourif (!response.ok)check will betrue, causing us tothrow new Error(...). This error is then caught by thecatchblock. The console will log:Could not fetch data: Error: HTTP error! Status: 404.
Practical Application: Fetching Pokémon Data
Now let's apply this to a small, practical project. Since your goal is to build web applications, seeing how fetch interacts with the user interface is a great next step.
The following video walks through building a tiny app that fetches Pokémon data based on user input and displays the Pokémon's image (its "sprite"). This will give you a preview of DOM manipulation, which we'll cover in the next module.
How to FETCH data from an API using JavaScript ↩️
This video from Bro Code, 'How to FETCH data from an API using JavaScript', demonstrates everything we've learned in a fun, interactive example.
Please watch from 6:20 to the end. The first part (from 6:20) shows the async/await implementation with error handling, which will be a great review. The second part (from 8:54) builds the interactive HTML page. Don't worry about memorizing the DOM manipulation code; focus on how fetch is used to get and display dynamic data.
This project is a perfect example of the "80/20" principle you value: a simple fetch call is the 20% of effort that provides 80% of the dynamic functionality in many web apps.
Conclusion
You've just learned a cornerstone of modern web development. By combining the power of async/await with the fetch() API, you can now retrieve data from countless services across the web and start building truly dynamic applications.
Key Takeaways:
- The
fetch()API is the standard for making HTTP requests in JavaScript. - Fetching data is a two-promise process: first
fetch(url)resolves to aResponseobject, thenresponse.json()resolves to the actual data. - Error handling is crucial:
fetch()only fails on network errors. You must always checkresponse.okto handle HTTP errors like 404s or 500s. - The standard pattern combines
async/awaitwith atry...catchblock and anif (!response.ok)check for robust data fetching.
In our next lesson, we'll cover the other side of the coin: sending data to an API using POST requests. This will enable us to create new resources on a server, a key step toward building full-stack applications.