Hello! Welcome to the very first lesson in your journey to creating your wedding dress. I'm excited to get started with you.
This course is designed to take you from the foundational skills of sewing all the way to the final press of your custom-made gown. Your background in product design, with its emphasis on prototyping, iteration, and systems thinking, will be a significant asset throughout this process. We'll be applying that same mindset to garment construction: testing, refining, and building with precision.
Today, we're starting with a crucial, yet often overlooked, foundation: sewing machine tension. Just as a designer calibrates their tools before starting a project, a sewer must master tension to ensure every stitch is strong, balanced, and beautiful. By the end of this lesson, you will be able to identify and adjust the tension settings on your sewing machine for different fabric weights—a skill that will be vital when you work with both the structured materials for your bodice and the delicate sheer fabrics for your skirt.
1. Understanding the "Why": The Anatomy of a Perfect Stitch
At its core, sewing machine tension is a balancing act. Your machine uses two threads: a top thread (from the spool) and a bottom thread (from the bobbin). For every stitch, the needle pushes the top thread down through the fabric, where it loops around the bobbin thread. This creates a lockstitch.
When the tension is perfectly balanced, this "lock" or knot happens exactly in the middle of your fabric layers, completely hidden from view. The stitch looks identical on both the top and the bottom, and the fabric lies perfectly flat. This is what creates a strong, professional-looking seam.
To visualize this concept, let's start with a short video. It uses a simple cardboard model to brilliantly explain how a lockstitch is formed and what happens when the tension is off.
Sewing machine tension - what it is and how to adjust it. Understanding what's happening is the key
Watch this segment from Pretty Simple Sara's video, 'Sewing machine tension - what it is and how to adjust it.' It provides an excellent visual analogy for the lockstitch mechanism.
Please watch from the beginning until timestamp 02:22. Focus on how the top and bottom threads are meant to interlock in the middle of the 'fabric' layers.
This diagram provides a clear, simplified visual of what you're aiming for and what to avoid.
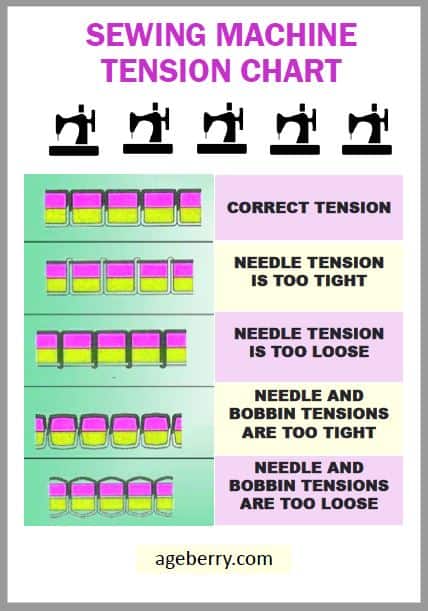
2. Identifying Tension Problems: What Your Stitches Are Telling You
When the tension is imbalanced, your stitches will give you clear visual cues. There are two primary problems you'll encounter with upper thread tension:
- Upper Tension is Too Loose: The bobbin thread wins the "tug-of-war" and pulls loops of the top thread down to the underside of the fabric.
- Upper Tension is Too Tight: The top thread wins the "tug-of-war" and pulls dots or loops of the bobbin thread up to the top side of the fabric.
This next image shows what these issues look like on actual fabric samples.

For a quick reference, the article "Sewing Machine Tension Settings Made Simple" has an excellent diagnostic table.
Sewing Machine Tension Settings Made Simple
Please read the first part of this article from Linda's. It clearly defines a perfect stitch and provides a handy table for diagnosing issues.
Read the sections 'Demystifying Your Tension Dials,' 'The Anatomy of a Perfect Stitch,' and pay close attention to the table under 'Quick Guide to Diagnosing Stitch Tension.' This table is your go-to reference for troubleshooting.
3. The "Debug" Phase: What to Check Before You Adjust the Dial
Here is where your product design mindset comes directly into play. Before you assume a core feature is broken (the tension mechanism), you must first check for simple "bugs" or user errors. In sewing, most apparent tension issues are actually caused by something much simpler.
Always run through this checklist first:
- Re-thread the Machine: This solves the vast majority of problems. Completely unthread both the top thread and the bobbin and re-thread them carefully according to your machine's manual. Crucially, always thread the top thread with the presser foot UP. This opens the tension discs, allowing the thread to seat properly between them.
- Change the Needle: A dull, bent, or incorrect type of needle can cause skipped stitches and puckering, which look like tension problems. Start every new project with a fresh needle.
- Clean Your Machine: Lint and dust can build up in the bobbin case and along the thread path, creating drag on the thread and mimicking the effect of tight tension. A quick brush-out can work wonders.
This video segment reinforces the importance of this pre-adjustment routine.
Sewing machine tension - what it is and how to adjust it. Understanding what's happening is the key
Let's return to the Pretty Simple Sara video. This part explains why re-threading is the first step and shows where the tension discs are located.
Watch from 02:22 to 04:34. Notice her emphasis on re-threading and cleaning as the first troubleshooting steps.
Test your understanding!
You are sewing a seam and notice messy loops of thread on the bottom of your fabric. What is the very first thing you should do?
Show answer
The first thing you should do is check for a simple "bug." Raise the presser foot, completely unthread the top thread, and re-thread the machine carefully. The loops on the bottom indicate that the upper tension is too loose, and the most common cause is that the thread is not seated correctly in the tension discs.
4. The Systematic Approach: How to Test and Adjust Tension
Once you've ruled out the simple fixes, it's time to adjust the tension dial. We will approach this systematically, creating a "prototype" or a test sandwich to find the perfect setting before touching our final fabric.
The process is methodical:
- Create a Test Sandwich: Cut two small scraps of your project fabric and place them together, just as they would be in a seam.
- Set to Baseline: Set your upper tension dial to the machine's default or middle setting (usually "Auto," 4, or 5).
- Use Contrasting Thread: For testing, it's helpful to use a different color thread in the bobbin than on top. This makes it much easier to see which thread is pulling through.
- Stitch, Adjust, Repeat: Sew a line of stitches for a few inches. Then, turn the tension dial down one full number (e.g., from 4 to 3) and sew another line parallel to the first. Turn it up one number from the baseline (e.g., to 5) and sew a third line.
- Analyze the Results: Examine your test swatch. Look at the top, bottom, and even pull on the seam. The line with the smoothest, most identical appearance on both sides has the correct tension.
The following resource provides a detailed guide to this testing process and, most importantly, explains how tension relates to fabric weight—which is key for your project.
Sewing Machine Tension Settings Made Simple
Please read these sections from the Linda's article. They cover the practical steps for testing and explain the logic of adjusting for different fabric weights.
Read the sections 'How to Test and Adjust Your Tension' and 'Matching Tension to Fabric and Thread.' The table 'Tension Starting Points for Common Fabrics' will be your guide. Take special note of the recommendations for 'Sheer/Delicate' fabrics like organza and chiffon, as this is directly applicable to your skirt.
Your First Practical Exercise: Building a Tension Library
Now it's time to put this theory into practice with your own machine. This exercise will help you get a feel for your machine's behavior and build a physical reference you can use throughout this course.
Estimated time: 30 minutes
Your Task:
- Gather Scraps: Find three different types of woven fabric scraps you have at home. Aim for a variety of weights:
- Lightweight: Something like cotton voile, lawn, or even an old polyester lining. This will simulate your sheer skirt layers.
- Medium-weight: Quilting cotton, linen, or muslin. This is a good all-purpose baseline.
- Heavyweight: Denim, canvas, or twill. This simulates a potential structured bodice fabric.
- Prepare Your Machine: Clean the bobbin area and insert a new, universal needle (size 80/12 is a good start). Wind a bobbin with a thread color that contrasts with your top thread.
- Conduct the Test: For each of the three fabric types, create a test sandwich and follow the systematic adjustment process described in section 4.
- Start at your machine's middle tension setting.
- Sew a test line.
- Adjust the dial up and down, sewing a new line for each setting. Keep going until you see clear examples of "too loose" and "too tight."
- Create Your Library:
- Take a sheet of paper for each fabric type.
- Cut out your test swatches and tape them to the paper.
- Label each line of stitching with the tension number you used.
- Circle or star the setting that produced the most balanced stitch.
This tangible library will be an invaluable reference, removing guesswork as you switch between the different components of your dress.
Conclusion and Next Steps
Well done! You've just mastered one of the most fundamental skills in sewing. Understanding how to diagnose and control tension is the bedrock of quality construction.
Key Takeaways from Today's Lesson:
- A balanced stitch forms a lock that is hidden between the fabric layers.
- Loops on the bottom mean the upper tension is too loose; dots of thread on top mean it's too tight.
- Always follow the "debug" checklist (re-thread, new needle, clean machine) before you adjust the tension dial.
- The golden rule is to always test on a scrap of your actual project fabric.
- As a general rule: use lower tension for lightweight fabrics and higher tension for heavyweight fabrics.
In our next lesson, we will build directly on this foundation. With your newfound ability to create a perfect stitch, you'll be ready to learn how to execute straight seams with consistent seam allowances, the next step in building the components of your gown.