Hello! Welcome back to our work on your wedding dress.
In our last session, you expertly basted your underlining and sheer overlay skirts together at the waist, transforming multiple delicate layers into a single, manageable unit. You now have the two primary components of your gown: the structured bodice and the multi-layered skirt.
Today's lesson is the final, crucial preparatory step before we join them. Our learning outcome is to staystitch the waistline edges of the bodice and the multi-layered skirt to prevent stretching. This is a non-negotiable step in high-quality garment construction. Think of it as reinforcing a critical, load-bearing joint in a structure before the final assembly. It ensures the waistline, which is a curved edge under stress, maintains its precise shape and doesn't distort under the weight of your beautiful skirt.
1. The "Why": Understanding Fabric Grain and Stretching
Before we pick up a needle and thread, it's essential to understand why staystitching is so important. The stability of a woven fabric depends entirely on its grain. Edges cut along the stable lengthwise or crosswise grain don't stretch much. However, any edge cut at an angle—on the bias—has inherent stretch. The waistline of your bodice and skirt is a curve, meaning much of it is on a bias grain.
To get a foundational understanding of this principle, let's watch an expert explanation.
Daryl Lancaster for Threads Magazine provides a superb explanation of fabric grain and its direct relationship to staystitching.
Please watch the first part of the video, from the beginning to 03:18. Focus on the explanation of warp, weft, and bias, and how any edge not on the straight grain is subject to stretching.
Now that you understand the theory, let's see a dramatic visual of the consequences. Handling the fabric during construction—even just moving it from the table to the machine—can be enough to distort an unprotected edge.
WHAT IS STAYSTITCHING? And why you don’t want to skip this crucial step in sewing!
This video from Evelyn Wood provides a powerful side-by-side comparison of a staystitched edge versus an unstitched one.
Watch the segment from 06:35 to 09:41. Observe how easily the unstitched curved edge becomes wavy and distorted, while the staystitched edge remains perfectly stable. This is exactly what we are trying to prevent.
2. The "How-To": The Rules of Staystitching
Staystitching is precise and follows a few key rules. Getting these right is what separates an amateur finish from a professional one.
Rule 1: Placement and Stitch Type
Staystitching is a permanent stitch that remains in the garment. Therefore, it must be placed inside the seam allowance where it won't be seen.
- Placement: Stitch inch ( mm) away from your main seamline, towards the raw edge. For a standard -inch ( cm) seam allowance, you will stitch at inch ( cm) from the raw edge.
- Stitch Length: Use a normal stitch length suitable for your fabric (e.g., 2.0-2.5 mm). Do not use a long basting stitch. This stitch provides permanent stability.
- Thread: Use a quality all-purpose or cotton thread.
You may find some tutorials suggesting a long stitch length, but for a structural seam like a waistline, a permanent, shorter stitch provides the necessary long-term support.
Rule 2: The Critical Role of Direction
As demonstrated in the first video, the direction you stitch in is paramount. Stitching "against the grain" can actively stretch the fabric, defeating the purpose. The rule of thumb is to stitch from a wider or higher point to a narrower or lower one.
This concept is explained brilliantly in the Threads Magazine video.
Let's return to the 'Staystitching Basics' video to understand the physics of directional stitching.
Watch the section from 06:13 to 08:31 for a physical demonstration of why stitching direction matters. Then, watch the 'cat analogy' recap from 12:38 to 13:35. This analogy is a memorable way to think about stitching 'with the grain'.
For a curved waistline, this means you will stitch from the side seams in towards the center. You will not stitch all the way around in one continuous line.
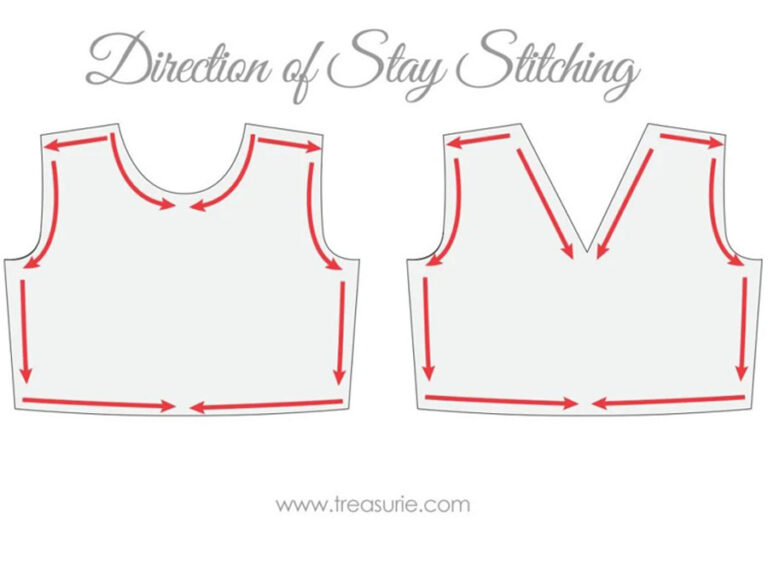
3. Practical Application: Staystitching Your Gown
It's time to apply these principles to your bodice and skirt.
A. Staystitching the Bodice Waistline
- Prepare: Place your assembled bodice on your work surface, right side up.
- Stitch from Left Side to Center Back: Begin stitching at the left side seam, inch from the raw edge. Stitch towards the center back and stop. Do not backstitch.
- Stitch from Right Side to Center Back: Repeat the process on the other side, starting at the right side seam and stitching towards the center back.
- Stitch from Left Side to Center Front: Flip the bodice. Begin at the left side seam and stitch towards the center front.
- Stitch from Right Side to Center Front: Repeat for the final section, starting at the right side seam and stitching to the center front.
You will now have four separate lines of staystitching stabilizing the bodice waistline.
B. Staystitching the Skirt Waistline
Your multi-layered skirt unit, with its sheer organza and chiffon, is particularly vulnerable to stretching. The basting you did last lesson helps, but staystitching is what provides the final, locked-in stability.
Tips For Sewing With Chiffon Fabric - The Creative Curator
The article 'Tips For Sewing With Chiffon Fabric' reminds us that 'Stay stitching is your friend!' when working with delicate fabrics. This reinforces the importance of this step for your sheer layers.
Briefly review 'Stabilizing Tip 2' and 'Stabilizing Tip 3' in the 'Sewing Chiffon' section. This reinforces the point about staystitching and using an appropriate stitch length and tension.
The process for the skirt is identical to the bodice:
- Prepare: Lay your multi-layered skirt unit flat, ensuring all layers are smooth.
- Stitch in Four Sections: Just as you did with the bodice, stitch the skirt waistline in four separate passes, always starting from the side seams and stitching towards the center front and center back. Maintain your -inch distance from the raw edge. Be gentle and guide the fabric, letting the machine do the work to avoid stretching the layers as you sew.
To solidify these directional rules for different pattern pieces, take a look at the following resource.
How to Staystitch | Video - Threads Magazine
This 'How to Staystitch' article from Threads Magazine includes an incredibly helpful Q&A section in the comments that clarifies stitching direction for different garment parts.
Read through the comments, specifically the detailed answer from Carol J. Fresia, Threads Senior Technical Editor. She explains the 'why' behind stitching up on a skirt side seam versus down on a bodice side seam, all based on the 'wide to narrow' principle. This will deepen your understanding for future projects.
Conclusion
Excellent work. You have just completed a small but profoundly important step that safeguards the integrity of your gown. By meticulously staystitching the waistlines of both the bodice and the skirt, you have ensured they are stable, secure, and ready for a perfect assembly.
Key Takeaways:
- Staystitching is a line of permanent, normal-length stitches sewn inside the seam allowance to prevent curved or bias-cut edges from stretching.
- The direction of stitching is critical: always sew with the grain, typically from a higher/wider point to a lower/narrower point.
- For waistlines, this means stitching in sections from the side seams toward the center front and center back.
In our next lesson, we will reach one of the most exciting milestones of this project: you will align and stitch the skirt to the bodice at the waistline. Thanks to the preparation you've done today, those two stabilized edges should match beautifully, making the process smooth and precise.