Hello! Welcome to your next lesson in the "Large Language Models and Generative AI" module.
In our last session, we explored the theory behind how LLMs generate text. We discussed autoregressive generation and the various decoding strategies—like greedy search, sampling with temperature, and top-p—that models use to pick the next word. You learned why a model's output can be either highly creative or strictly deterministic.
Today, we'll bridge that theory with practice. Our goal is to use the OpenAI API to generate text completions and chat responses. This is a fundamental skill for any AI developer, as it's the primary way to integrate powerful models like GPT-4 into your applications. We will cover:
- Setting up your environment to use the OpenAI API.
- Making API calls using the Python library.
- Using key parameters like
temperatureto control the model's output. - Structuring conversations to build interactive chatbots.
1. What is an API and Why Use OpenAI's?
Before we write any code, let's clarify what an API is and why it's so powerful. An API (Application Programming Interface) is a set of rules that allows different software applications to communicate with each other. In our case, it allows our Python code to send requests to OpenAI's powerful language models and receive their generated text in response.

While you've likely used web interfaces like ChatGPT, the API offers far more control and flexibility, which is essential for building custom applications.
The OpenAI (Python) API | Introduction & Example Code
The video 'The OpenAI (Python) API | Introduction & Example Code' provides a great analogy for what an API is and highlights the key advantages of using the API over a web interface.
Watch the first two sections of this video: What is an API? (00:48 - 02:27): This provides a simple, clear analogy to help you build an intuitive understanding. Why use the API over ChatGPT? (03:19 - 05:22): Pay close attention to how the features mentioned here—like customizable system messages and adjustable parameters (max_tokens, temperature)—directly relate to the decoding strategies we discussed in the previous lesson.
2. Setting Up Your Environment
To use the OpenAI API, you need two things: the openai Python library and an API key.
Step 1: Install Libraries
First, you'll need to install the necessary Python packages. We'll use openai for accessing the API and python-dotenv to securely manage our API key.
Open your terminal and run:
pip install openai python-dotenv
Step 2: Get Your API Key
An API key is a unique secret token that authenticates your requests to the OpenAI servers.
The OpenAI (Python) API | Introduction & Example Code
This next segment from the same video walks you through creating an account, setting up billing, and generating your secret API key. It's crucial to follow these steps carefully.
Watch the 'Setup' section (07:42 - 11:15). Follow along on the OpenAI website (platform.openai.com) to create your account and get your key. I strongly recommend setting a usage limit to prevent any surprise charges.
Step 3: Secure Your API Key
Never hard-code your API key directly in your Python scripts. If you share your code or commit it to a public repository like GitHub, your key will be exposed. The best practice is to use an environment variable.
OpenAI API With Python Tuorial 1-ChatCompletion API and Completion API
Krish Naik's tutorial provides a clear, practical demonstration of how to set up your project to use environment variables for your API key. This is a standard industry practice you should adopt.
Watch the 'Environment Setup' portion of this video (01:41 - 07:24). The key steps are: Create a file named .env in your project's root directory. Inside the .env file, add a line like this, replacing sk-... with your actual secret key: OPENAI_API_KEY="sk-..." You will then use the python-dotenv library in your code to load this key.
3. Making Your First API Call
The OpenAI library has evolved. The latest version (v1.0 and above) uses a slightly different, more object-oriented syntax. While many tutorials (including the videos above) use the older syntax, we will use the modern approach as it is the current standard.
Let's start with a basic request to generate a text completion. The modern way to do this is with the Chat Completion API, which is designed for conversational models like gpt-3.5-turbo and gpt-4 but is flexible enough for single-turn completions too.
The OpenAI API: Chat Completions - Medium
The article 'The OpenAI API: Chat Completions' provides excellent, up-to-date code examples using the modern syntax. We'll follow its structure.
Read the sections 'Setting Up the Environment' and 'Making Your First API Request'. Notice the code structure: from openai import OpenAI client = OpenAI() (this automatically looks for the OPENAI_API_KEY environment variable). response = client.chat.completions.create(...) This is the pattern we will use.
Here is a complete, runnable example. Create a Python file (e.g., app.py) in the same directory as your .env file.
import os
from openai import OpenAI
from dotenv import load_dotenv


# Load environment variables from .env file
load_dotenv()


# Initialize the OpenAI client
# The API key is read automatically from the OPENAI_API_KEY environment variable
client = OpenAI()

try:


    # Make the API call
    response = client.chat.completions.create(
        model="gpt-3.5-turbo",
        messages=[
            {"role": "user", "content": "What is the capital of France?"}
        ]
    )


    # Extract and print the response
    answer = response.choices[0].message.content
    print(f"Assistant: {answer}")

except Exception as e:
    print(f"An error occurred: {e}")
When you run this script, the openai client will create a request, send it to the gpt-3.5-turbo model, and print the assistant's reply.
4. Generating Chat Responses
The true power of the Chat Completion API comes from its ability to handle multi-turn conversations. To do this, you must manage the conversation history and send it with each new request.
The messages parameter is a list of dictionaries, where each dictionary represents one turn in the conversation. There are three main roles:
system: Sets the overall behavior of the assistant. This is where you give it a persona or high-level instructions. It's usually the first message.user: The input from the person interacting with the model.assistant: The model's previous responses.
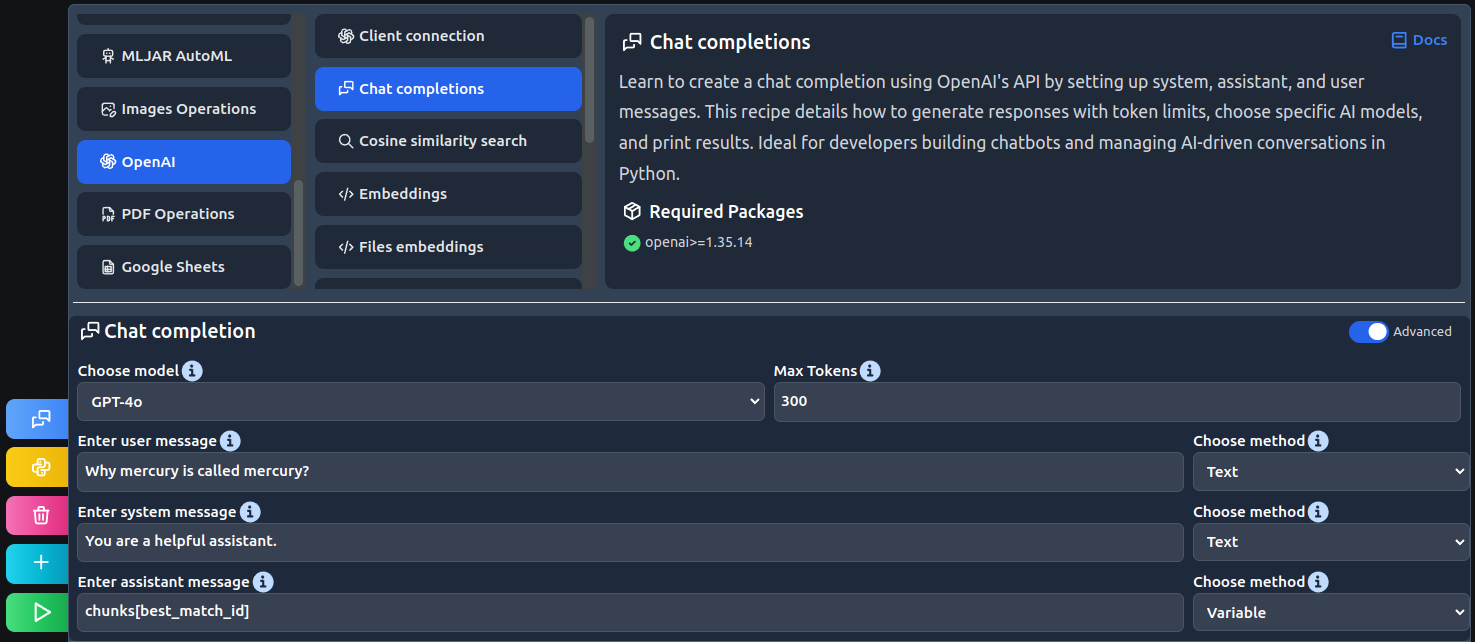
To continue a conversation, you simply append the last assistant response and the new user message to your messages list before making the next API call.
The OpenAI API: Chat Completions - Medium
The 'Multi-Turn Conversations' section of the Medium article provides a clear code example of how to maintain conversation history.
Read this section and study the code example. See how the messages list is appended with both the assistant's last reply and the new user question to maintain context for the follow-up query.
5. Controlling the Generation Process
Now, let's connect back to our previous lesson. The decoding strategies we discussed are controlled via parameters in the API call. The two most important are temperature and max_tokens.
temperature: Controls randomness. A value of0will make the output deterministic (less creative), while a higher value like1.5will make it more random and creative.max_tokens: Limits the length of the generated response. This helps control costs and ensures the response doesn't become excessively long.
The OpenAI (Python) API | Introduction & Example Code
Let's revisit the video by Shaw Talebi. This segment provides an excellent visual demonstration of how changing the temperature parameter drastically alters the model's output.
Watch the section on 'Input Parameters' (14:50 - 18:21). Pay close attention to the experiment where temperature is set to 0 and then to 2. This will give you a very concrete feel for how you can steer the model's behavior from predictable to highly creative.
Here's how you would modify our previous code to include these parameters:
response = client.chat.completions.create(
    model="gpt-3.5-turbo",
    messages=[
        {"role": "system", "content": "You are a poetic assistant, skilled in explaining complex programming concepts with creative flair."},
        {"role": "user", "content": "Explain what a variable is in Python."}
    ],
    temperature=0.8,  # A bit creative
    max_tokens=100    # Limit the response length
)
By adjusting the system message and the temperature, you can guide the model to produce a specific style of output.
Conclusion
You have now taken your first steps into practical Generative AI development. You've learned how to communicate with a state-of-the-art LLM from your own Python code and how to control its output.
Key Takeaways:
- API Setup: You know how to install the
openailibrary and securely manage your API key using a.envfile. - Chat Completion API: This is the modern, primary interface for interacting with OpenAI's models. You should use it for both single-turn completions and multi-turn chats.
- Message Roles: The
system,user, andassistantroles are crucial for structuring conversations and providing context to the model. - Controlling Output: You can apply the theoretical knowledge from the last lesson by using parameters like
temperatureandmax_tokensto shape the model's creativity and length.
Preview of the Next Lesson:
We've just scratched the surface of guiding the model. The content of your messages, especially the user and system prompts, is the most powerful tool you have. In the next lesson, we will dive into prompt engineering, where you'll learn techniques like zero-shot, few-shot, and role-playing to elicit precisely the responses you need from the model.