Hello! Welcome to the fifth lesson in our MLOps and Model Deployment module.
In our previous lessons, we've focused on the application code itself—building APIs with FastAPI, deploying models, and handling requests asynchronously. However, building the code is only half the battle. How do we ensure that every change we make is tested, reliable, and can be deployed smoothly and repeatably? Manually running tests and deploying code is slow, error-prone, and doesn't scale.
This is where automation comes in. Today, we'll dive into the heart of modern software development and MLOps: Continuous Integration and Continuous Deployment (CI/CD). Our goal is to learn how to create CI/CD workflows with GitHub Actions for testing and deployment. By the end of this lesson, you'll be able to automate the process of testing your code and preparing it for deployment every time you make a change.
1. What is CI/CD? The "Why" Behind Automation
Before we start writing code, let's understand the core concepts. CI/CD is a set of practices that automates the software delivery process.
- Continuous Integration (CI): The practice of developers frequently merging their code changes into a central repository. After each merge, an automated build and test sequence is run. The goal is to detect integration bugs early and ensure the main codebase is always stable.
- Continuous Deployment/Delivery (CD): The practice of automatically deploying every code change that passes the CI stage to a testing or production environment. This allows for rapid and reliable releases.
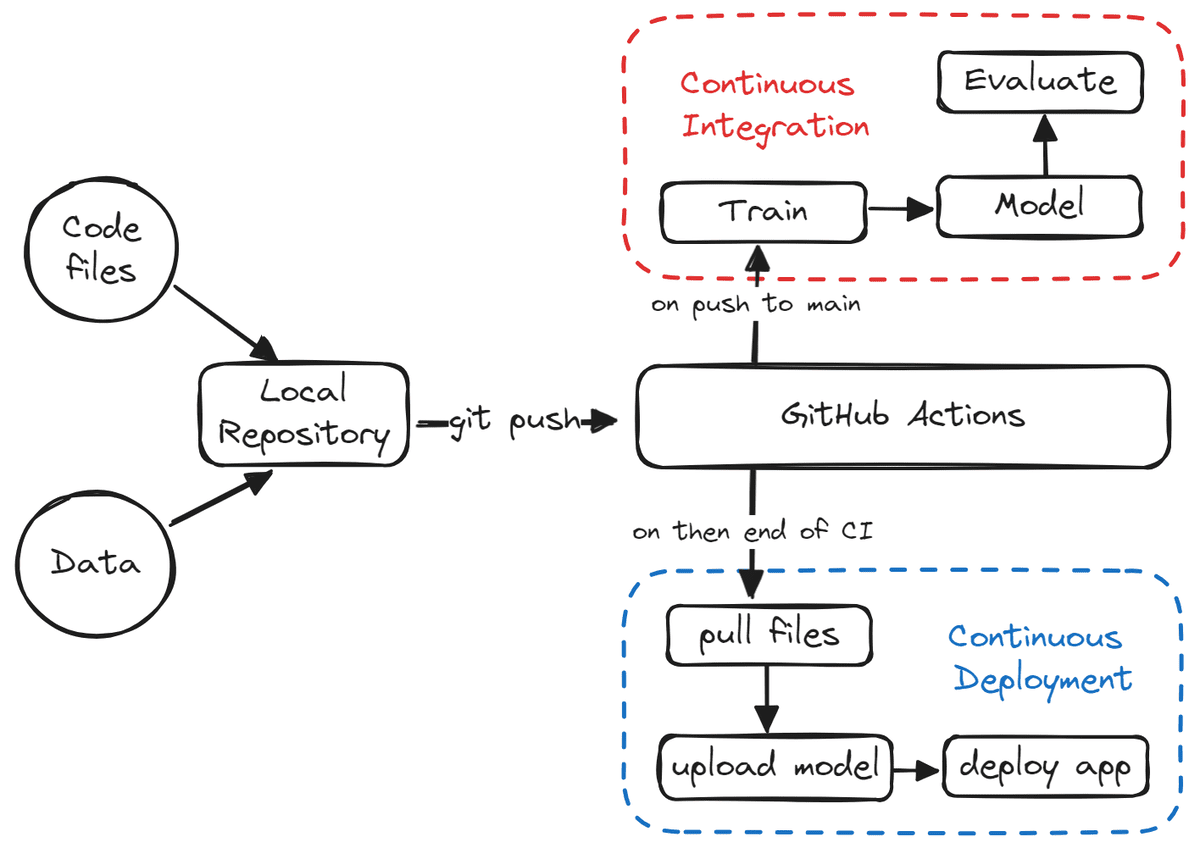
To get a clear and detailed understanding of these concepts, let's watch a video that explains them using a practical multi-developer project example.
MLOPS Github Action With CICD Pipeline One Shot Tutorial
This video by Krish Naik provides an excellent introduction to GitHub Actions, CI, and CD. It clearly explains why these practices are essential in a collaborative development environment.
Watch the first 25 minutes of the video (00:00 - 25:03). Focus on understanding: The difference between Git (version control system) and GitHub (code repository). The concept of Continuous Integration (CI): how multiple developers merge code, and automated tests prevent breaking the project. The concept of Continuous Deployment (CD): how code is automatically pushed through different environments (Dev, QA, Production) after passing tests.
2. The Anatomy of a GitHub Actions Workflow
GitHub Actions is the tool we'll use to implement our CI/CD pipeline. It allows us to define automated workflows directly within our GitHub repository. These workflows are defined in YAML files located in a special directory: .github/workflows/.
A workflow file has a few core components that you need to understand.
The Real Python article "Continuous Integration and Deployment for Python With GitHub Actions" provides a very clear breakdown of a workflow file's structure. We'll use it to learn the key terminology.
Please read the section "Exploring GitHub Workflows". It covers the three main parts of a workflow file: Triggers, Jobs, and Steps. Pay close attention to the purpose of each part and the concept of a runner.
To summarize the key components from the article:
- Workflow: The top-level automated process, defined in a single YAML file.
- Event (Trigger): The activity that starts a workflow. This can be a
pushto a branch, apull_request, a new Gittag, or even a scheduled time. - Job: A set of steps that execute on the same runner. A workflow can have one or more jobs, which can run in sequence or in parallel.
- Runner: A virtual machine hosted by GitHub (or self-hosted) that runs your jobs. You can choose different operating systems like Ubuntu, Windows, or macOS.
- Step: An individual task within a job. A step can either run shell commands (
run) or use a pre-packaged Action. - Action: A reusable piece of code that performs a complex but common task, like checking out your repository code (
actions/checkout) or setting up a specific version of Python (actions/setup-python). You use these with theuseskeyword.
3. Practical CI: Automating Python Tests with pytest
Now, let's build our first workflow. We'll create a CI pipeline that automatically runs our project's unit tests every time we push code to the repository. This provides immediate feedback on whether our changes have broken anything.
This practical demonstration will guide you from setting up a new repository to creating the Python application, writing tests, and finally, authoring the GitHub Actions workflow file to automate it all.
MLOPS Github Action With CICD Pipeline One Shot Tutorial
We'll continue with Krish Naik's video, which now transitions into a full-fledged practical demonstration. Follow along as he builds a simple Python application and sets up an automated testing workflow.
Watch from 45:30 to 1:07:48. This is a step-by-step guide, so feel free to pause and replicate the steps in your own GitHub account. Focus on: Creating the repository and the local project structure (src/, tests/). Writing a simple Python function and corresponding pytest test cases. Creating the .github/workflows/test.yml file. Understanding each line of the YAML file, especially the on, jobs, runs-on, and steps sections. Observing how the workflow automatically triggers after he pushes the code to GitHub.
Here is a breakdown of the key steps from the workflow file created in the video. This is a fundamental pattern you will use in almost every Python-based CI pipeline:
jobs:
  test:
    runs-on: ubuntu-latest
    steps:


      # 1. Check out the repository code so the workflow can access it
      - name: Checkout Code
        uses: actions/checkout@v3


      # 2. Set up a specific Python version
      - name: Set up Python
        uses: actions/setup-python@v4
        with:
          python-version: '3.8'


      # 3. Install project dependencies
      - name: Install dependencies
        run: |
          pip install -r requirements.txt


      # 4. Run the tests
      - name: Run Tests
        run: pytest
This simple workflow ensures that your test suite is executed in a clean environment for every single code push, giving you confidence in your code's quality.
4. Practical CD: Containerizing the Application
The "D" in CI/CD stands for Deployment. A modern and common deployment strategy involves containerizing your application with Docker. In a previous lesson, you learned how to do this manually. Now, let's automate it.
We'll extend our workflow to build a Docker image from a Dockerfile and push it to a container registry like Docker Hub. This creates a versioned, portable artifact that is ready to be deployed to any server.
A crucial part of this process is handling credentials securely. You should never hardcode passwords or API tokens in your workflow files. GitHub provides a feature called Secrets for this purpose.
GitHub Actions Tutorial - Basic Concepts and CI/CD Pipeline with Docker
The video by TechWorld with Nana provides a fantastic tutorial on integrating Docker into a CI/CD pipeline. It clearly explains how to use pre-built actions and manage secrets.
Watch from 24:46 to 31:52. Pay close attention to: The use of docker/build-push-action to simplify building and pushing the image. The concept of GitHub Secrets for storing the DOCKER_HUB_USERNAME and DOCKER_HUB_TOKEN. How to create secrets in your repository's settings. How to reference these secrets in the workflow file using the syntax ${{ secrets.YOUR_SECRET_NAME }}.
By adding this step, our CI/CD pipeline now automatically tests our code and packages our application into a deployable Docker image.

Conclusion
In this lesson, you've taken a massive step into the world of MLOps by learning to automate your development workflow. You've moved from manual processes to a reliable, repeatable CI/CD pipeline.
Key Takeaways:
- CI/CD is a set of practices for automating software integration, testing, and deployment.
- GitHub Actions is a powerful tool for creating CI/CD pipelines using YAML files that define workflows, events, jobs, and steps.
- A CI pipeline for a Python project typically includes checking out code, setting up Python, installing dependencies, and running tests with a tool like
pytest. - A CD pipeline often involves building a Docker image from your application code and pushing it to a container registry.
- Sensitive information like API tokens and passwords must be stored securely using GitHub Secrets.
Preview of the Next Lesson:
We've successfully automated the process of building and publishing a containerized version of our application. We now have a reliable artifact sitting in a container registry. The final piece of the puzzle is getting it to run on a server in the cloud. In our next lesson, we will deploy containerized applications to cloud platforms, taking the image we just built and running it on a service like AWS or Google Cloud Platform.