Hello! Welcome to the second lesson in our module on MLOps and Model Deployment.
In our last lesson, we mastered the art of containerizing an ML application with Docker. You learned how to package your code and all its dependencies into a portable image, solving the classic "it works on my machine" problem. This was a crucial first step in making our models deployable.
However, packaging an application raises a new, critical question: which model should we package? As you develop a model, you'll run countless experiments—tweaking hyperparameters, trying different algorithms, or using updated datasets. This process can quickly become chaotic, leaving you with dozens of notebooks and model files, with no clear record of which one performed best and why.
This lesson introduces the tool that brings order to this chaos. We will learn how to track experiments and model versions using MLflow, an open-source platform for managing the end-to-end machine learning lifecycle.
By the end of this lesson, you will be able to:
- Explain the challenges of manual experiment tracking.
- Log experiment parameters, metrics, and model artifacts using MLflow Tracking.
- Use the MLflow UI to compare the performance of different model runs.
- Register models and manage their lifecycle (e.g., from Staging to Production) using the MLflow Model Registry.
- Load a specific model version from the registry for use in an application.
1. The Chaos of Machine Learning Experimentation
Before we dive into the solution, it's important to understand the problem. Imagine you're working on a classification problem. You might try a Logistic Regression model, then a Random Forest with 50 trees, then another with 100 trees, and then an XGBoost model. Each experiment has different code, parameters, and results. How do you keep track of it all?
Manually tracking this in spreadsheets or by naming files like final_model_v2_really_final.pkl is not scalable, reproducible, or collaborative.
MLFlow Tutorial | ML Ops Tutorial
To see a great illustration of this problem, let's watch the beginning of this tutorial from codebasics. It perfectly captures the challenges a data science team faces without a proper tracking system.
Watch from the beginning until 07:23. Focus on how the data scientists in the video struggle to manage, compare, and reproduce their experiments, and how this leads to inefficiency and confusion.
This scenario highlights the need for a systematic approach. This is where MLOps tools like MLflow become indispensable.
2. Introducing MLflow: Your ML Lifecycle Companion
MLflow is an open-source platform designed to manage the entire machine learning lifecycle. For this lesson, we will focus on two of its most important components:
- MLflow Tracking: An API and UI for logging parameters, code versions, metrics, and artifacts when running your machine learning code. It provides a central place to record and query your experiments.
- MLflow Model Registry: A centralized model store for managing the lifecycle of your ML models, including versioning, stage transitions (e.g., staging, production), and annotations.
MLflow Experiment Tracking: The Ultimate Beginner's Guide
This article from Towards AI provides a great introduction to MLflow and its core components. It will give you a solid conceptual foundation before we start coding.
Read the 'Introduction' and 'What is MLflow?' sections. Pay close attention to the descriptions of the four essential elements, especially 'Tracking with MLflow' and 'MLflow Repository' (which is the Model Registry).
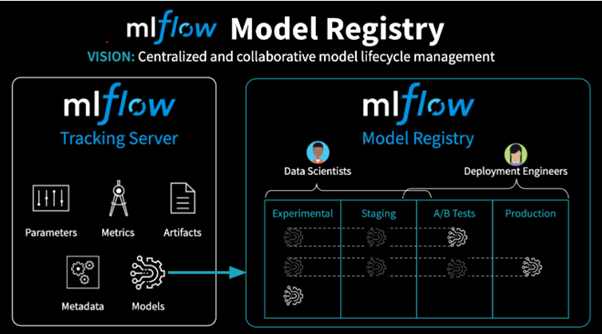
The diagram below shows how these components work together. The Tracking Server captures the details of every experiment, and the best models from those experiments can be promoted to the Model Registry for lifecycle management.
3. Hands-On: Tracking Experiments with MLflow
Let's get practical. We'll start by tracking a simple model training experiment.
Step 1: Installation and Setup
First, you'll need to install MLflow. Open your terminal and run:
pip install mlflow scikit-learn
Next, to view our experiments, we need to launch the MLflow Tracking UI. In your terminal, run the following command. This will start a local server, and by default, it will store all experiment data in a new mlruns directory in your current folder.
mlflow ui
Now, open your web browser and navigate to http://127.0.0.1:5000 (or http://localhost:5000). You should see the MLflow dashboard. Keep this tab open!
Step 2: Logging Your First Experiment
Create a Python file named train.py. This script will train a simple Random Forest classifier, but this time, we'll add MLflow logging.
# train.py
import mlflow
from sklearn.datasets import load_iris
from sklearn.ensemble import RandomForestClassifier
from sklearn.model_selection import train_test_split
from sklearn.metrics import accuracy_score


# Set the tracking URI to your local server
# This is optional if you run the script from the same directory as 'mlruns'
mlflow.set_tracking_uri("http://127.0.0.1:5000")


# Set a name for the experiment
mlflow.set_experiment("Iris Classification")


# Load and split data
X, y = load_iris(return_X_y=True)
X_train, X_test, y_train, y_test = train_test_split(X, y, test_size=0.2, random_state=42)


# Define parameters for our model
n_estimators = 100
max_depth = 5


# Start an MLflow run
with mlflow.start_run(run_name="RandomForest_Run_1"):
    print("Starting MLflow run...")


    # Log parameters
    mlflow.log_param("n_estimators", n_estimators)
    mlflow.log_param("max_depth", max_depth)
    print(f"Logged parameters: n_estimators={n_estimators}, max_depth={max_depth}")


    # Train the model
    model = RandomForestClassifier(n_estimators=n_estimators, max_depth=max_depth, random_state=42)
    model.fit(X_train, y_train)


    # Evaluate the model
    y_pred = model.predict(X_test)
    acc = accuracy_score(y_test, y_pred)


    # Log metrics
    mlflow.log_metric("accuracy", acc)
    print(f"Logged metric: accuracy={acc}")


    # Log the model itself as an artifact
    # The 'artifact_path' is the name of the folder inside the run's artifact directory
    # 'sk_model' is the model object
    mlflow.sklearn.log_model(sk_model=model, artifact_path="random-forest-model")
    print("Model logged as an artifact.")

print("Run completed.")
Now, run this script from your terminal:
python train.py
Go back to your MLflow UI in the browser and refresh the page. You should see:
- A new experiment named "Iris Classification" on the left sidebar.
- A new run named "RandomForest_Run_1" inside that experiment.
- Clicking on the run will show you the Parameters (
n_estimators,max_depth), the Metric (accuracy), and the Artifacts (a folder namedrandom-forest-modelcontaining the pickled model and other files).
You have just tracked your first experiment!
Step 3: Comparing Multiple Runs
The real power of MLflow shines when you compare different experiments. Let's modify our train.py script to run a few experiments with different hyperparameters.
# train.py (modified for multiple runs)
import mlflow
from sklearn.datasets import load_iris
from sklearn.ensemble import RandomForestClassifier
from sklearn.model_selection import train_test_split
from sklearn.metrics import accuracy_score

mlflow.set_tracking_uri("http://127.0.0.1:5000")
mlflow.set_experiment("Iris Classification")

X, y = load_iris(return_X_y=True)
X_train, X_test, y_train, y_test = train_test_split(X, y, test_size=0.2, random_state=42)


# A list of parameters to try
param_list = [
    {"n_estimators": 50, "max_depth": 3},
    {"n_estimators": 100, "max_depth": 5},
    {"n_estimators": 150, "max_depth": 7},
]


# Loop through the parameters and run an experiment for each
for i, params in enumerate(param_list):
    with mlflow.start_run(run_name=f"RandomForest_Run_{i+2}"):


        # Log parameters
        mlflow.log_params(params)


        # Train and evaluate
        model = RandomForestClassifier(**params, random_state=42)
        model.fit(X_train, y_train)
        y_pred = model.predict(X_test)
        acc = accuracy_score(y_test, y_pred)


        # Log metric
        mlflow.log_metric("accuracy", acc)


        # Log model
        mlflow.sklearn.log_model(model, "random-forest-model")

print("All runs completed.")
Run the modified script. Now, go back to the MLflow UI and refresh. You will see several new runs.
- Select all the new runs using the checkboxes.
- Click the "Compare" button.
This comparison view is incredibly powerful. You can see a table of all parameters and metrics side-by-side. You can also generate plots, like a parallel coordinates plot, to visualize how changing parameters affects your model's accuracy.
MLFlow Tutorial | ML Ops Tutorial
The codebasics video demonstrates this process of logging and comparing multiple runs very clearly. Watching this will solidify what you've just done.
Watch from 07:23 to 24:27. The first part covers logging a single experiment, which we've already done. The second part shows how to run multiple experiments in a loop and use the UI to compare them. Pay close attention to how he uses the scatter plot and table view to identify the best-performing model.
4. Hands-On: Managing Models with the MLflow Model Registry
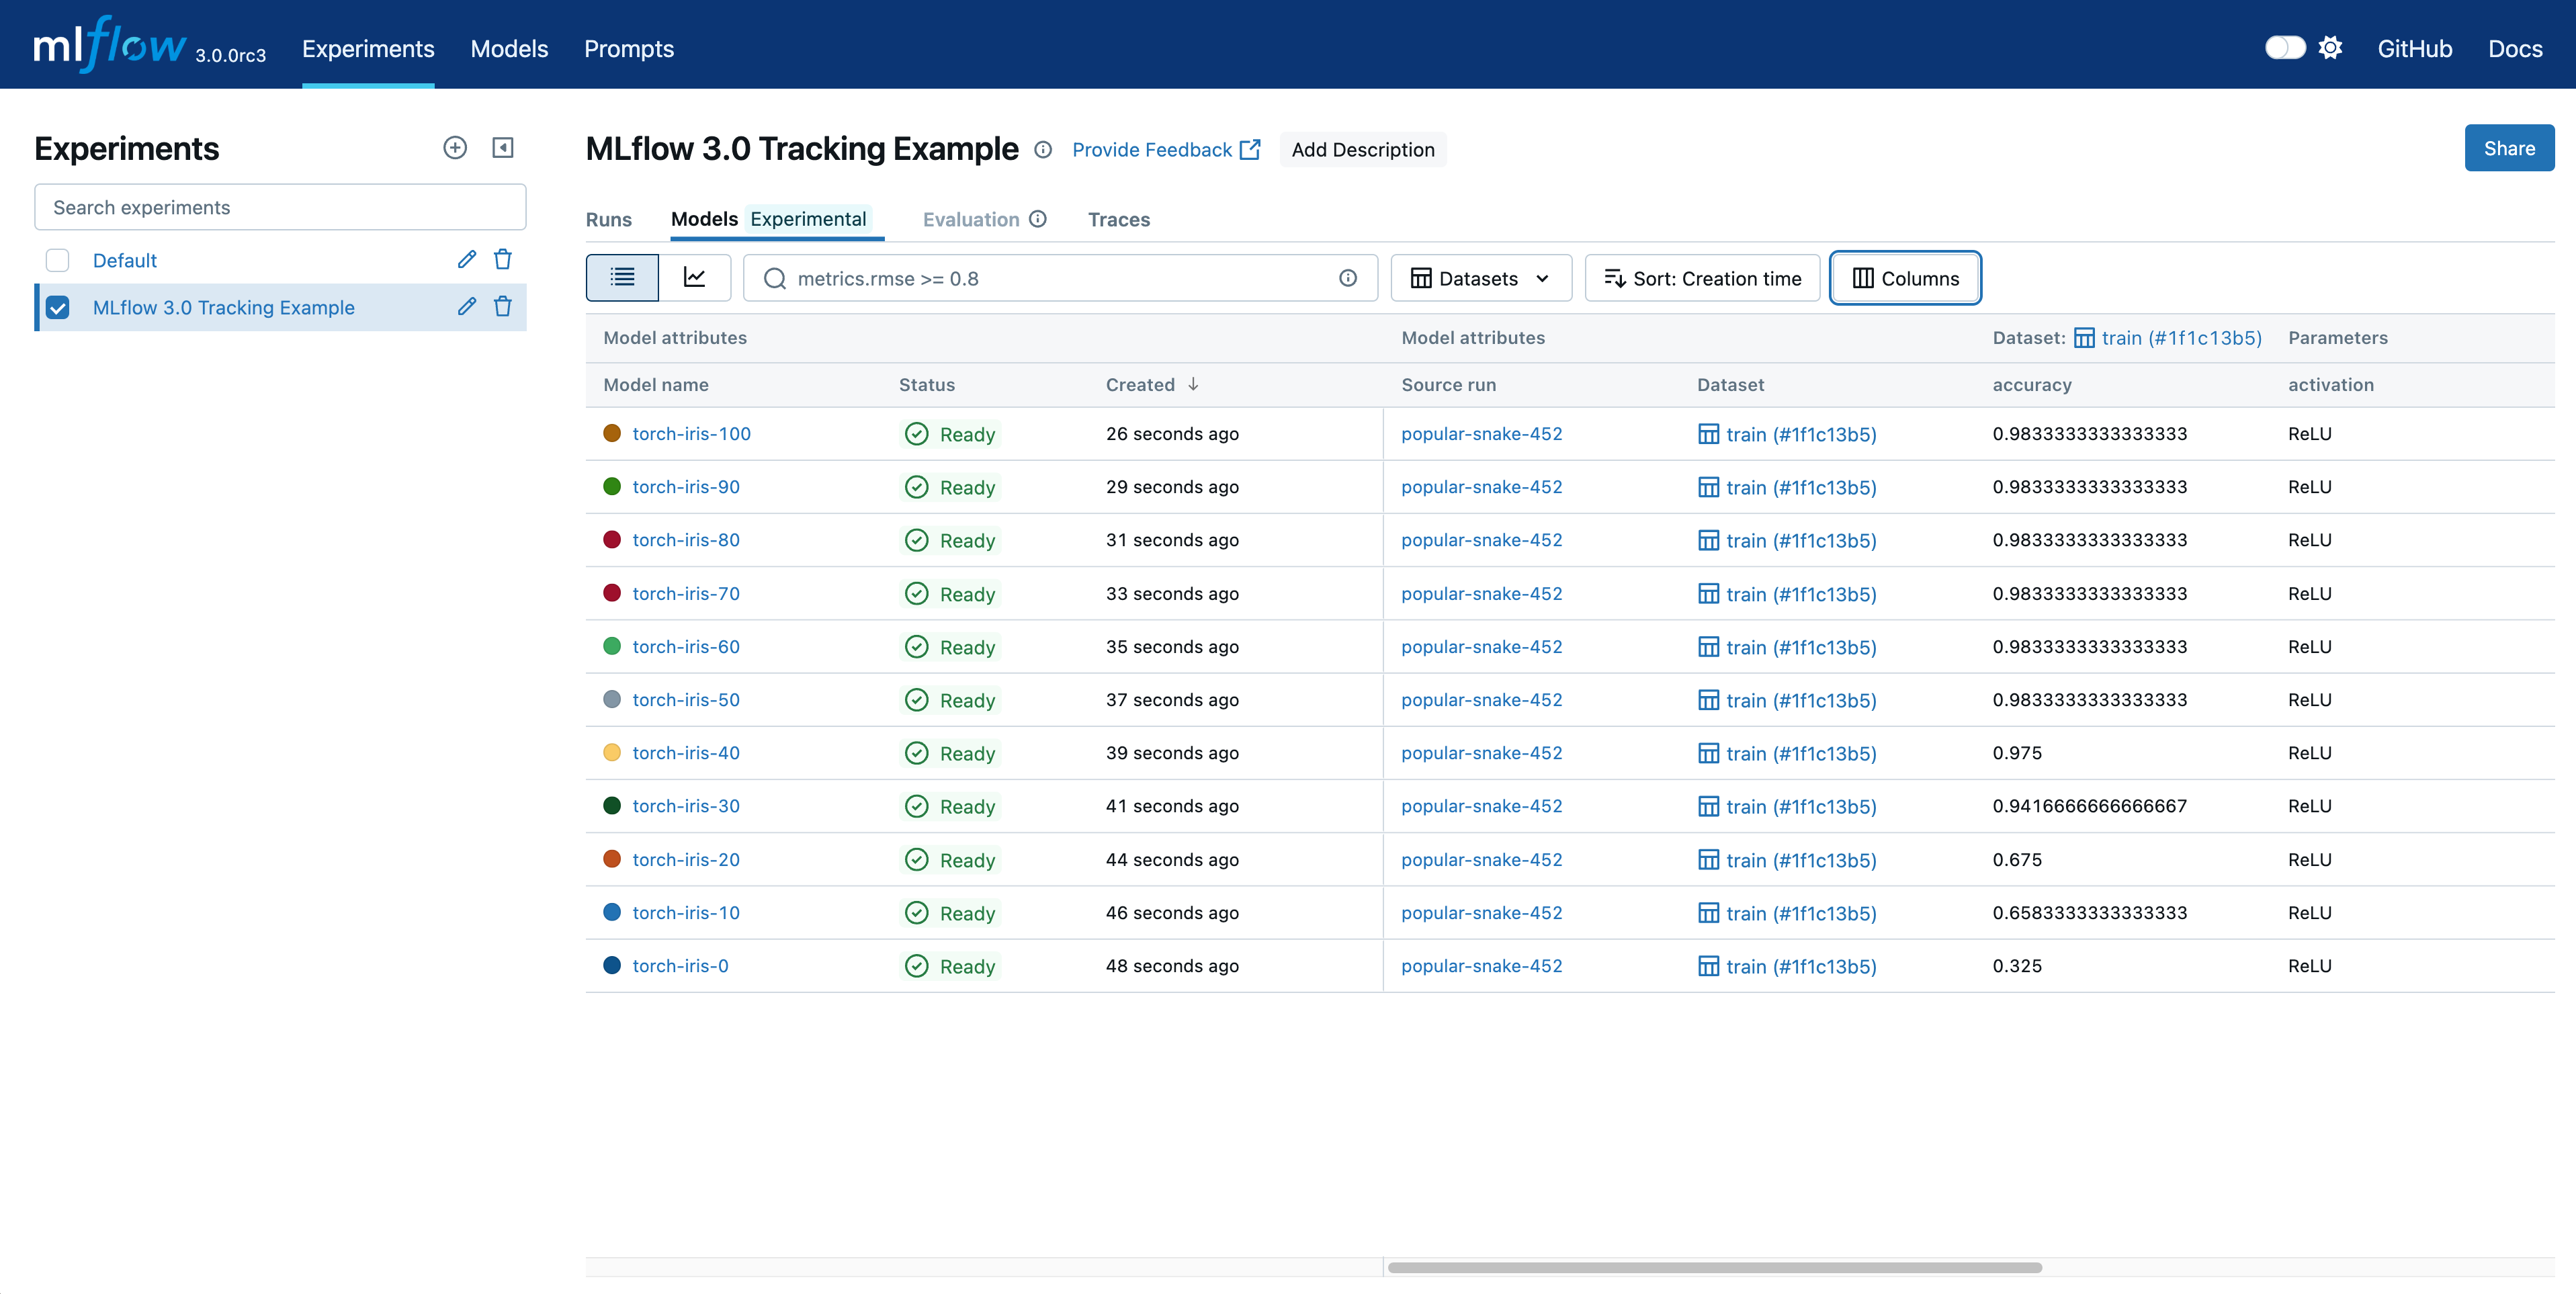
After comparing runs, you've identified your best model. The next step is to manage its lifecycle. You don't want to deploy a model directly from an experiment run; instead, you should promote it to a central, version-controlled repository. This is the MLflow Model Registry.
Step 1: Registering a Model
You can register a model in two ways: through the UI or programmatically.
Via the UI (simple for one-offs):
- Go to the experiment run that produced your best model.
- Navigate to the Artifacts section.
- Click on the model folder (e.g.,
random-forest-model). - Click the blue "Register Model" button in the top right.
- If this is the first time, select "Create New Model" and give it a name, for example,
iris-classifier. - Click "Register".
Now, if you click the "Models" tab at the top of the MLflow UI, you'll see your new registered model, iris-classifier, at Version 1.
Programmatically (best for automation):
For a more reproducible workflow, it's better to register models directly from your code. You can do this by simply adding the registered_model_name parameter to your log_model call.
# Inside your mlflow.start_run() block:
mlflow.sklearn.log_model(
    sk_model=model,
    artifact_path="random-forest-model",
    registered_model_name="iris-classifier"  # This is the key!
)
If you run this code, MLflow will automatically create a new version of the iris-classifier model (or create the registered model if it doesn't exist).
Step 2: Managing Versions and Aliases (Stages)
A registered model can have many versions. As you improve your model, you'll register new versions. The Model Registry helps you manage these versions using aliases (formerly called stages). Common aliases include Staging and Production.
Let's imagine you have two versions of your iris-classifier model.
- Version 1: Your first good model.
- Version 2: A newer model with better accuracy.
You want to test Version 2 before deploying it, and then promote it to production.
Mastering MLflow Model Registry: A Complete Hands-On Guide
This guide from Faizul Khan on Medium is an excellent, code-focused walkthrough of the Model Registry. It explains aliases and tags very clearly.
Read the sections 'What is Model Registry?', 'Working with Aliases', and 'Getting Model Versions'. These sections explain the core concepts and show how to manage and retrieve models programmatically.
You can manage aliases through the UI or programmatically using the MlflowClient.
Programmatic Example: Let's assign an alias to our new model version. You'll need the model name (iris-classifier) and the version number.
import mlflow

client = mlflow.tracking.MlflowClient()

model_name = "iris-classifier"
model_version = 2 # Assuming we just registered version 2


# Transition the new version to "Staging" for testing
client.set_registered_model_alias(
    name=model_name,
    alias="Staging",
    version=model_version
)


# After testing, you might move it to "Production"
# This will automatically remove the "Production" alias from any other version
client.set_registered_model_alias(
    name=model_name,
    alias="Production",
    version=model_version
)


# You can also archive old versions
client.transition_model_version_stage(
    name=model_name,
    version=1,
    stage="Archived" # transition_model_version_stage is the older API but still works for archiving
)
Step 3: Loading a Model from the Registry
The ultimate goal of the registry is to provide a reliable way to load a specific model version for deployment. Instead of hard-coding a path to a file, you can load a model using its name and alias.
import mlflow
import numpy as np


# This URI format points to the model with the 'Production' alias
model_uri = "models:/iris-classifier@Production"


# Load the model
production_model = mlflow.pyfunc.load_model(model_uri)


# Now you can use it for prediction!
sample_input = np.array([[5.1, 3.5, 1.4, 0.2]])
prediction = production_model.predict(sample_input)

print(f"Prediction from Production model: {prediction}")
This is incredibly powerful. Your deployment code can always ask for the Production model. When your ML team decides to promote a new version, they simply update the alias in the MLflow registry. The deployment code doesn't need to change at all to start using the new model.
Conclusion
In this lesson, you've learned how to bring structure and sanity to the ML development process using MLflow. You've moved from chaotic, manual tracking to a systematic, reproducible workflow.
Key Takeaways:
- MLflow Tracking is your digital lab notebook. It records every parameter, metric, and artifact from your experiments, allowing for easy comparison and reproducibility.
- The MLflow UI is a powerful tool for visualizing and comparing experiment results to identify the best-performing models.
- The MLflow Model Registry is a centralized repository for managing the lifecycle of your models. It provides version control and a clear path from development to production.
- Aliases (like
StagingandProduction) decouple your deployment code from specific model versions, enabling seamless model updates.
Preview of the Next Lesson:
We now have a version-controlled, production-ready model that we can reliably load from the MLflow Model Registry. The next logical step is to expose this model to the outside world. In our next lesson, you will learn to deploy models as REST APIs using FastAPI, where we will use the mlflow.pyfunc.load_model() function you just learned about to serve predictions.