Hello! Welcome back to our journey to becoming a Full Stack AI Developer.
In the last lesson, you successfully built a complete CRUD RESTful API using Flask. Your API can create, read, update, and delete users from a database. However, it currently has two significant real-world limitations:
- Any application or user on the internet can access it without restriction.
- A web browser would, by default, block a front-end application (like one you might build with JavaScript or React) from communicating with your API because they would be running on different domains.
Today, we will address both of these issues. Our learning outcome is to configure CORS and implement JWT-based API authentication. We'll first tackle the browser security issue with CORS, then implement a robust authentication system using JSON Web Tokens (JWT) to protect our API endpoints.
1. Allowing Cross-Origin Requests with CORS
Imagine you build a JavaScript front-end for your API that runs on http://localhost:3000. Your Flask API runs on http://localhost:5000. When your front-end tries to fetch data from the API, the browser's Same-Origin Policy will step in and block the request because the "origins" (the combination of protocol, domain, and port) are different. You would see an error like this in your browser's console:
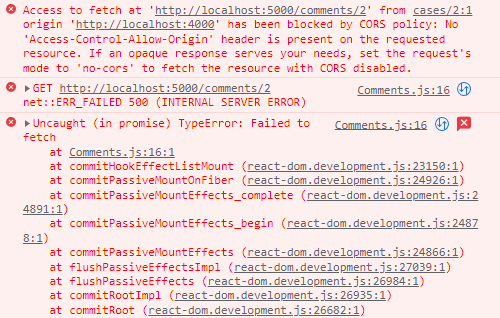
To fix this, we need to configure our Flask server to tell the browser which origins are allowed to access its resources. This is done using CORS headers. The Flask-CORS extension makes this straightforward.
First, you'll need to install it in your virtual environment:
pip install Flask-CORS
Now, let's watch a short video that explains how to use it.
Fix Flask CORS Error: Access-Control-Allow-Origin
This video by Luke Peters clearly demonstrates what a CORS error looks like and walks through three different ways to configure Flask-CORS to resolve it.
Watch the entire video (around 8 minutes). It covers: The simple approach: Allowing all origins for all routes using CORS(app). A more specific approach: Allowing specific origins (e.g., your front-end's address) for a group of routes (e.g., all routes under /api/*). The decorator approach: Using @cross_origin() to enable CORS for individual routes, giving you the most fine-grained control.
For your project, a good practice during development is to be specific. After importing CORS, you could add this to your api.py file to allow requests from a hypothetical React development server running on port 3000:
# In your api.py
from flask_cors import CORS


# ... after app is defined ...
# This will allow requests from http://localhost:3000 to any route in your app
cors = CORS(app, resources={r"/*": {"origins": "http://localhost:3000"}})
This configuration ensures that only your front-end application can interact with your API, which is a good security starting point.
2. Understanding JWT for API Authentication
Now that your API can talk to a front-end, we need to ensure only authorized users can access sensitive data. In the past, web applications used sessions stored on the server to track logged-in users. This is a stateful approach, as the server needs to maintain the state of every user's session.
For modern APIs, a stateless approach using tokens is preferred. The most popular standard for this is the JSON Web Token (JWT). With JWT, the server doesn't need to store any session information. Instead, after a user logs in, the server generates a signed token and sends it to the client. The client then includes this token with every subsequent request to prove its identity.

The Structure of a JWT
A JWT consists of three parts separated by dots (.): header.payload.signature.
- Header: Contains metadata, like the token type (
JWT) and the signing algorithm used (e.g.,HS256). - Payload: Contains the "claims" or data, such as the user's ID, their role, and the token's expiration time (
exp). - Signature: A cryptographic signature created using the header, payload, and a secret key known only to the server. This signature ensures the token hasn't been tampered with.
Let's watch a video that introduces these concepts practically.
User Authentication in Flask App using JWT [ JSON Web Token ]
This video from BekBrace contrasts session-based authentication with JWTs and uses the jwt.io website to visually break down the three parts of a token.
Watch from the beginning to 04:45. Focus on: The difference between stateful (session) and stateless (JWT) authentication. How the server creates and sends a JWT instead of a session ID. The three components of a JWT: header, payload, and signature. Pay attention to how changing the payload or secret key invalidates the signature on jwt.io.
3. Implementing JWT Authentication in Flask
Now, let's add JWT authentication to the API you built in the previous lesson. We will use the PyJWT library, which provides the core functions for encoding and decoding JWTs.
First, install the library:
pip install PyJWT
We'll also need to update our UserModel from the last lesson to include a password field. For security, we will store a hash of the password, not the password itself. The werkzeug library (which Flask depends on) is great for this.
Your updated UserModel in api.py should look like this:
# In api.py
from werkzeug.security import generate_password_hash, check_password_hash


# ...

class UserModel(db.Model):
    id = db.Column(db.Integer, primary_key=True)
    name = db.Column(db.String(80), unique=True, nullable=False)
    email = db.Column(db.String(80), unique=True, nullable=False)


    # Add a password hash field
    password_hash = db.Column(db.String(128))

    def set_password(self, password):
        self.password_hash = generate_password_hash(password)

    def check_password(self, password):
        return check_password_hash(self.password_hash, password)

    def __repr__(self):
        return f"<User {self.name}>"
You'll need to update your user creation (POST /api/users) logic to use user.set_password(password) and re-create your database to apply this change.
Now, we'll implement the full authentication flow.
Step 1: Create a /login Endpoint to Issue Tokens
First, we need a secret key in our app configuration. This key is crucial for signing the tokens. Then, we will create a /login route.
User Authentication in Flask App using JWT [ JSON Web Token ]
Let's continue with the BekBrace video. This part shows how to set up the app with a secret key and create the /login route that authenticates a user and generates a JWT.
Watch from 04:45 to 08:38 for the initial setup, including how to generate a strong secret key. Then, watch from 10:55 to 16:38 to see the implementation of the login route. Focus on: Setting app.config['SECRET_KEY']. How the /login route gets the username and password from the request. How jwt.encode() is used to create the token with a payload containing the user identity and an expiration time (exp).
Step 2: Create a Decorator to Protect Routes
Next, we need a way to check for a valid token on routes that should be protected. A Python decorator is the perfect tool for this. We'll create a @token_required decorator that we can add to any route we want to secure.
User Authentication in Flask App using JWT [ JSON Web Token ]
This is the core of our security mechanism. This segment of the video demonstrates how to build a custom decorator that verifies a JWT.
Watch from 16:38 to 20:34. Pay close attention to how the token_required decorator is constructed: It extracts the token from the request (in this case, from URL arguments, but headers are more common). It uses a try-except block to handle errors like a missing or invalid token. jwt.decode() is used with the secret key to verify the signature and decode the payload. It passes the decoded data (or the user) to the protected route.
Note: The video passes the token as a URL query parameter (?token=...). A more standard approach for REST APIs is to pass it in the Authorization header as a "Bearer" token. You can adapt the decorator to check request.headers.get('Authorization').
Step 3: Apply the Decorator to a Protected Route
Finally, let's use our new decorator to protect an endpoint. For example, you could create a /api/profile endpoint that only a logged-in user can access.
User Authentication in Flask App using JWT [ JSON Web Token ]
Let's see our decorator in action. This final clip shows how to apply the @token_required decorator to a route and test the entire flow.
Watch from 20:34 to the end. Observe how: The @token_required decorator is placed directly above the definition of the protected route function. Testing the flow involves first hitting /login to get a token, and then using that token to access the protected route. The video also shows verifying the received token on jwt.io, reinforcing the concepts from earlier.
Conclusion
Excellent work! You have now taken a simple, open API and transformed it into a secure, production-ready service. You've learned two indispensable concepts for modern web development.
Key Takeaways:
- CORS is a browser security mechanism, and you must configure your backend with
Flask-CORSto allow your frontend to communicate with it across different origins. - JWT (JSON Web Tokens) provide a stateless, scalable way to handle user authentication in APIs.
- A JWT is composed of a header, a payload (with claims like user ID and expiration), and a signature that guarantees its integrity.
- The authentication flow involves a login endpoint to issue a token and a verification mechanism (like a custom decorator) to protect routes by checking for a valid token on incoming requests.
In our next lesson, we will continue to harden our API. We'll focus on how to validate request data and handle API errors with appropriate status codes, ensuring our API is not only secure but also robust and user-friendly for other developers.