Hello! Welcome to the "Web Development with Python" module.
In the previous module, you mastered the fundamentals of databases, learning to choose between SQL and NoSQL based on application requirements. This skill is crucial for storing and managing the data that will power your AI applications. Now, it's time to build the "front door" to those applications—the web interface that users will interact with.
This lesson marks our first step into web development with Flask, a popular and powerful Python web framework. Our goal is to build a basic Flask application with routes, URL parameters, and Jinja2 templates. You'll learn how to create different pages, handle dynamic URLs, and efficiently generate HTML to display data. This is the foundational skill for creating the "Full Stack" part of your Full Stack AI Developer toolkit.
Let's get started.
1. Your First Flask Application
Flask is a "microframework" for Python. The "micro" part doesn't mean it's not powerful; it means that Flask provides a solid core of web development essentials, leaving more specialized functionalities to extensions. This makes it lightweight and easy to learn.
A minimal Flask application consists of three main parts:
- An app instance, which is the central object of your web application.
- Routes, which map URLs (like
/homeor/about) to specific Python functions. - View functions, which are the Python functions that run when a user visits a corresponding route and return the content to be displayed in the browser.
To get a hands-on feel for this, let's start with the official documentation.
Quickstart — Flask Documentation
The official Flask Quickstart guide is the best place to start. It shows you the simplest possible Flask application.
Read the section titled "A Minimal Application". This will walk you through the four essential lines of code needed to create and run a 'Hello, World!' web app. Don't worry about running it just yet; focus on understanding the role of Flask, @app.route, and the view function.
As you saw, the basic structure is straightforward. You import Flask, create an app object, and use the @app.route() decorator to link a URL path to a Python function that returns an HTML string.
2. Defining Routes and Handling URL Parameters
A web application with only one page isn't very useful. Real applications have multiple pages, and their URLs often contain dynamic information, like a user's ID or a blog post's title. Flask's routing system makes this easy to handle.
There are three common types of URLs you'll work with:
- Static Routes: Fixed paths, like
/aboutor/contact. - Dynamic Routes: Paths with variable parts, like
/user/alexor/post/123. - Query Parameters: Key-value pairs at the end of a URL, like
/search?q=python.
The following video provides a practical, code-driven walkthrough of creating these different types of routes.
Routes & URLs - Flask Tutorial Series #2
This video from NeuralNine, "Routes & URLs", clearly demonstrates how to set up static routes, dynamic routes with type converters, and how to process query parameters.
Watch from 01:41 to 10:26. Follow along as the presenter demonstrates: Adding a static route (01:41 - 02:40): See how to add another simple page. Creating dynamic routes (02:40 - 04:16): Pay close attention to the <variable_name> syntax in the route decorator and how the variable is passed to the view function. Using type converters (04:16 - 06:12): Understand how you can enforce data types like <int:id> directly in the URL. Handling query parameters (06:12 - 10:26): Learn how to use the request object to access data from the URL's query string (e.g., ?name=value).
To summarize the key concepts from the video:
- You can define multiple
@app.route()decorators for your application. - For dynamic routes, use angle brackets:
@app.route('/user/<username>'). The value from the URL is then passed as an argument to your view function:def profile(username): .... - You can specify a type for the dynamic part, like
@app.route('/post/<int:post_id>'). Flask will automatically convert the type and only match URLs with a valid integer. - To access query parameters, you first
from flask import request, and then userequest.args.get('param_name')inside your view function.
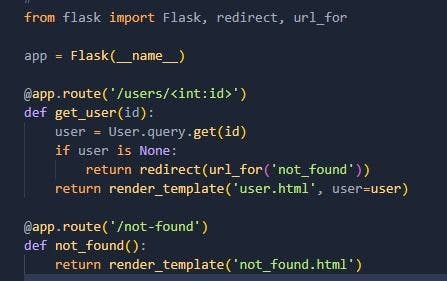
This image shows a great example of a dynamic route that fetches data and renders a template.
3. Using Jinja2 for Template Rendering
So far, we've been returning HTML as simple Python strings. This is fine for "Hello, World," but it quickly becomes unmanageable for real web pages. The solution is to separate your Python logic from your HTML structure using templates.
Flask uses the Jinja2 templating engine. This allows you to create HTML files with special placeholders and logic. Your Flask view function can then "render" these templates, filling in the dynamic data before sending the final HTML to the user.
Key features of Jinja2 include:
- A
templatesfolder: Flask automatically looks for template files in a directory namedtemplates. - The
render_template()function: This function takes the template's filename and any variables you want to pass to it. - Expressions
{{ ... }}: Used to print a variable's value into the HTML. - Statements
{% ... %}: Used for control flow, likeifconditions andforloops.
The following comprehensive tutorial by Corey Schafer is an excellent guide to using templates in Flask.
Python Flask Tutorial: Full-Featured Web App Part 2 - Templates
Corey Schafer's tutorial, "Python Flask Tutorial: Full-Featured Web App Part 2 - Templates", is a classic for a reason. It walks you through every essential aspect of templating, from the basics to more advanced, best-practice techniques.
Watch from the beginning to 18:29. This is a bit longer, but it's packed with crucial information. Creating and Rendering Templates (00:00 - 04:50): Learn why templates are necessary and how to use render_template() to serve HTML files from the templates directory. Passing Variables (04:50 - 07:17): See how to pass Python data (like a list of dictionaries) to your template. Template Logic (07:17 - 13:16): Understand how to use Jinja2's for loops and if/else conditionals to dynamically generate HTML. Template Inheritance (13:16 - 18:29): This is a very important concept! Learn how to create a base layout template to avoid repeating code across multiple pages.
The Power of Template Inheritance
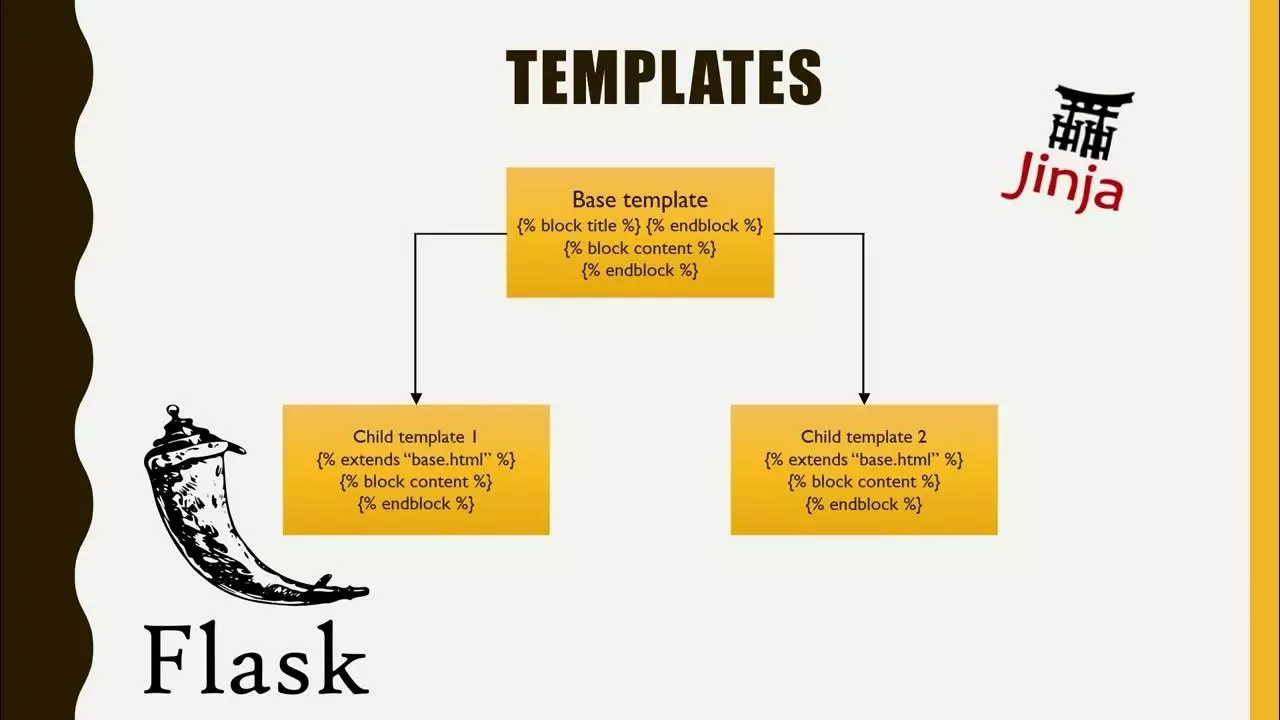
The concept of template inheritance covered at the end of the video is fundamental to writing clean, maintainable web applications. The "Don't Repeat Yourself" (DRY) principle is just as important in frontend structure as it is in backend logic.
By creating a base.html template with your common HTML structure (like the <html>, <head>, <body> tags, navigation bar, and footer) and defining {% block %} sections, your other templates can simply {% extends 'base.html' %} and fill in the unique content.
Conclusion
In this lesson, you've built the essential foundation for any web application in Flask. You now have the tools to create a multi-page website with dynamic content.
Key Takeaways:
- A Flask application is built around an
appinstance, with@app.route()decorators mapping URLs to view functions. - Routing can be static (
/about), dynamic (/user/<username>), or use query parameters (/search?q=...), giving you full control over your URL structure. - Jinja2 templates are used to separate presentation (HTML) from logic (Python). You use
render_template()to pass data to them. - Within templates, you can use
{{ variable }}to display data and{% for item in items %}or{% if condition %}to control the flow. - Template inheritance with
{% extends 'base.html' %}and{% block content %}is a powerful feature for keeping your code DRY and maintaining a consistent site layout.
In our next lesson, we'll make our applications interactive. You'll learn how to handle form submissions and validate user input, allowing you to start collecting data from users and building truly dynamic web experiences.