Hello! Welcome to your next lesson in our Natural Language Processing module.
In the previous lesson, we dove into the theory behind the Transformer architecture, exploring the attention mechanism, encoders, and decoders that make models like GPT and BERT so powerful. We saw how they overcome the limitations of older sequential models like LSTMs.
Today, we'll bridge the gap from theory to practice. Our goal is to use Hugging Face transformers for text classification and Named Entity Recognition (NER). You will learn how to leverage the vast library of pre-trained models provided by the Hugging Face ecosystem to solve real-world NLP problems with just a few lines of Python code. We will cover two main approaches: using the high-level pipeline API for quick results, and then diving deeper into the process of fine-tuning a model for a specific task.
1. The Hugging Face Ecosystem: Your NLP Toolkit
Before we write code, it's important to understand what Hugging Face is. It's a platform and company that has become central to the NLP community. It provides:
- The Model Hub: A massive repository of thousands of pre-trained models for various tasks, languages, and frameworks.
- The Datasets library: A tool for easily downloading and processing thousands of public datasets.
- The Transformers library: The core Python library that provides a standardized API for using the models from the Hub.
Today, our focus will be on the transformers library.
2. The Easy Way: Using the pipeline API
The simplest way to use a Transformer model is with the pipeline function. It abstracts away all the preprocessing, model inference, and post-processing steps, allowing you to get results for common tasks in just one or two lines of code. Let's see it in action for our two target tasks: text classification and NER.
Learn How to use Hugging face Transformers Library | NLP | Python | Code
This video from Pradip Nichite provides a great practical introduction to the pipeline API. We'll watch sections that cover our two main tasks.
Please watch the following two segments: Sentiment Analysis (Text Classification): Watch from 01:22 to 07:56. Pay attention to how a pipeline is created for a task, how you can use the default model, and how you can specify a different model from the Hub. Named Entity Recognition (NER): Watch from 11:05 to 12:37. Notice the aggregation_strategy parameter, which is very useful for cleaning up the NER output.
As the video demonstrated, the pipeline is incredibly convenient. Under the hood, it performs the exact steps we discussed in previous lessons:
- Tokenization: The raw text is converted into a sequence of numbers (token IDs) that the model can understand.
- Model Inference: The token IDs are fed through the pre-trained Transformer model.
- Post-processing: The model's raw output (logits) is converted into human-readable predictions, like labels and confidence scores.

You can also find clear code examples for these tasks in the following article. It's a great reference to keep handy.
How to Get Started with Hugging Face Transformers - OneUptime
The article 'How to Get Started with Hugging Face Transformers' provides concise code examples for using pipelines.
Quickly scan the code blocks under the headings 'Sentiment Analysis' and 'Named Entity Recognition'. You'll see they match the concepts from the video.
The pipeline is perfect for quick experiments or when using a model that's already trained for your exact use case (e.g., a general-purpose sentiment classifier). But what if you need higher performance on your specific data? For that, we need to fine-tune.
3. The Powerful Way: Fine-Tuning a Transformer Model
Fine-tuning is the process of taking a pre-trained model and training it for a few more epochs on your own labeled dataset. This adapts the model's general linguistic knowledge to the specifics of your task. For most industry applications, fine-tuning is the standard approach to achieve state-of-the-art results.
Let's focus on text classification. The general workflow looks like this:
- Load your specific dataset (e.g., customer reviews, support tickets).
- Load a pre-trained model (like BERT) and its corresponding tokenizer.
- Tokenize your dataset.
- Set up a
Trainerwith training arguments (learning rate, epochs, etc.). - Run the training process.
- Evaluate the fine-tuned model.
What is BERT?
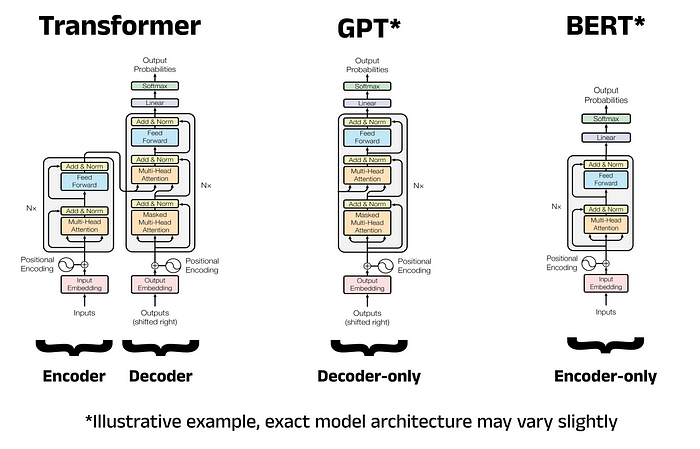
We'll use a model called BERT (Bidirectional Encoder Representations from Transformers). Unlike the full encoder-decoder Transformer we saw in the last lesson, BERT is an encoder-only model. It's pre-trained by masking words in a sentence and learning to predict them from both left and right context. This makes it exceptionally good at understanding the meaning of a sentence, creating a powerful base for tasks like classification.
The Fine-Tuning Process in Detail
The following video provides an excellent walkthrough of the entire fine-tuning process for a text classification task. It covers the concepts and the code step-by-step.
Fine-Tuning BERT for Text Classification (w/ Example Code)
This video by Shaw Talebi, 'Fine-Tuning BERT for Text Classification', will guide us through the complete process.
Watch the following segments, which correspond to the key steps of fine-tuning: Introduction to Fine-Tuning and BERT (00:00 - 09:41): This gives crucial context on why we fine-tune and how BERT was pre-trained. Loading Data, Model, and Tokenizer (10:54 - 12:54): See how to load a dataset and a pre-trained BERT model with a classification head attached using AutoModelForSequenceClassification. Preprocessing the Data (15:38 - 17:09): Understand how to use the tokenizer on the entire dataset and what a DataCollator does. Training the Model (19:07 - 20:45): Learn how to define TrainingArguments and use the Trainer class to launch the fine-tuning job.
To complement the video, the official Hugging Face documentation provides a complete, code-first guide for text classification. It's an invaluable resource for implementing this yourself.
Text classification - Hugging Face
This is the official Hugging Face guide for text classification. It walks through a sentiment analysis fine-tuning task on the IMDb dataset.
I recommend you read through this guide after watching the video. It reinforces all the steps: loading the dataset (load_dataset), preprocessing (AutoTokenizer, map), setting up evaluation (evaluate), and training (AutoModelForSequenceClassification, TrainingArguments, Trainer). Don't worry about running all the code now; focus on understanding the flow.
4. Applying Your Fine-Tuned Model
Once your model is fine-tuned, you can use it for inference in two ways:
- With the
pipeline: Simply point thepipelineto the directory where your trained model was saved.from transformers import pipeline # `my_awesome_model` is the output_dir from TrainingArguments classifier = pipeline("sentiment-analysis", model="my_awesome_model") classifier("This movie was fantastic!") - Manually: Load your fine-tuned model and tokenizer, and perform the steps yourself for maximum control. This is also shown in the Hugging Face documentation guide (LINK) we just looked at.
A Note on Fine-Tuning for NER
The process for fine-tuning a model for Named Entity Recognition is very similar to text classification. The main difference is that NER is a token classification task—we are assigning a label to each token (e.g., B-PER for the beginning of a person's name, I-ORG for inside an organization's name, O for outside any entity).
To do this, you would simply use AutoModelForTokenClassification instead of AutoModelForSequenceClassification. The rest of the Trainer API workflow remains almost identical.
Conclusion
Congratulations! You've taken a huge practical step in your NLP journey. You now have the tools to apply massive, state-of-the-art language models to solve real-world problems.
Key Takeaways:
- The Hugging Face
transformerslibrary is the standard for working with Transformer models. - The
pipelineAPI is the quickest way to perform inference for common NLP tasks like text classification and NER. - Fine-tuning adapts a general-purpose pre-trained model to your specific dataset, leading to much better performance.
- The fine-tuning workflow involves loading a dataset, a tokenizer, and a model with a task-specific head (e.g.,
AutoModelForSequenceClassification), then using theTrainerAPI to manage the training process.
Preview of the Next Lesson:
In today's fine-tuning example, we used accuracy as our evaluation metric. While simple and effective for balanced classification tasks, many NLP tasks require more nuanced metrics. In our next lesson, we will explain and apply evaluation metrics for NLP tasks, looking at specialized metrics like BLEU and ROUGE for translation and summarization, and perplexity for language modeling. This will equip you to properly measure the performance of a wider variety of NLP models.