Welcome to a new module! We've spent a lot of time on data structures like arrays and strings, which store elements in contiguous blocks of memory. Now, we shift our focus to a different paradigm: linked lists. This is a foundational data structure that you will encounter constantly in interviews and systems design.
In our last lesson, we mastered highly efficient string-searching algorithms. Today, we'll start fresh with the first learning outcome of our Linked Lists module: to implement a singly linked list in Java, covering the essential operations of insertion, deletion, and traversal. We will build this structure from the ground up to ensure you have a deep understanding of its internal mechanics.
1. From Contiguous Arrays to Linked Nodes
Arrays are powerful but have a key limitation: their size is fixed (or requires a costly resizing operation), and all elements must be stored together in memory. What if we could have a linear structure that grows and shrinks dynamically, with elements scattered across memory? This is the core idea behind a linked list.
A linked list is a chain of nodes. Each node is a small object that contains two pieces of information:
- The actual data value (e.g., an integer).
- A reference (or "pointer") to the very next node in the chain.
The list is accessed through a single entry point called the head, which is a reference to the first node. The last node in the chain points to null, signaling the end of the list.

To get a clear conceptual overview of how linked lists compare to arrays and why they are useful, the following video provides an excellent introduction.
Linked List Tutorial - Singly + Doubly + Circular (Theory + Code + Implementation)
This video explains the motivation behind linked lists and introduces the core concepts of nodes, head, and tail.
Watch the initial segment from the beginning. Focus on the comparison with arrays and the explanation of the Node structure, which consists of a value and a next pointer.
2. Building the Linked List in Java
Let's translate this concept into Java code. A linked list implementation typically involves two classes: the LinkedList class itself, and an inner Node class that defines the structure of each element in the chain.
The Node and LinkedList Classes
We'll start by creating our LinkedList class and defining a private inner Node class within it. This encapsulation is good practice, as the Node is an implementation detail that code outside our LinkedList class doesn't need to know about.
public class LinkedList {

    private Node head;
    private Node tail;
    private int size;

    public LinkedList() {
        this.size = 0;
    }

    private class Node {
        private int value;
        private Node next;

        public Node(int value) {
            this.value = value;
        }

        public Node(int value, Node next) {
            this.value = value;
            this.next = next;
        }
    }
}
Here's what each part does:
Nodeclass: Represents one link in our chain. It holds an integervalueand a referencenextto the subsequentNode.LinkedListclass: This is the main class that manages the entire structure.head: ANodereference that always points to the first node in the list. Initiallynull.tail: ANodereference that always points to the last node. This is an optimization that allows for O(1) insertion at the end. Initiallynull.size: An integer to keep track of the number of nodes in the list.
Kunal Kushwaha's video provides a clear walkthrough of creating this initial structure.
Linked List Tutorial - Singly + Doubly + Circular (Theory + Code + Implementation)
This segment shows how to implement the basic Node and LinkedList classes in Java.
Watch the section from this timestamp where the Node and LinkedList classes are coded, including their attributes (head, tail, size) and constructors.
3. Core Operations: Traversal, Insertion, and Deletion
Now that we have the skeleton, let's implement the core functionalities.
Traversal: Displaying the List
To see the contents of our list, we need to traverse it from head to tail. The logic is simple:
- Create a temporary
Nodereference, let's call ittemp, and point it tohead. - Use a
whileloop that continues as long astempis notnull. - Inside the loop, print
temp.value. - Move to the next node by setting
temp = temp.next.
It is crucial to use a temporary variable for traversal. If you were to move the actual head pointer, you would lose the entry point to your list, effectively breaking the data structure.
Linked List Tutorial - Singly + Doubly + Circular (Theory + Code + Implementation)
This part of the video demonstrates how to implement a display method to traverse and print the linked list, emphasizing the importance of using a temporary node.
Watch from this segment to see the traversal logic implemented and explained. Pay attention to why modifying the head pointer directly is a bad idea.
Insertion
We'll cover three types of insertion: at the beginning, at the end, and at a specific position.
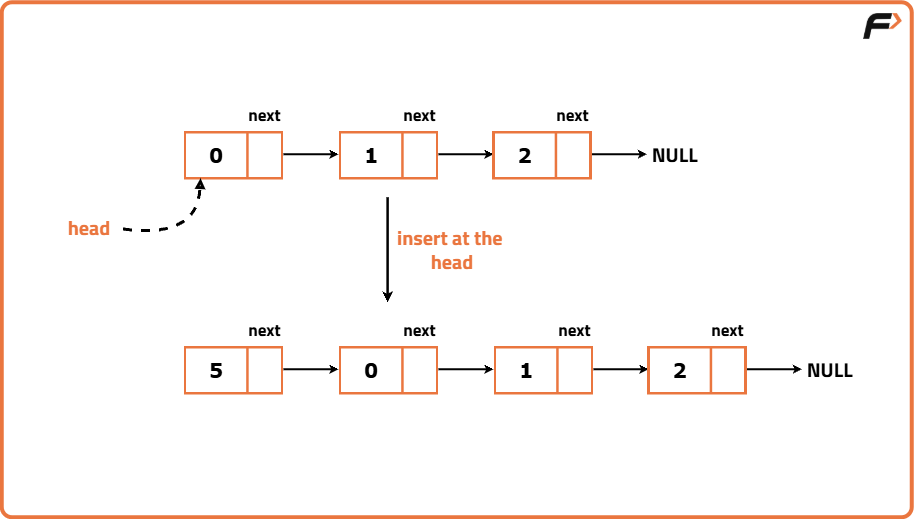
1. Inserting at the Head (O(1))
This is the most efficient insertion.
- Create a new
Nodewith the given value. - Set the
nextpointer of this new node to the currenthead. - Update the
headto point to the new node. - Handle the edge case: If the list was empty, the
tailmust also point to this new node.
L2. Deletion and Insertion in LL | 8 Problems
This video from your preferred TUF series clearly explains how to insert a node at the head.
Watch the section on inserting at the head. The explanation is concise and provides the direct Java code for this O(1) operation.
2. Inserting at the Tail (O(1) with tail pointer)
Thanks to our tail pointer, this is also an O(1) operation.
- If the list is empty, simply call the
insertAtHeadmethod. - Otherwise, create a new
Node. - Set the
nextpointer of the currenttailto point to this new node. - Update the
tailto be the new node.
If we didn't maintain a tail pointer, we would have to traverse the entire list to find the last node, making the operation O(n). This highlights a key design choice in data structures.
L2. Deletion and Insertion in LL | 8 Problems
This segment shows how to insert a node at the tail. It first explains the traversal approach (O(n)) and then the optimized O(1) approach.
Focus on the logic explained from this timestamp. Note how having a tail pointer avoids a full list traversal.
3. Inserting at a Specific Position (O(n))
To insert a node at a position k, we must traverse.
- Handle edge cases: If
k=1, it's an insertion at the head. Ifkequals the length of the list + 1, it's an insertion at the tail. - Traverse the list to find the node at position
k-1(the node before our target position). Let's call itprev. - Create the new node.
- Set the new node's
nextto point toprev.next. - Set
prev.nextto point to the new node.
L2. Deletion and Insertion in LL | 8 Problems
This detailed section covers insertion at a specific k-th position, including all edge cases and the traversal logic.
Watch the entire explanation from here. Trace the counter and temp variables to understand how the algorithm finds the correct insertion point.
Deletion
Similar to insertion, we'll look at deleting from the beginning, end, and a specific position.
1. Deleting the Head (O(1))
This is straightforward.
- Handle the edge case of an empty list.
- Move the
headpointer tohead.next. - If the list is now empty (was a single-node list), update
tailtonull.
L2. Deletion and Insertion in LL | 8 Problems
This segment explains how to delete the head node, covering edge cases and the difference in memory management between C++ and Java (garbage collection).
Watch from the beginning of the video. The logic is simple: just move the head pointer.
2. Deleting the Tail (O(n))
In a singly linked list, this is an O(n) operation because we must find the second-to-last node.
- Handle edge cases (empty or single-node list).
- Traverse the list until you reach the node whose
next.nextisnull. This is the second-to-last node. - Set this node's
nextpointer tonull. - Update the
tailto point to this node.
L2. Deletion and Insertion in LL | 8 Problems
This section covers the logic for deleting the last node, which requires traversing to the second-to-last element.
Watch the explanation from this part. The condition temp.next.next != null is the key to finding the second-to-last node.
3. Deleting at a Specific Position (O(n))
This is analogous to insertion at a position.
- Handle edge cases (deleting the head or tail).
- Traverse to the node at position
k-1(the node before the one to be deleted). Let's call itprev. - Update
prev.nextto point toprev.next.next, effectively "skipping" the node at positionk.
L2. Deletion and Insertion in LL | 8 Problems
This segment combines the previous concepts to create a general function for deleting the k-th element.
Watch from this timestamp to understand how to delete an arbitrary node by finding its predecessor and rewiring the next pointers.
4. The Complete Implementation
You've now seen the theory and logic for each operation. The final step is to see them all together in a single, cohesive LinkedList class.
Linked List Operations: Traverse, Insert and Delete
This resource from Programiz provides a complete, self-contained Java implementation of a singly linked list with all the operations we've discussed.
Find the code block titled LinkedList operations in Java. Read through the entire class. Identify the Node inner class and the methods for: insertAtBeginning, insertAfter, insertAtEnd deleteNode (by position) printList (traversal) Compare this implementation with the concepts you learned from the videos. Trace the logic in the main method to see how these operations are used in practice.
Conclusion
In this lesson, you've built a fundamental data structure from scratch. You now understand not just what a linked list is, but how it works under the hood.
Key Takeaways:
- Structure: A linked list is a chain of
Nodeobjects, each containing data and anextpointer. It is accessed via aheadpointer. - vs. Arrays: Linked lists offer dynamic sizing and efficient insertions/deletions at the ends, but suffer from O(n) time for access and search. Arrays offer O(1) access but have costly insertions/deletions in the middle.
- Traversal: Always use a temporary variable to traverse the list to avoid losing the
headreference. - Operations & Complexity:
- Insertion/Deletion at Head: O(1)
- Insertion at Tail: O(1) if you maintain a
tailpointer, O(n) otherwise. - Deletion at Tail: O(n) in a singly linked list.
- Access/Search/Insertion/Deletion in Middle: O(n) due to traversal.
We have focused on a singly linked list, where traversal is only possible in one direction. In our next lesson, we will explore the doubly linked list, where each node also contains a pointer to the previous node. This small change has significant implications for certain operations, such as deleting the tail.