Hello! Welcome to the next lesson in our module on Azure and Power Platform Integration Patterns.
In our previous lesson, we dove deep into the "code-first" world of integration by developing C# Azure Functions. You learned how to write custom code to process data from Dataverse, leveraging your strong .NET and C# background.
Today, we shift our focus to a different but equally powerful approach. Your goal for this lesson is to learn how to develop an Azure Logic App to orchestrate a business process involving Power Platform and other Azure services. Instead of writing imperative code line-by-line, you will use a visual designer to compose a workflow by connecting pre-built components. Think of it as moving from writing a function to conducting an orchestra of services.
Logic Apps vs. Azure Functions: A Quick Comparison
- Azure Functions: A compute service. Ideal for running small pieces of custom code in response to an event. You have full control over the code logic.
- Azure Logic Apps: An integration and orchestration service. Ideal for connecting disparate systems and defining a business process. It excels at workflow management, not complex data transformation (which you might still use a Function for).
By the end of this lesson, you'll have another critical tool in your integration toolkit, setting the stage for our next lesson where we'll focus on choosing the right tool for any given scenario.
1. Understanding Azure Logic Apps
At its core, a Logic App is a serverless workflow that runs based on a trigger and executes a series of actions. These actions are made possible by a vast library of connectors for services both inside and outside of Azure.
For a foundational understanding of what Logic Apps are and how they compare to tools you may know, like Power Automate, please watch the beginning of this comprehensive guide.
Logic Apps for Everyone - A complete guide for anyone!
This video from John Savill's Technical Training provides a clear introduction to Logic Apps, their serverless nature, and their role in the Azure ecosystem.
Please watch the first 2 minutes and 24 seconds of the video, which covers the core concepts of Logic Apps, triggers, actions, and how it relates to Power Automate. Focus on the distinction John makes between using Power Automate for personal/departmental tasks and Logic Apps for enterprise/company-wide automation.
As a developer, you'll appreciate that while Power Automate is built on Logic Apps, Logic Apps offer capabilities that are critical for enterprise-grade solutions, including:
- Hosting Models: Consumption (pay-per-use) vs. Standard (dedicated compute, VNet integration, private endpoints).
- Development: A "code view" with a JSON definition that can be source-controlled in Git.
- ALM/DevOps: Native support for deployment via ARM templates or Bicep, enabling professional CI/CD practices.
- Performance & Management: Advanced monitoring, stateful/stateless execution modes, and direct integration with other Azure management tools.
2. Orchestrating a Business Process
Let's design a Logic App to automate a common business scenario. This will show you how to combine the Power Platform with other Azure services in a single, orchestrated workflow.
Scenario: When a new "Service Request" (incident) record is created in Dataverse, we need to orchestrate the following process:
- The Logic App is triggered by the new Dataverse record.
- It retrieves the related
accountrecord to check its service level agreement (SLA). - If the account has a "Premium" SLA:
- An urgent message is sent to an Azure Service Bus queue for immediate processing by a specialized team.
- The Service Request record is updated in Dataverse to set its priority to "High".
- If the account does not have a "Premium" SLA:
- An email is sent to the general support team queue.
This workflow involves triggers, data retrieval, conditional logic, and integration with both Dataverse and other services (Azure Service Bus, Office 365).
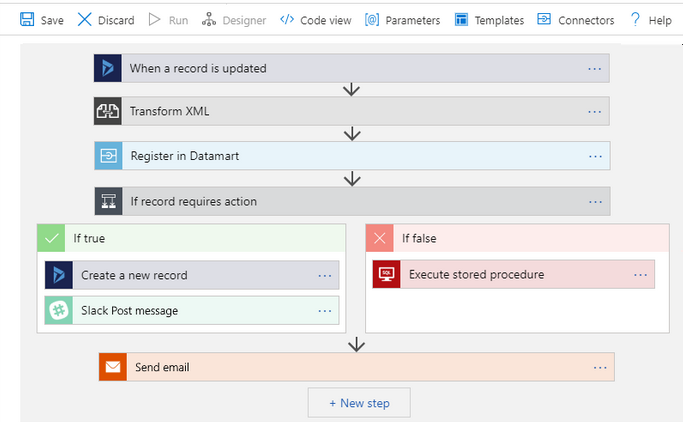
Step 1: Create the Logic App and Set the Trigger
First, you need to create the Logic App resource in Azure and define what starts the workflow. We will use the Dataverse connector.
Connect Workflows to Microsoft Dataverse
This Microsoft Learn article is the official documentation for the Dataverse connector. We'll use it as a reference for setting up our trigger and subsequent actions.
Please review the sections 'Prerequisites' and 'Add a Dataverse trigger'. You don't need to follow it step-by-step yet, but understand the process of adding the 'When a row is added, modified or deleted' trigger and providing the connection details for your Dataverse environment.
In the Azure Portal, create a Logic App (Consumption) resource. Once in the designer, you will:
- Select the When a row is added, modified or deleted trigger from the Microsoft Dataverse connector.
- Sign in to your Dataverse environment.
- Configure the trigger:
- Change type:
Added - Table name:
incidents(Service Requests) - Scope:
Organization
- Change type:
Step 2: Get the Related Account Record
The trigger gives you the ID of the new incident, but we need information from the parent account.
- Add a new action: Get a row by ID from the Microsoft Dataverse connector.
- Configure the action:
- Table name:
accounts(Accounts) - Row ID: From the dynamic content panel, select the
_customerid_valuefrom the trigger step. This is the lookup value for the account.
- Table name:
Step 3: Implement Conditional Logic
Now we'll check the SLA of the account we just retrieved.
- Add a new action: Condition from the Control connector.
- Configure the condition:
- In the first value box, select the
address1_shippingmethodcode(Service Level) field from the "Get a row by ID" step. - Set the operator to is equal to.
- Set the value to
1(or the corresponding integer value for "Premium" in your environment).
- In the first value box, select the
You will now have two branches: If true and If false.
Step 4: Configure the "True" Branch (Premium SLA)
Inside the If true branch, add the following actions:
- Send message to Service Bus:
- Add the Send message action from the Azure Service Bus connector.
- Create a connection to your Service Bus namespace.
- Queue/Topic name: Select your target queue (e.g.,
premium-requests). - Content: Use dynamic content to compose a message. For example, you can include the
Ticket NumberandTitlefrom the trigger step.
- Update the Dataverse record:
- Add the Update a row action from the Microsoft Dataverse connector.
- Table name:
incidents - Row ID: Select the
Incident IDfrom the trigger step. - Click "Add new parameter" and select Priority (
prioritycode). Set it to1(High).
Step 5: Configure the "False" Branch (Standard SLA)
Inside the If false branch, add one action:
- Send an email:
- Add the Send an email (V2) action from the Office 365 Outlook connector.
- Sign in and configure the email:
- To:
support@yourcompany.com - Subject:
New Standard Service Request:(add theTitlefrom the trigger). - Body: Compose a body with relevant details from the trigger and account steps.
- To:
You have now fully orchestrated the business process!
Test your understanding!
Imagine the business requirement changes. For "Premium" SLA customers, before updating the Dataverse record, you must first get approval from the account manager, who is also a user in Dataverse. How would you modify the "True" branch to accommodate this? Briefly describe the actions you would add.
Show answer
- Get Account Manager: After checking the SLA, add a Get a row by ID action from the Dataverse connector. Use the
_ownerid_valuefrom the "Get a row by ID" (Account) step to retrieve the User record for the account manager. This will give you their email address. - Start an approval: Add the Start and wait for an approval action from the Approvals connector.
- Assign to: Use the
Primary Emaildynamic content from the "Get Account Manager" step. - Add a Condition: After the approval action, add a new
Conditioncontrol to check theOutcomeof the approval step. - Place existing logic: Move the "Send message to Service Bus" and "Update a row" actions inside the "If true" branch of this new approval condition (i.e., if
Outcomeis equal toApprove). You could add a "Send rejection email" action in the "If false" branch.
This shows how you can easily extend the orchestration with more steps and integrations.
3. Professional Development Concepts in Logic Apps
To use Logic Apps effectively in an enterprise setting, you need to go beyond the designer. Here are two key concepts that are essential for the PL-400 exam and real-world projects.
A. Securely Connecting to Services with Managed Identity
Hardcoding connection strings or secrets is a major security risk. The professional way to connect to Azure resources (like Service Bus or a SQL database) is with Managed Identity. The Logic App gets its own identity in Microsoft Entra ID, and you grant that identity permissions to other resources.
The process involves:
- Enabling a system-assigned or user-assigned managed identity on your Logic App.
- Navigating to the target resource (e.g., your Service Bus queue) and adding a role assignment (e.g., "Azure Service Bus Data Sender") for the Logic App's managed identity.
- In your Logic App's connector, choosing the "Connect with managed identity" authentication option.
Dataverse healthcare APIs - Configure Azure Logic App
This Microsoft Learn article, though focused on a healthcare scenario, provides an excellent, detailed walkthrough of setting up authentication using a managed identity. The principles are universally applicable.
Review the following sections to understand the end-to-end process of using managed identities: Set up authentication: Read the introduction to understand the concept. Create a managed identity: Skim this to see how a user-assigned identity is created. Grant access to Azure Health Data Services: This shows the crucial step of assigning a role to the identity on the target service. Grant access to Dataverse healthcare APIs: This demonstrates how an application user in Dataverse can be linked to a managed identity, a key pattern for service-to-service authentication with Dataverse. Configure identity: See how the managed identity is linked to the Logic App itself.
B. Building Robust Workflows with Error Handling
By default, if an action fails, the entire Logic App run stops and is marked as "Failed". For robust orchestration, you need more control, similar to a try-catch-finally block in C#. Logic Apps provides this through Scopes and "Configure run after" settings.
A Scope groups a series of actions together. You can then define a second Scope that runs only if the first one fails, effectively creating a try-catch block.
The "Configure run after" setting on an action lets you define the condition under which it runs, based on the status of the preceding action (is successful, has failed, is skipped, has timed out). This is perfect for implementing a finally block (e.g., an action that runs whether the previous step succeeded or failed).
Logic Apps for Everyone - A complete guide for anyone!
This segment of the John Savill video demonstrates how to use Scopes and the 'Run After' configuration to build a simple but effective try-catch pattern.
Please watch the section from 45:37 to 48:28. Pay close attention to how a parallel branch and a Scope are used, and how the 'Run After' setting is configured to only execute if the main action is 'not successful'.
Conclusion
In this lesson, you've learned how to use Azure Logic Apps as a powerful tool for orchestrating complex business processes that integrate the Power Platform with other Azure services.
Key Takeaways:
- Azure Logic Apps are a "designer-first" integration service for building and managing workflows.
- They are triggered by events and use a vast library of connectors to perform actions on services like Dataverse, Office 365, and Azure Service Bus.
- You can build complex orchestrations using control flow actions like
ConditionandFor each. - For professional, secure, and robust solutions, you must use Managed Identities for authentication and configure error handling with Scopes and "run after" settings.
- Every Logic App has a JSON definition that can be source-controlled and deployed via CI/CD pipelines, aligning with professional DevOps practices.
What's Next?
You now have hands-on experience with two powerful, yet very different, integration methods: code-first Azure Functions and designer-first Azure Logic Apps. In our next lesson, we will synthesize this knowledge and learn how to choose an appropriate integration technology (Custom Connector, Webhook, Service Bus, Logic Apps) for a given scenario. This will equip you with the architectural decision-making skills expected of a senior Power Platform developer.