Hello! Welcome back to your training for the PL-400 certification.
In our last lesson, we focused on performance, learning how to use Patch and Remove to execute bulk data operations efficiently. We now know how to save an entire collection of data to Dataverse in a single, optimized call. However, before we commit that data, it's crucial to ensure its integrity.
Today, we'll address the learning outcome: Implement input validation on user entry fields using Power Fx functions like IsMatch and IsBlank.
Given your background in C# and JavaScript, you're already familiar with the importance of client-side validation for creating responsive user experiences and reducing unnecessary server calls. In this lesson, we'll translate those concepts into the world of Power Fx, focusing on the specific patterns and functions used in Canvas Apps to build robust, professional-grade validation logic.
The Power Apps Approach to Validation
In traditional web development, you might manually attach validation logic to form submission events. While you can do that in Power Apps, the more idiomatic and user-friendly approach is to leverage the built-in properties of form controls.
When you use a Form control in a Canvas App, each field is contained within a DataCard control. These data cards have properties we can customize to implement validation:
Required: A boolean property that marks a field as mandatory.ValidationState: An enum (ValidationState.Error,ValidationState.None) that controls the visual state of the input, such as showing a red border.ErrorMessage.Text: The text displayed in the error label associated with the card.ErrorMessage.Visible: Controls the visibility of that error label.
By manipulating these properties with Power Fx formulas, we can provide immediate, in-context feedback to the user.
Controlling When Validation Appears
A common challenge is that validation rules can trigger as soon as the form loads, showing a screen full of errors before the user has even interacted with it. This is a poor user experience.
A professional pattern to solve this is to use a variable that tracks whether the user has attempted to submit the form.
- On your "Submit" button's
OnSelectproperty: Set a variable.
Set(varFormSubmitted, true) - On your "Cancel" or "Reset" button: Reset the variable.
Set(varFormSubmitted, false) - In your validation formulas: Check this variable before applying the rule.
If(varFormSubmitted && IsBlank(Self.Value), ...)
This ensures that error messages only appear after the user has made their first submission attempt.
Basic Validation: Checking for Blanks and Length
The most common validation requirements are ensuring a field is not empty and that its content meets a certain length. The key Power Fx functions for this are IsBlank() and Len().
Let's see how to combine these functions with the varFormSubmitted pattern to create custom validation logic.
Custom Validations in Power Apps Modern Forms | Tutorial
The following video by Reza Dorrani provides an excellent demonstration of implementing custom validation rules. We'll focus on how he handles length and required field checks.
Please watch from 04:16 to 09:44. As you watch, pay close attention to: Unlocking Data Cards: You must unlock a data card to customize its properties. ValidationState Property: See how the formula combines varFormSubmitted with the validation logic (e.g., Len(Self.Value) >= 5 or IsBlank(Self.Selected.Value)). ErrorMessage.Text and Visible Properties: Observe how these are modified to show custom error messages when the ValidationState is Error.
As you saw, the core pattern for a text input's ValidationState property looks like this:
// On the ValidationState property of the text input control
If(
    varFormSubmitted && IsBlank(Self.Text),
    ValidationState.Error,  // Rule 1: Field is required
    If(
        varFormSubmitted && Len(Self.Text) < 5,
        ValidationState.Error, // Rule 2: Minimum 5 characters
        ValidationState.None   // All rules passed
    )
)
Test your understanding!
You have a ComboBox control named cmbCategory inside a data card. This field is not required in the data source, but you need to make it mandatory within the app.
Write the Power Fx formula for the ValidationState property of cmbCategory to enforce this rule, ensuring the error only shows after the user clicks the submit button.
Show answer
If(
    varFormSubmitted && IsBlank(Self.Selected),
    ValidationState.Error,
    ValidationState.None
)
We check the varFormSubmitted flag and then use IsBlank(Self.Selected) to see if the user has made a selection in the ComboBox. If nothing is selected, the state is set to Error.
Advanced Validation with IsMatch
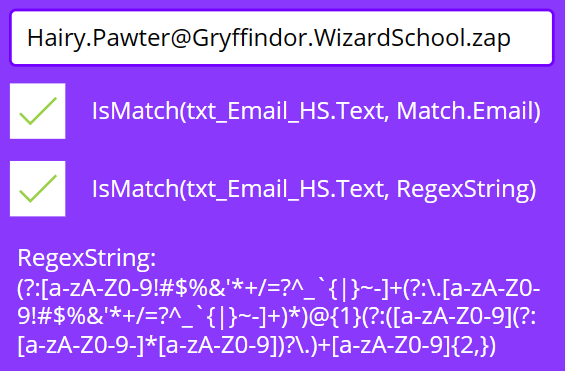
For more complex scenarios like validating email formats, phone numbers, or specific product codes, IsMatch is the essential function. It tests a text string against a pattern. Your experience with regular expressions in other languages will be directly applicable here.
You can define a pattern in IsMatch in three ways:
- Ordinary Characters: A simple string literal like
"abc". - Predefined Patterns: An enum of common patterns like
Match.EmailorMatch.MultipleDigits. - Regular Expressions: A powerful string pattern like
"\d{3}-\d{2}-\d{4}"for a US social security number.
To get a foundational understanding of this function, please review the official Microsoft documentation.
IsMatch, Match, and MatchAll functions - Power Platform
The official documentation provides a comprehensive overview of the IsMatch function, its syntax, predefined patterns, and options.
Read the following sections to understand the core concepts: Description: Get an overview of what IsMatch does. Patterns: Understand the three ways to define a pattern (ordinary, predefined, and regular expressions). Pay special attention to the table of Predefined patterns. Syntax: Review the syntax for IsMatch. Predefined patterns examples: See how to use patterns like Match.Email. Regular expressions examples: Look at the examples to see how custom regex can be applied for more complex formats.
Now let's see these concepts applied in a practical tutorial.
Power Apps form data validation tutorial
This second video from Reza Dorrani is a masterclass in using IsMatch. It also introduces a very clean pattern for handling multiple validation rules on a single field.
Please watch from 05:24 to 16:40. Focus on these key techniques: Reusing the ErrorMessage Label: Instead of adding new labels, he modifies the Text property of the existing error message label. The Coalesce Pattern: He uses Coalesce(parent.Error, "My custom error") to stack validation rules. This function returns the first non-blank value, allowing you to chain multiple validation checks in a specific order. IsMatch in Action: See how he uses IsMatch with both a predefined pattern (MultipleDigits) and custom regular expressions to validate a serial number format. Conditional Validation with Switch: Observe how the validation logic for an 'Asset Tag' changes based on the value of another field ('Asset Type').
The Coalesce pattern shown in the video is particularly powerful. By applying it to the Text property of the error message label, you can create a prioritized list of validation rules:
// On the Text property of the ErrorMessage label
Coalesce(
    // Rule 1: Check if it's blank (and form submitted)
    If(varFormSubmitted && IsBlank(DataCardValue1.Text), "Product Code is required.", Blank()),

    // Rule 2: Check if it matches the 'PROD-####' format
    If(!IsMatch(DataCardValue1.Text, "PROD-\d{4}"), "Code must be in 'PROD-1234' format.", Blank())
)
Finalizing the Validation Strategy
A complete validation strategy provides clear feedback and prevents the user from submitting invalid data. The final step is often to disable the submit button until all errors are resolved.
You can achieve this by checking the Visible property of your error message labels on the DisplayMode property of the submit button.
// On the DisplayMode property of the Submit Button
If(
    ErrorMessage1.Visible || ErrorMessage2.Visible || ErrorMessage3.Visible,
    DisplayMode.Disabled,
    DisplayMode.Edit
)
This ensures the user cannot even attempt to use the Patch or SubmitForm functions we learned about previously until the data is in a valid state.
Conclusion
In this lesson, you've learned how to implement robust, client-side input validation in your Canvas Apps. By moving beyond simple required fields, you can create a much more guided and error-resistant user experience.
Key Takeaways:
- Leverage the built-in
DataCardproperties (ValidationState,ErrorMessage.Text) for an idiomatic Power Apps validation experience. - Use a variable like
varFormSubmittedto control when validation messages appear, preventing errors on initial form load. - Use
IsBlankandLenfor basic required field and length checks. - Employ
IsMatchwith predefined patterns or custom regular expressions for complex format validation. - Chain multiple validation rules elegantly using the
Coalescefunction on the error message'sTextproperty. - Disable the submit button based on the visibility of error messages to prevent the submission of invalid data.
Up Next:
Validation is about preventing errors before they happen. But what about unexpected errors that can occur during data operations, like a network failure or a data source issue? In our next lesson, we will tackle this by learning to "Implement error handling for data source operations and formulas using the IfError and Errors functions."