Hello! Welcome to the sixth module of our course, where we shift our focus from client-side customization to server-side automation using Power Automate.
In the last lesson, you mastered building reusable JavaScript libraries for Model-driven Apps, a key skill for creating maintainable client-side logic. Now, we'll explore how to automate business processes that run in the background, without any user interaction.
This lesson kicks off our journey into Power Automate cloud flows. Your learning outcome is to implement cloud flows triggered by events in Dataverse, SharePoint, and other services. We will focus on creating automated flows that spring into action when data changes in these core systems. Given your extensive experience with Dynamics 365 plugins, you'll find many of these concepts, like event pipelines and execution context, quite familiar.
1. Understanding Automated Cloud Flow Triggers
An automated cloud flow is initiated by an event. This event could be a new email arriving in Outlook, a file being added to SharePoint, or, most relevant to our work, a row being created or updated in Dataverse. The component that listens for this event is called a trigger.
Every automated flow begins with exactly one trigger. The Power Platform offers hundreds of connectors, each with its own set of triggers, allowing you to connect and automate processes across a vast ecosystem of applications and services. Today, we'll concentrate on the two most critical services for a Power Platform developer: Dataverse and SharePoint.
2. Implementing Triggers for Dataverse
The Dataverse connector provides a powerful and highly configurable trigger that is fundamental to most Power Platform solutions. It allows you to start a flow in response to data operations, much like you would register a plugin step in classic Dynamics 365 development.
The primary trigger is "When a row is added, modified or deleted." Let's break down its key configuration parameters.
Trigger flows when a row is added, modified, or deleted
To start, please read this Microsoft Learn article which provides a solid overview of the Dataverse trigger's main parameters. This will serve as a foundational reference.
Read the sections covering 'Trigger condition' (Change type), 'Table name', and 'Scope'. These concepts should be very familiar from your plugin development experience, but it's good to see how they are applied in Power Automate.
As you read, you'll notice the parallels:
- Change type: Corresponds to the
Create,Update, andDeletemessages for plugins. You can choose to trigger on any combination of these. - Table name: The specific Dataverse table (entity) to monitor.
- Scope: Defines the execution context (User, Business Unit, Organization, etc.), determining which users' actions will trigger the flow. This directly maps to the execution scope of a plugin.
Optimizing Dataverse Triggers for Performance
A key aspect of professional development is ensuring your automations are efficient. Triggering a flow for every single change on a busy table can be costly and lead to unnecessary runs. The Dataverse trigger provides two powerful filtering mechanisms to prevent this.
- Select columns (Filtering Attributes): This allows you to specify a comma-separated list of column logical names. The flow will only trigger if one of these specific columns is updated. This is analogous to setting Filtering Attributes on a plugin step to avoid it running on irrelevant field changes.
- Filter rows (Filter Expression): This lets you write an OData-style expression to evaluate the state of the row after the change. The flow will only run if the expression is true. This acts as a server-side condition, preventing the flow from even starting if the criteria aren't met.
The following video provides an excellent practical demonstration of how to apply these filters.
Power Automate Dataverse Trigger: Row modified + Track Column Changes
Watch this video by Reza Dorrani to see how to configure column and row filters on a Dataverse trigger. This demonstrates the practical application of the concepts you just read about.
Watch from the beginning up to the 7:43 mark. Pay close attention to: Setting up the basic trigger (00:56). Using 'Select columns' to trigger the flow only when the 'quantity' field is modified (02:00). Combining column filters with 'Filter rows' to trigger only when the quantity is also greater than 10 (05:47).
By combining these filters, you can create highly specific and efficient triggers. For instance, a flow could be configured to run only when the "Status" of an "Order" is changed to "Approved" and the "Total Amount" is over $10,000.
Test your understanding!
You need to create a flow that sends a high-priority notification. The business requirement is that the flow must run only when the statuscode field on the incident (Case) table is updated to "In Progress" (statuscode value of 2) for cases where the prioritycode is "High" (prioritycode value of 1).
How would you configure the Dataverse trigger to be as efficient as possible?
Show answer
You would configure the trigger as follows:
- Change type: Modified
- Table name:
incidents - Scope: Organization (or as required)
- Select columns:
statuscode(This ensures the flow only considers running when the status changes, ignoring other field updates). - Filter rows:
statuscode eq 2 and prioritycode eq 1(This checks the final state of the row. The flow will only run if the status is "In Progress" AND the priority is "High").
This configuration is highly efficient because Dataverse filters the events on the server side, and the flow instance only runs when all conditions are met.
Handling Different Change Types
When your flow triggers on more than one change type (e.g., Added or Modified), you can use a Switch action to perform different logic for each case. The trigger output body contains an SdkMessage property that will be 'Create', 'Update', or 'Delete'.

3. Implementing Triggers for SharePoint
SharePoint is another cornerstone of the Power Platform, often used for document management and as a data source for lists. The SharePoint connector offers a variety of triggers for lists and document libraries.
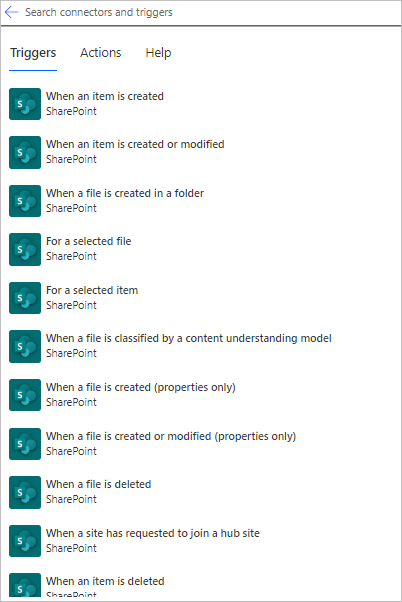
The most common triggers are:
When an item is createdWhen an item is created or modifiedWhen a file is created or modified in a folder
Microsoft SharePoint Connector for Power Automate
For a quick overview of the available triggers, please review the 'SharePoint triggers' section in the Microsoft documentation.
Briefly scan the list under the 'SharePoint triggers' heading to familiarize yourself with the different event types you can monitor.
The Challenge: Detecting Specific Column Changes in SharePoint
Unlike the Dataverse trigger, the SharePoint trigger When an item is created or modified does not have a built-in "Select columns" or "Filter rows" parameter. This presents a common developer challenge: how do you run a flow only when a specific column (e.g., a "Status" column) changes? Running the flow on every minor modification to an item is inefficient.
The standard pattern to solve this involves a few extra steps within the flow itself. The following video masterfully explains this technique.
Run Flow When SharePoint Column Value Changes | Is There an Option in Power Automate?
This video, also from Reza Dorrani, is a must-watch for any developer working with SharePoint and Power Automate. It walks through the complete pattern for detecting if a specific column's value has changed.
Please watch this video in its entirety. It covers several advanced, practical techniques: Differentiating Created vs. Modified: Using a trigger condition on the item's version number to run the flow only on modifications (02:39). Detecting Column Changes: Using the 'Get changes for an item or a file' action and checking the Has Changed property for your column (07:00). Retrieving the Previous Value: A very useful technique using the 'Send an HTTP request to SharePoint' action to query the SharePoint REST API for the item's previous version and get the old column value (10:48). Advanced Trigger Conditions: Combining the version check with a check on the column's new value right in the trigger settings (15:13).
This pattern—using Get changes and a condition—is fundamental for building robust and efficient SharePoint automations. The ability to retrieve the previous value via an HTTP request is an especially powerful technique for scenarios requiring detailed logging or notifications.
Conclusion
In this lesson, you've learned how to build the foundation of any server-side automation: the trigger. You now know how to create flows that respond to events in the two most important data services in the Power Platform ecosystem.
Key Takeaways:
- Automated cloud flows start with a trigger that listens for an event in a source system.
- The Dataverse trigger is highly efficient, offering server-side filtering via Select columns and Filter rows to minimize unnecessary flow runs.
- The SharePoint trigger for item modification requires an in-flow pattern: use the Get changes for an item or a file action followed by a condition to check if a specific column has been updated.
- You can distinguish between
Create,Update, andDeleteoperations in a Dataverse-triggered flow by using a Switch action on theSdkMessageproperty from the trigger output.
Up Next:
Now that you can reliably trigger flows based on specific events, the next step is to manipulate the data you receive. In our next lesson, we will dive into using expressions and built-in functions for data transformation within a flow. This will unlock the ability to format data, perform calculations, and prepare information for subsequent actions in your automation.