Hello! Welcome to your next lesson in automating your trading strategies.
In our last session, we mastered the ICT Silver Bullet, a powerful trade model that is heavily dependent on specific one-hour time windows. This highlights a core principle in ICT's methodology: time is a crucial element of analysis.
Today, we will take that principle and apply it directly to your Python programming journey. The goal of this lesson is to learn how to write a script to filter for trading activity only within specific ICT Killzones. This is your first major step in teaching your computer to think like an ICT trader by focusing its analysis on the most important times of the day. This skill is fundamental for automating signal generation and backtesting the time-based setups you aim to master.
1. A Refresher on ICT Killzones
Before we write any code, let's quickly review what Killzones are and when they occur. Killzones are specific periods of the trading day where institutional order flow is expected to create higher volatility and clearer price movements. Focusing your analysis within these windows helps filter out noise and concentrate on high-probability opportunities.
The main sessions are the Asian, London, and New York Killzones.
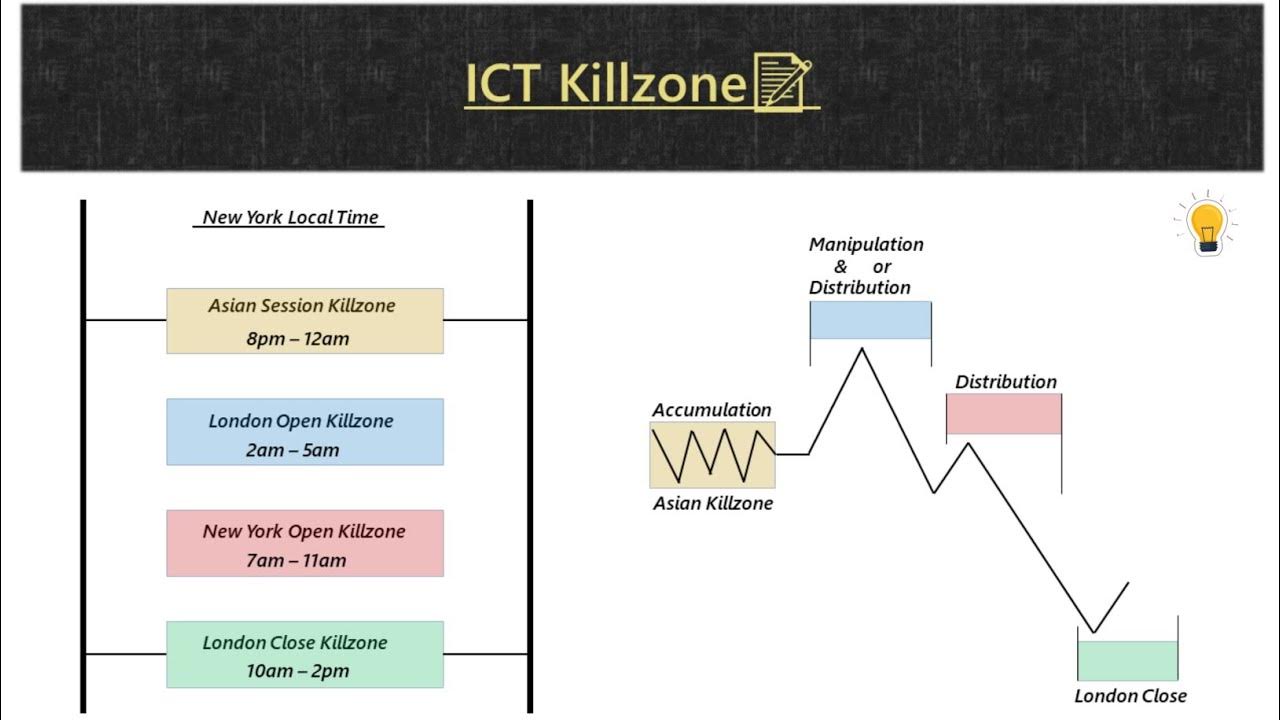
To solidify the exact timings, which can differ slightly for Forex and Indices, let's watch a short video that breaks them down.
ICT Killzones & Indicator Settings
The video 'ICT Killzones & Indicator Settings' by TTrades provides a concise overview of what Killzones are and their precise timings. This will serve as a great refresher.
Please watch from the beginning until 02:23. Focus on: The concept of Killzones as high-volatility windows. The specific time slots for the Asia, London, and New York sessions. The slight differences in timing between Forex and Indices markets.
As the video explains, all times are based on New York Local Time (UTC-4/UTC-5). For our coding purposes, we will stick to these standardized times. Here is a table for quick reference (we will focus on the Indices times):
| Killzone | Time (New York Local) |
|---|---|
| Asian Session | 20:00 - 00:00 |
| London Open | 02:00 - 05:00 |
| New York AM | 08:30 - 11:00 |
| New York PM | 13:30 - 16:00 |
2. The Right Tool for the Job: pandas.between_time()
In previous modules, you learned to work with market data using the pandas library. Your data, loaded into a DataFrame, likely has a DatetimeIndex — an index composed of date and time information. This is perfect, because pandas has a built-in function specifically designed for the task we need to perform.
While you could construct filters using standard comparison operators (> and <), it would be cumbersome to do so for every single day in your dataset. A much more elegant and efficient solution is the between_time() method.
Let's see how it works.
Pandas dataframe.between_time()
The article 'Pandas dataframe.between_time()' from GeeksforGeeks provides a direct and clear explanation of the function we need. It covers the syntax and shows a simple, effective example.
Read the introduction to understand the function's purpose and syntax. Then, carefully review the example code to see how it's applied to a sample DataFrame. This will form the basis of our Killzone script.
The key takeaway from the article is that df.between_time(start_time, end_time) selects all rows where the time portion of the index falls within the specified range, regardless of the date. This is exactly what we need to isolate a Killzone across many days of data.
3. Implementing the Killzone Filter in Python
Now, let's apply this to a practical example. Imagine you have a DataFrame named df containing 15-minute OHLC data for the E-mini S&P 500 futures (ES). The index of this DataFrame is a DatetimeIndex.
Here is a Python script that demonstrates how to isolate the London Open Killzone (02:00 - 05:00).
import pandas as pd
import numpy as np

# --- 1. Create a sample DataFrame ---
# This simulates having two days of 15-minute price data.
# In a real application, you would load this from a file or API.
rng = pd.date_range('2023-11-27', '2023-11-28 23:59:00', freq='15min')
data = {'open': np.random.random(len(rng)), 'high': np.random.random(len(rng)),
        'low': np.random.random(len(rng)), 'close': np.random.random(len(rng))}
df = pd.DataFrame(data, index=rng)
df.index.name = 'time'

print("--- Original DataFrame (first 5 rows) ---")
print(df.head())

# --- 2. Define the Killzone time window ---
london_start = '02:00:00'
london_end = '05:00:00'

# --- 3. Filter the DataFrame for the London Killzone ---
# The `inclusive='both'` argument ensures that data at exactly 02:00 and 05:00 is included.
london_kz_df = df.between_time(london_start, london_end, inclusive='both')

print(f"\n--- Data within London Killzone ({london_start} - {london_end}) ---")
print(london_kz_df)
Code Breakdown:
- We first create a sample DataFrame
dfwith aDatetimeIndex, similar to what you would get from a market data provider. - We define the
start_timeandend_timeas strings. - We call
df.between_time()with these times. The result is a new DataFrame,london_kz_df, that contains only the rows from our original data that fall within the 2 AM to 5 AM window, for both November 27th and November 28th.
Notice the inclusive='both' argument. This specifies whether the start and end times themselves should be included in the filter. For ICT Killzones, we typically want to include the boundaries. The resource "How to Select Values Between Two Times in Pandas" from Statology (LINK) provides more detail on this argument if you are curious. You can set it to 'left', 'right', or 'neither'.
4. A Complete Killzone Filtering Script
Let's expand on this to build a more useful script that identifies and separates multiple Killzones. This is a foundational block for a bot that needs to behave differently depending on the session.
import pandas as pd
import numpy as np

# --- Create a sample DataFrame ---
rng = pd.date_range('2023-11-27', '2023-11-28 23:59:00', freq='15min')
data = {'open': np.random.random(len(rng)), 'high': np.random.random(len(rng)),
        'low': np.random.random(len(rng)), 'close': np.random.random(len(rng))}
df = pd.DataFrame(data, index=rng)
df.index.name = 'time'

# --- Define Killzone Times for Indices ---
KILLZONES = {
    'asia': ('20:00', '00:00'),
    'london': ('02:00', '05:00'),
    'ny_am': ('08:30', '11:00'),
    'ny_pm': ('13:30', '16:00')
}

# --- Filter and store each Killzone's data ---
# We use a dictionary to hold the resulting DataFrames
filtered_data = {}

for name, (start_time, end_time) in KILLZONES.items():
    # The Asian session crosses midnight, so it requires special handling.
    if start_time > end_time:
         # Select from start_time to midnight, then from midnight to end_time
         filtered_data[name] = df.between_time(start_time, '23:59:59')._append(df.between_time('00:00', end_time))
    else:
        filtered_data[name] = df.between_time(start_time, end_time)

# --- Display the results ---
print("--- New York AM Session Data ---")
print(filtered_data['ny_am'])

print("\n--- Asian Session Data ---")
print(filtered_data['asia'])
Handling the Asian Session: The Asian Killzone (20:00 - 00:00) is a special case because it crosses midnight. A simple between_time('20:00', '00:00') would return an empty DataFrame. The code above handles this by filtering for two separate periods (20:00 to midnight, and midnight to 00:00) and combining the results. This is a common challenge when working with trading sessions that span across calendar days.
Test your understanding!
You are given the df DataFrame from the script above. How would you modify the script to only filter for the New York PM session (13:30 to 16:00)? Write the single line of code that performs the filtering and assigns it to a variable called ny_pm_df.
Show answer
ny_pm_df = df.between_time('13:30', '16:00')
This line correctly applies the between_time method with the start and end times for the NY PM session.
Conclusion
Congratulations! You have successfully bridged a key ICT concept with your Python skills. You can now programmatically isolate the most important trading sessions of the day from a raw dataset. This is a non-negotiable first step for automating any time-based trading strategy, like the Silver Bullet, or for building analytics that focus on session-specific behavior.
Key Takeaways:
- ICT Killzones are specific time windows where market volatility and directional moves are more likely.
- To filter time-series data in
pandas, the DataFrame must have aDatetimeIndex. - The
df.between_time(start_time, end_time)function is the most direct and efficient method for selecting data within a specific time range across multiple days. - Sessions that cross midnight, like the Asian Killzone, require special handling to combine data from two separate calendar days.
Preview for the Next Lesson:
Now that you can filter data by time, you have the ability to tell your script when to look. The next logical step is to tell it what to compare. In our next lesson, you will learn how to fetch data for two correlated assets to analyze their price relationship. This will lay the groundwork for programmatically detecting one of ICT's most powerful confirmation concepts: Smart Money Technique (SMT) divergence.