Hello! Welcome to the first lesson of your course.
Our journey to becoming a better overall 3D artist begins here. Your technical skills in VFX and computer science provide a fantastic foundation, but as you mentioned, the goal is to develop your "artistic eye." This course is designed to bridge that gap, moving from technical execution to artistic intention and polish.
We'll start with the bedrock of visual art: Foundational Composition. This module is all about learning how to arrange elements within a frame to create beautiful, compelling, and clear images.
In this first lesson, you will learn to recreate 3 film stills in 3D, focusing on the rule of thirds and golden ratio placement. This exercise is designed to train your eye to see the underlying structure in professional work and give you a practical framework for your own compositions. Let's begin!
The Building Blocks of Composition
Before we jump into 3D, we need to understand the principles we'll be working with. Compositional "rules" aren't strict laws you must obey. Think of them as time-tested guidelines or patterns that tend to create images that are pleasing and effective. As a TD, you can think of them as well-commented functions in a library: you don't have to use them, but they solve common problems elegantly.
1. The Rule of Thirds: Your Go-To Framework
The most widely known compositional guide is the Rule of Thirds. It’s simple, effective, and a great starting point for moving subjects away from a static, centered position.
Elements of Composition - The Complete Guide (Ebook)
First, let's get a concise, professional definition of the Rule of Thirds from the StudioBinder guide 'Elements of Composition'. Pay close attention to the example from 2001: A Space Odyssey and the explanation of why an off-center composition is often more engaging.
Please read the section titled 'Rule of Thirds' on pages 10-11 of the PDF.
To see this in motion and understand its psychological impact, this next short video is excellent.
Easily Understand THE RULE OF THIRDS - QUICK TIPS for Beginners - 4k
This video from BarbsterFilms quickly explains why placing subjects on the intersections of the grid feels more natural and helps guide the viewer's eye.
Watch the video from the beginning until the 01:24 mark.
The key idea is that placing points of interest on the intersections (the "power points") or along the lines creates a more balanced, dynamic, and visually interesting image than simply centering the subject.
2. The Golden Ratio: A Deeper Harmony
The Golden Ratio is another powerful guide, rooted in mathematics () and observed everywhere from classical art to nature. It often produces compositions with a very natural and harmonious flow. It can feel more complex than the Rule of Thirds, but it's an invaluable tool.
Art Lessons - Methods for finding pleasing compositions (Aaron's Art Tips Season 2 E17)
Aaron Blaise, a former Disney animator, provides a fantastic and approachable explanation of both the Rule of Thirds and the Golden Ratio. He demonstrates how he applies these guides to his own professional artwork, showing that they are practical tools, not just abstract theory.
Watch from 02:50 to 15:46. Pay special attention to: How the Golden Ratio is constructed from a rectangle and creates a spiral. How he overlays, scales, and even flips the guides to analyze his compositions. His core message: these are guides to help you understand why something that already 'looks good' works so well.
As Aaron Blaise emphasizes, you’ll often find that a composition you make that just feels right coincidentally aligns with these principles. They tap into an innate human preference for balance and visual harmony.
Test your understanding!
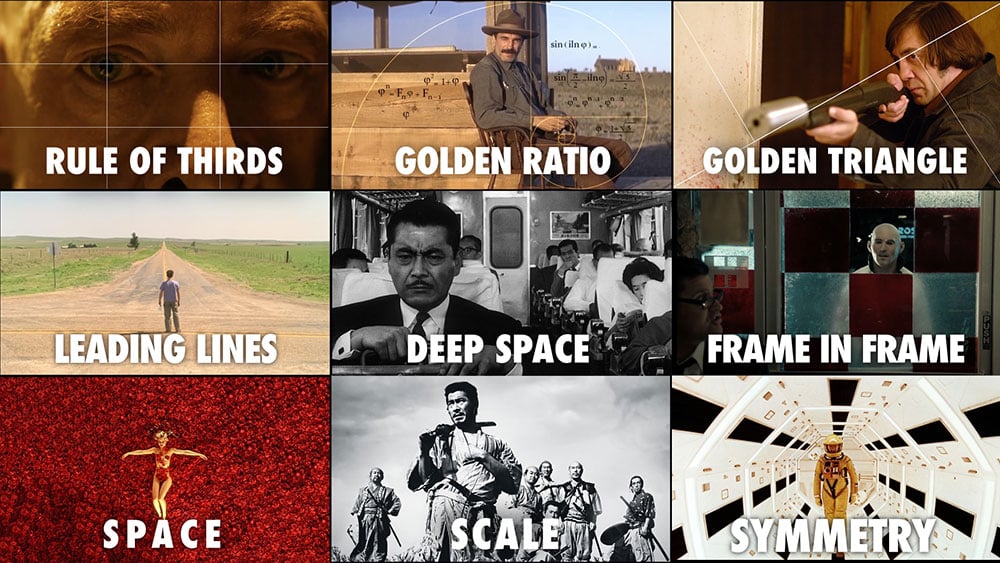
Take a look at the image below. Which compositional rule is most clearly demonstrated in the still from Blade Runner 2049? Where is the main focal point placed according to that rule?
Show answer
The still from Blade Runner 2049 (top left) is a classic example of the Rule of Thirds. The main focal point, the character K, is placed along the right vertical third line, and his eye level is very close to the top horizontal third line, placing his face near the top-right "power point".
From Theory to 3D Practice
So, how does this apply to your work as a 3D artist? Let's look at an analysis from a fellow 3D artist who critiques their own work. This will help bridge the gap between 2D theory and 3D application.
Valuable lessons to learn about 3D Composition and ...
This article from The Rookies blog features a 3D artist analyzing their own environment renders. It's a perfect example of applying compositional thinking in a 3D context, including the iterative process of finding the right shot.
Read the section titled 'A happy accident'. Notice how the artist explicitly mentions placing the helmet (the focal point) on the 'top-right intersection of the thirds' and critiques other elements that compete for attention.
This article highlights a key part of the creative process: composition isn't always pre-planned. Sometimes the strongest shots are discovered through iteration—flying a camera around your scene, testing angles, and analyzing what you see. Your TD experience in iterating on tools and pipelines has a direct parallel here in the artistic iteration of finding a great shot.
Your Turn: The Re-creation Exercise (Approx. 35 minutes)
Now it's time to put this into practice. Your task is to recreate the composition of 3 different film stills using simple primitives in Blender. The goal is not to model the details, but to capture the compositional structure.
Step 1: Set Up Your Camera Guides
First, let's enable the Rule of Thirds overlay in Blender. This is a built-in feature that is incredibly helpful.
- Select your camera.
- Go to the Object Data Properties (the green camera icon).
- Expand the Viewport Display section.
- Expand Composition Guides and check the box for Thirds.
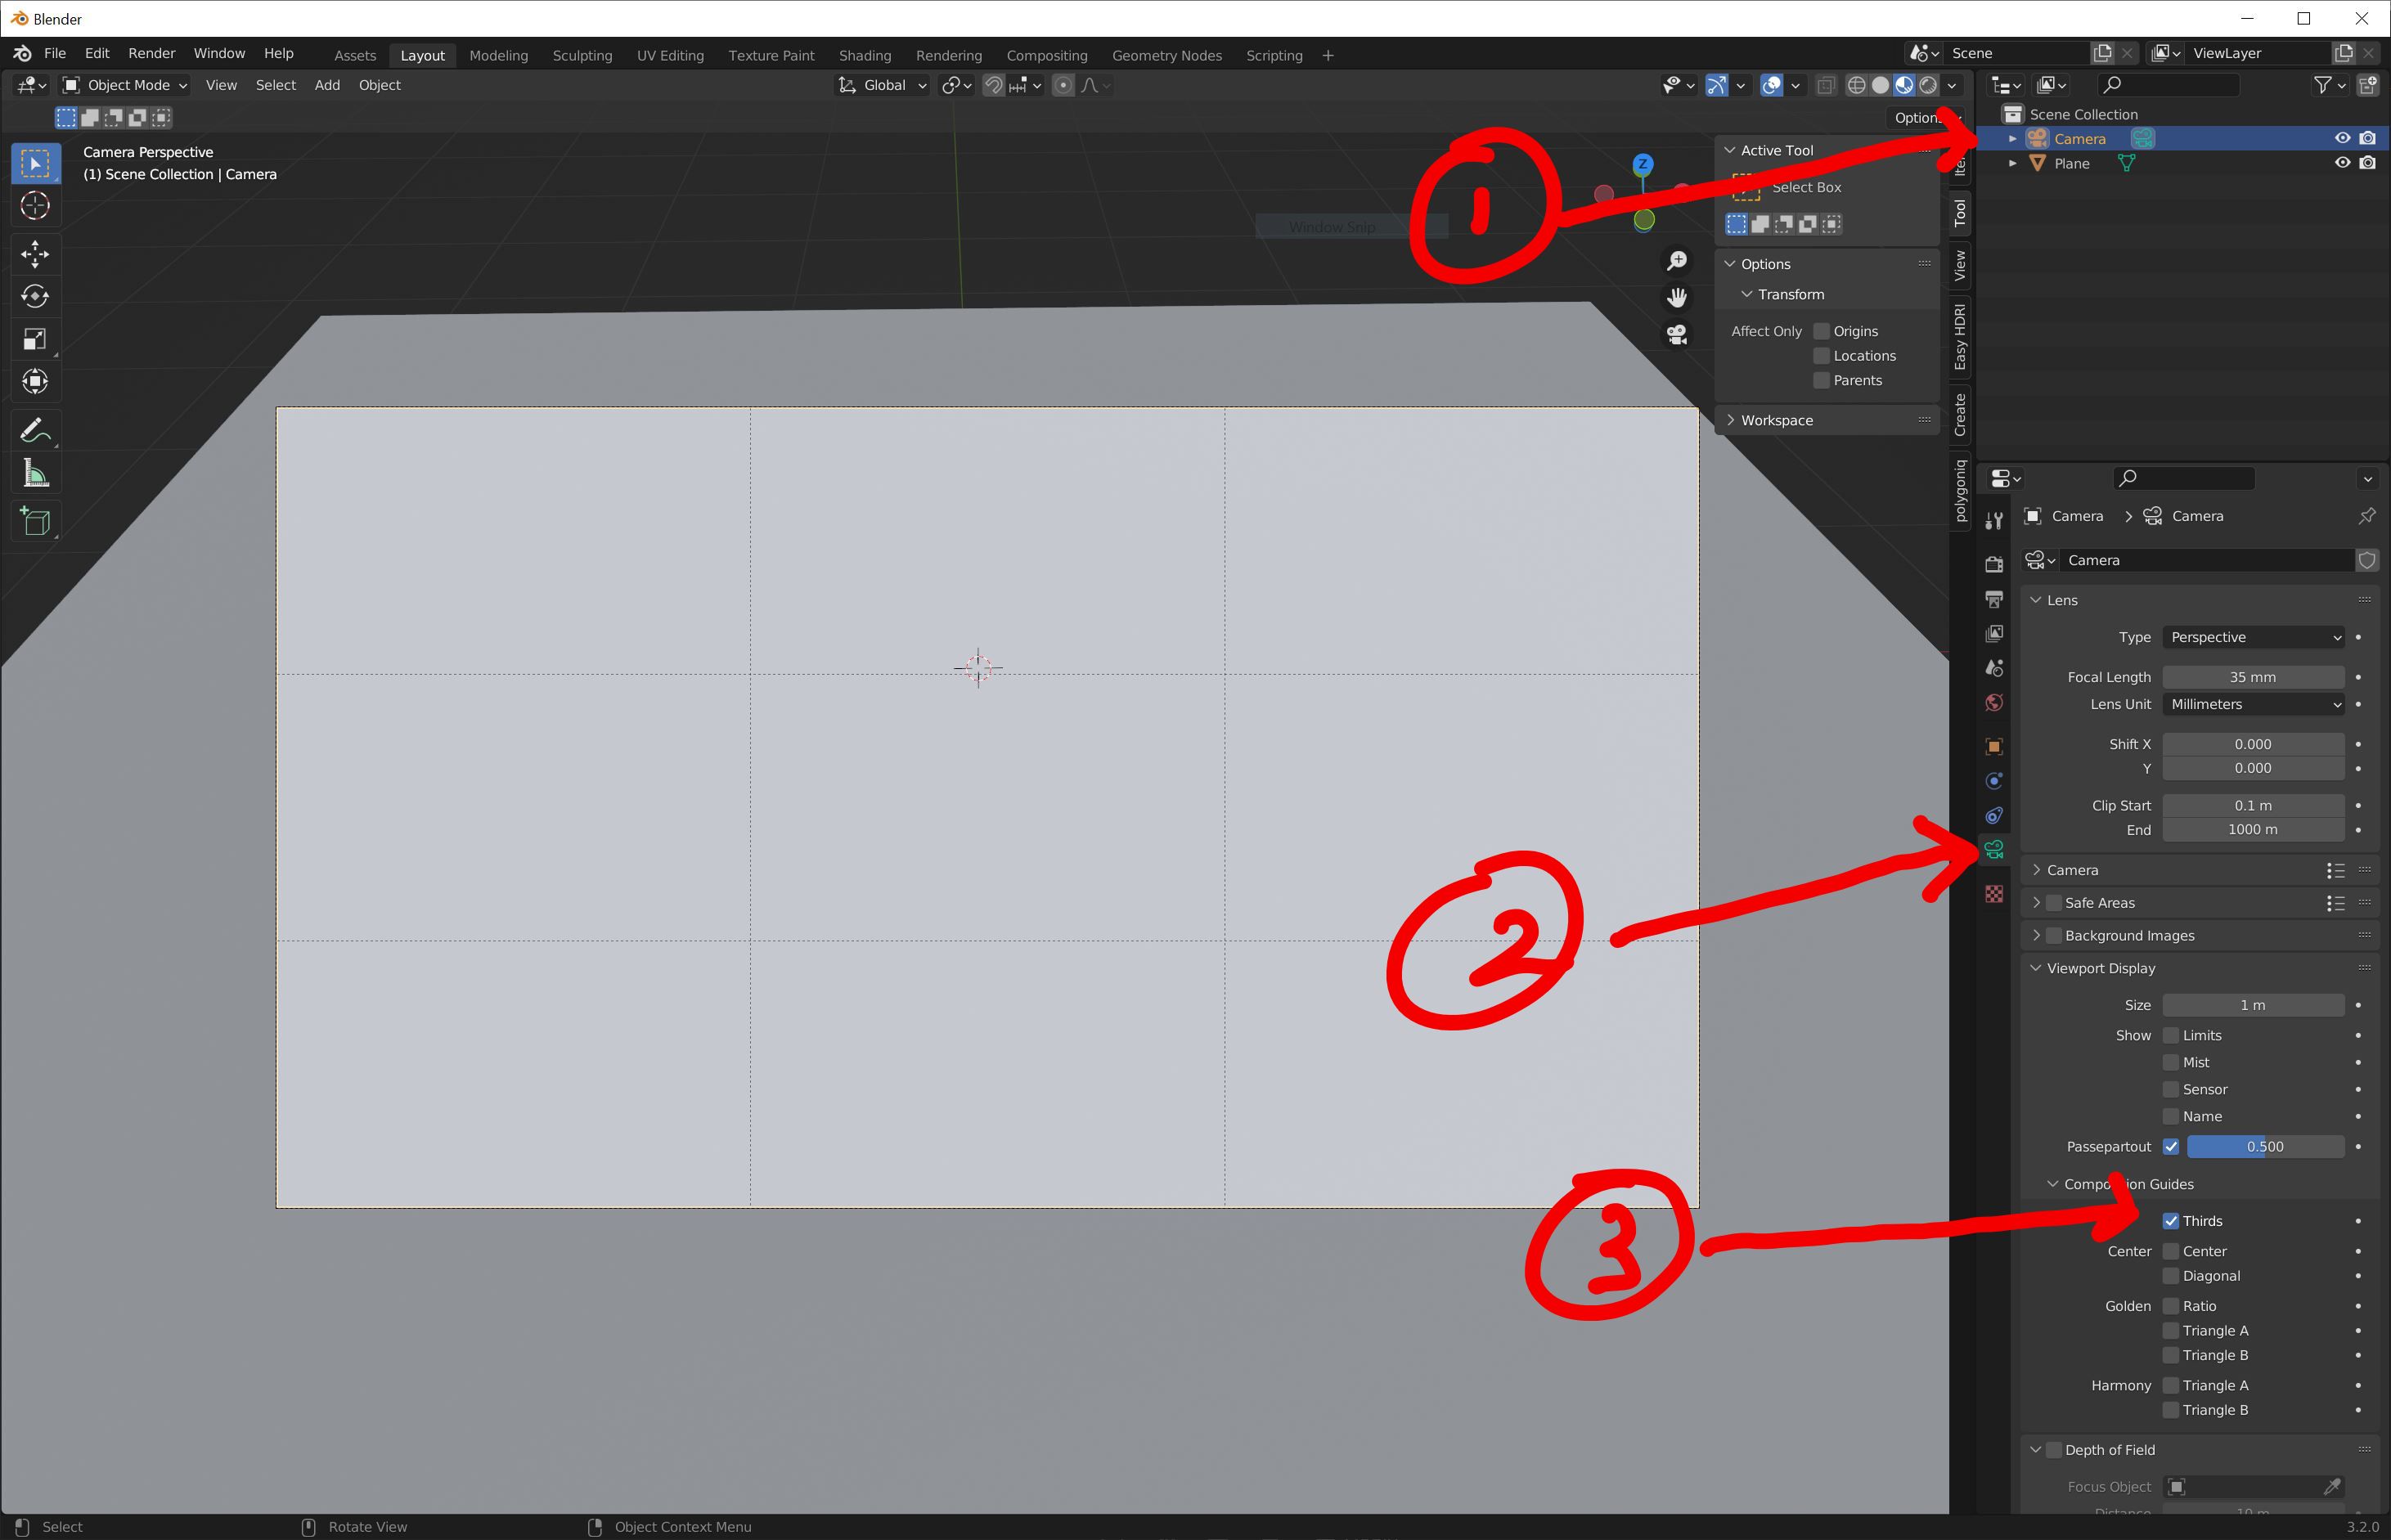
This image shows the steps to activate the Rule of Thirds overlay for your camera in Blender's viewport.
Blender doesn't have a default Golden Ratio overlay. You can find a transparent PNG of the golden spiral online and add it as an Image Plane parented to your camera, or simply keep a reference image open on another monitor.
Step 2: Choose Your Stills
Find three film stills you admire that demonstrate these principles. Websites like Film-grab or ShotDeck are excellent resources.
- Still 1: A clear example of the Rule of Thirds.
- Still 2: A clear example of the Golden Ratio/Spiral.
- Still 3: Your choice. It could be a more subtle example, or another strong use of either rule.
Step 3: Block Out the Scenes
For each still, do the following in Blender:
- Set your camera's aspect ratio to match the film still.
- Using only basic shapes (cubes for buildings/furniture, spheres/capsules for people, planes for ground), block in the major forms.
- Do not spend time on modeling, texturing, or lighting. This is about shape, scale, and placement. Think of it as creating a 3D sketch.
Step 4: Match the Composition & Analyze
- Position your camera and primitives to match the placement of elements in the original still.
- Use your camera guides (Rule of Thirds overlay and your Golden Ratio reference) to ensure your key elements align with the lines, intersections, or spiral.
- Take a screenshot or a simple viewport render of your block-out next to the original film still.
- For each recreation, write one or two sentences analyzing the composition. For example: "In No Country for Old Men, the character is framed on the left third, creating negative space that emphasizes his isolation." or "In Children of Men, the spiral of the staircase leads the eye directly down to the character, following the Golden Spiral."
This exercise will begin to train your brain to deconstruct strong compositions and apply that structural thinking to your own work.
Key Takeaways and Next Steps
In this lesson, we've introduced two fundamental compositional guides:
- The Rule of Thirds: A simple and effective grid for creating dynamic, balanced compositions by placing elements on lines and intersections.
- The Golden Ratio: A more organic, mathematical guide that creates natural flow and harmony, often in the form of a spiral.
The most important takeaway is that these are tools for analysis and creation, not rigid laws. Their purpose is to help you consciously guide the viewer's eye and create a specific feeling in your images.
In our next lesson, we will build directly on this foundation. Now that we know where to place things, we'll explore another powerful tool for directing attention: value. You'll learn how to "Design a composition using only value (grayscale) to establish a focal point."