Hello! Welcome to your third lesson on data structures.
In our last session, we built the basic structure of a singly linked list using Node and LinkedList classes and implemented the fundamental traversal algorithm. You learned that while traversing a linked list takes time, it's the gateway to all other operations.
Today, we'll implement the very operations that give linked lists their power: insertion and deletion. Your learning outcome is to implement insertion and deletion operations in a singly linked list (head, tail, and by value). Mastering these pointer manipulations is non-negotiable for technical interviews, as they form the basis for solving many complex list-based problems. We'll pay close attention to the logic, edge cases, and performance implications—all critical aspects for an interview setting.
Let's expand the LinkedList class we started in the previous lesson.
# Refresher from last lesson
class Node:
    def __init__(self, value):
        self.value = value
        self.next = None

class LinkedList:
    def __init__(self):
        self.head = None

    def print_list(self):
        current = self.head
        values = []
        while current:
            values.append(str(current.value))
            current = current.next
        print(" -> ".join(values) if values else "List is empty")

# We will be adding methods to this LinkedList class
1. Insertion Operations
Insertion in a linked list is all about "rewiring" the next pointers. We create a new node and then adjust the pointers of the surrounding nodes to link it into the chain.
For a clear visual and animated explanation of the different insertion types, the following video is an excellent resource.
Singly Linked List | Insert, Delete, Complexity Analysis
Watch the 'Singly Linked List | Insert, Delete, Complexity Analysis' video from Blue Tree Code to see animated examples of insertion.
Please watch from 01:41 to 07:46. This segment covers adding a node to the end, the start, and after a given node. Focus on how the next pointers are manipulated in each case. The code is in Java, but the logic and animations are perfectly transferable to Python.
Insertion at the Head (Prepending)
This is the most efficient insertion operation. It involves just two steps:
- Set the
nextpointer of the new node to point to the currentheadof the list. - Update the list's
headto be the new node.
This process is completed in constant time, , because it doesn't depend on the length of the list.
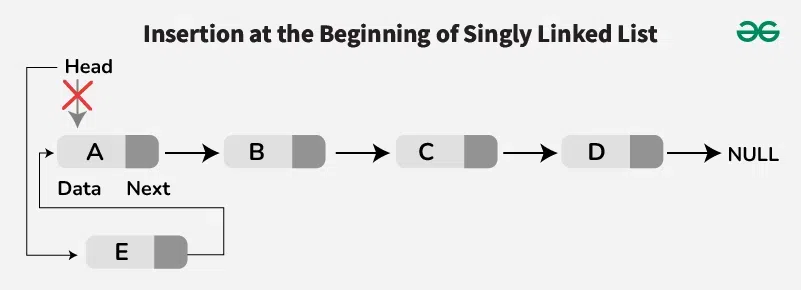
Here's the implementation:
# Add this method to your LinkedList class
def insert_at_beginning(self, value):
    new_node = Node(value)
    new_node.next = self.head
    self.head = new_node
Insertion at the Tail (Appending)
This is a very common operation. To add a node at the end, we must first find the current last node.
- Edge Case: If the list is empty (
self.head is None), the new node simply becomes thehead. - General Case: Traverse the list until you find the node whose
nextpointer isNone. This is the last node. - Update the
nextpointer of this last node to point to the new node.
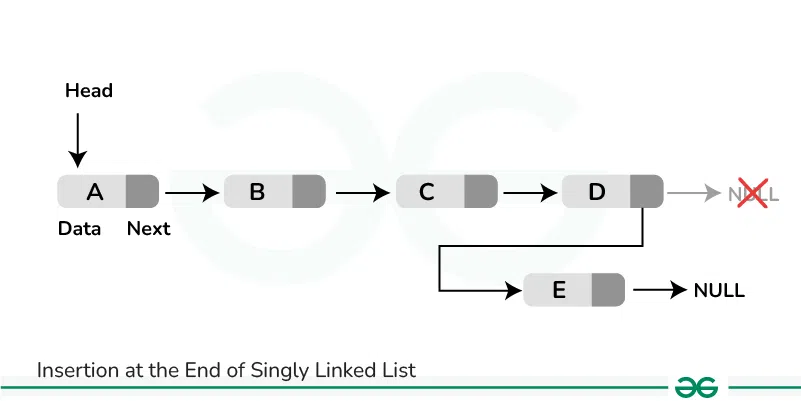
This operation has a time complexity of because, in the worst case, you have to traverse the entire list to find the end.
Here's the implementation:
# Add this method to your LinkedList class
def insert_at_end(self, value):
    new_node = Node(value)
    if self.head is None:
        self.head = new_node
        return

    # Traverse to the last node
    last_node = self.head
    while last_node.next:
        last_node = last_node.next

    last_node.next = new_node
Insertion by Value or Position
Inserting a node in the middle of the list (e.g., after a node with a specific value, or at a specific index) also requires traversal. The key is to stop at the node before the desired insertion point.
Let's implement insert_at_position(self, value, position).
- Handle edge cases: an invalid position or
position == 0(which is justinsert_at_beginning). - Traverse the list to find the node at
position - 1. - "Splice" the new node into the list by updating pointers:
- Set the new node's
nextpointer to thenextof the node atposition - 1. - Set the
nextpointer of the node atposition - 1to the new node.
- Set the new node's
Like appending, this is an operation due to the traversal.
Mastering Linked List Problems for Interviews
For concise, interview-ready Python code for these insertion operations, refer to the article from Algocademy.
Review the section named '2. Basic Linked List Operations' and find the subsection 'Insertion'. Study the Python functions insert_at_beginning, insert_at_end, and insert_at_position. Compare them with the methods we've just discussed.
2. Deletion Operations
Deletion also involves "rewiring" pointers, but this time to "bypass" the node being removed. A crucial detail is that to delete a node, you need a reference to the node preceding it.
Deletion from the Head
This is the counterpart to inserting at the head. It's simple and efficient.
- Edge Case: If the list is empty, there's nothing to do.
- General Case: Update the
headpointer toself.head.next. The old head is now "orphaned," and in a garbage-collected language like Python, its memory will be reclaimed automatically.
This is an operation.
# Add this method to your LinkedList class
def delete_from_beginning(self):
    if not self.head:
        print("List is empty. Cannot delete.")
        return
    self.head = self.head.next
Deletion by Value
This is a common interview task. To delete a node with a specific value, we must find it while keeping track of its predecessor.
- Edge Case: If the node to be deleted is the
head, handle it separately (same asdelete_from_beginning). - General Case: Use a
currentpointer to traverse the list. Whencurrent.nextis the node to be deleted, you've found the predecessor. - Bypass the target node by setting
current.next = current.next.next.
This operation is due to the search.
# Add this method to your LinkedList class
def delete_by_value(self, value):
    if not self.head:
        return

    # If the head node itself holds the value to be deleted
    if self.head.value == value:
        self.head = self.head.next
        return

    current = self.head
    # Search for the node to be deleted, keep track of the previous node
    while current.next and current.next.value != value:
        current = current.next

    # If the value was found, current is the node *before* the one to delete
    if current.next:
        current.next = current.next.next
    else:
        # Value not found in the list
        print(f"Value {value} not found.")
Deletion from the Tail
This is surprisingly tricky in a singly linked list. To delete the last node, you must set the next pointer of the second-to-last node to None. This means you have to traverse the list to find that second-to-last node.
- Edge Cases: Handle an empty list or a list with only one node.
- General Case: Traverse until
current.next.nextisNone. At this point,currentis the second-to-last node. - Set
current.next = None.
This is also an operation.
Linked List Interview Questions & Tips for Senior Engineers
The article 'Linked List Interview Questions & Tips' provides a good textual summary of the deletion process and discusses the complexities involved.
Read the section titled 'Deletion from a Singly Linked List', including the subsections on Head, Middle, and Tail deletion. Note the discussion on time and space complexity.
Test your understanding!
Given the LinkedList class we've been building, why is deleting the last node while deleting the first node is ? How could you change the LinkedList class structure to make deleting the last node an operation?
Show answer
Deleting the last node is because, in a singly linked list, you can only move forward. To remove the last node, you need access to the second-to-last node to set its next pointer to None. Finding this node requires traversing the entire list from the head.
To make this an operation, you would need to use a doubly linked list, where each node has both a next and a prev pointer. Alternatively, for a singly linked list, you could maintain a tail pointer in your LinkedList class that always points to the last node. However, even with a tail pointer, deletion remains because you would still need to traverse the list to find the new tail (the second-to-last node). A doubly linked list is the true solution for tail deletion.
An Interview Pro-Tip: The Dummy Node
When implementing list manipulations, especially deletion, you often have to write special if conditions to handle the head node. A common technique to simplify this logic is to use a dummy node (or sentinel node).
A dummy node is a placeholder node that sits before the actual head of your list. Your operations then start from dummy, and the real list begins at dummy.next. This way, every node you want to delete, including the original head, has a preceding node, eliminating the need for special case handling.
Linked List Interview Questions & Tips for Senior Engineers
The article from interviewing.io also introduces this powerful technique.
Read the section 'How to Show Mastery of Linked Lists in Interviews', focusing on 'Using a Dummy Node'. Compare the code for deletion with and without the dummy node to see how it simplifies the logic. This is a sign of a seasoned candidate in an interview.
Conclusion
You've now implemented the complete set of fundamental CRUD (Create, Read, Update, Delete) operations for a singly linked list.
Key Takeaways:
- Insertion and Deletion are about manipulating
nextpointers to either splice a node in or bypass it. - Head Operations (insertion/deletion at the beginning) are highly efficient at .
- Tail and Mid-list Operations are less efficient at because they require traversal from the head.
- Edge Cases are Critical: Always consider the empty list, a single-node list, and operations on the head/tail. Using a dummy node is a pro-level technique to simplify head-related edge cases.
In our next lesson, we will build directly on these pointer manipulation skills to learn high-ROI interview patterns. We'll start with the Two-Pointer Technique, a versatile method used to solve a wide range of array and linked list problems, such as finding the middle of a list or detecting cycles.