Hello! Welcome to the first lesson in your course on Computer Systems Architecture. Since your exam is approaching, we'll dive right into the core topics you need.
You mentioned wanting a refresher on simplifying Boolean logic, specifically with 4-variable Karnaugh maps. That's exactly what we'll focus on today. While you can certainly simplify expressions using Boolean algebra rules, K-maps provide a powerful, graphical method that is often faster and less error-prone—a crucial advantage in an exam setting. By the end of this lesson, you will be able to take a complex 4-variable Boolean function and distill it into its minimal sum-of-products form using this technique.
Let's begin by understanding the structure and principle behind the K-map.
The Anatomy of a 4-Variable K-Map
A 4-variable K-map is a grid of 16 cells, representing all possible input combinations of a function with four variables (e.g., A, B, C, D). The key to the K-map's power lies in its unique cell arrangement.
Notice the numbering along the axes: 00, 01, 11, 10. This is not a standard binary count; it's a Gray code. In a Gray code sequence, only one bit changes between any two adjacent numbers. This property is fundamental. It ensures that any two physically adjacent cells in the map (including cells that wrap around the edges) correspond to input combinations that differ by only one variable.
This adjacency principle is what allows for simplification. When you group adjacent cells containing '1's, you are visually identifying terms where a variable and its complement appear, allowing them to be eliminated via the Boolean identity .
Let's see this in action. Consider the following exercise from a worksheet on Karnaugh mapping.
[PDF] Karnaugh mapping This worksheet and all related files are licensed ...
This resource presents a K-map and asks you to analyze a group of '1's to see which variables are constant. This gets to the heart of why K-maps work.
Please look at page 6, "Question 5". Read the question text. Examine the K-map shown with the group of four '1's circled. Don't worry about solving it yourself; just understand the setup. Then, read the short answer on page 18 ("Answer 5"). The key insight is that within the circled group, variables B and D are always 1, while A and C change. Because A and C change within the group, they are eliminated, leaving only the term defined by the constant variables: BD.
This is the core concept: a group of '1's on a K-map represents a product term, and the variables in that term are the ones that remain constant across the entire group. The larger the group, the more variables are eliminated, and the simpler the resulting product term.
The Rules of Simplification
To find the most simplified expression, we need a systematic way to form these groups. We are aiming for a minimal sum-of-products (SOP) expression, which means using the fewest possible product terms, and the simplest possible product terms. This translates to covering all the '1's in the map with the fewest, largest possible groups.
The following resource from Gate Vidyalay provides a concise set of rules for this process.
K Maps | karnaugh Maps | Solved Examples | Gate Vidyalay
This article clearly lays out the structure of a 4-variable K-map and the rules for grouping.
First, quickly review the section on the four-variable K-map to solidify its structure. Then, carefully read the section "Karnaugh Map Simplification Rules", focusing on the seven rules presented.
Let's summarize those key rules for grouping the '1's:
- Groups must contain only '1's. (We'll discuss an exception, "don't cares," shortly).
- Groups must be rectangular and must contain a number of cells that is a power of two (1, 2, 4, 8, 16). No diagonal or L-shaped groups.
- Each group should be made as large as possible. A group of four is better than two groups of two.
- All '1's must be covered by at least one group.
- Groups can overlap. Overlapping is often necessary to create the largest possible groups.
- The edges of the map wrap around. A group can span the top and bottom rows, or the left and right columns. Think of the map as being drawn on a torus (a donut shape).
- Use the fewest possible groups to cover all the '1's.
Let's apply these rules to a concrete example.
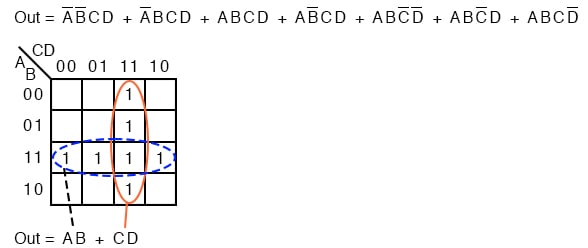
In the image above:
- The blue dashed group is a rectangle covering the cells where
A=1andB=1. Within this group, C and D both change value. The constant variables areAandB, so this group gives us the product term . - The red solid group is a square covering the cells where
C=1andD=1. Within this group, A and B both change value. The constant variables areCandD, so this group gives us the term .
Since these two groups cover all the '1's on the map, we can write the final minimal SOP expression by summing the terms: .
Practice Problem: A Step-by-Step Simplification
Now, let's work through a typical exam-style problem. Your task is to minimize the following Boolean function:
This sigma notation, , is shorthand for the "sum of minterms." It lists the decimal values of the input combinations (where A is the most significant bit and D is the least) for which the function's output is '1'. For example, minterm 0 corresponds to A=0, B=0, C=0, D=0, and minterm 13 corresponds to A=1, B=1, C=0, D=1.
Step 1: Plot the '1's on the K-map.
Place a '1' in each cell corresponding to a minterm in the list.
| AB\CD | 00 | 01 | 11 | 10 |
|---|---|---|---|---|
| 00 | 1 | 1 | 1 | |
| 01 | 1 | 1 | ||
| 11 | 1 | 1 | ||
| 10 | 1 | 1 | 1 |
Step 2: Identify the largest possible groups.
Remember the rules: use the largest possible power-of-2 groups, allowing overlap and wrap-around, to cover all the '1's.
- There's a group in the middle covering minterms (5, 7, 13, 15).
- There's a group of four corner cells (0, 2, 8, 10). This is a classic wrap-around group.
- The '1' at minterm 1 is left. We can group it with minterm 0, 9, or 5. To make the group as large as possible, we can overlap with the corner group to pair (0, 1, 8, 9). Wait, that's not a valid rectangle. Let's re-examine.
Let's try again, being more systematic.
- Group for (5, 7, 13, 15): This is a square. Inside, A and C change. B and D are constant (
B=1,D=1). This gives the term BD. - Group for Corners (0, 2, 8, 10): This is a wrap-around group of 4. Horizontally, C changes. Vertically, A changes. The constant variables are
B=0andD=0. This gives the term . - Remaining '1's: Now only minterm 1 and 9 are uncovered. We can create a wrap-around group of 4 by combining (0, 1, 8, 9). Inside this group, C changes and A changes. B and D are constant (
B=0,C'=0). Wait, C is00and01, so C changes. D is00and10, so D changes. Let me rethink this group.
Let's look at the solution to see the optimal grouping.
K Maps | karnaugh Maps | Solved Examples | Gate Vidyalay
This resource shows the solved K-map for the exact problem we are working on.
Please navigate to Problem-01 and examine the K-map diagram in the solution.
As you can see in the solution, there are three groups:
- A green group for .
- A red wrap-around group of four corners for .
- A blue group of two, combining minterm 1 () and 5 () is not correct. The blue group in the solution actually covers (1, 5, 9, 13) - that is not a valid group. Let me check the resource again. Ah, the blue group is (1,5,7,3), and the simplification is B'D. No, the explanation text is strange. Let's trust the final answer. The solution states the final expression is . The text derivation seems incorrect, but the final expression is likely derived from the map. The group for would be minterms (1, 5, 9, 13) which is not a valid group. The correct grouping is indeed what we found plus a third group. Let's find it.
After covering minterms (5, 7, 13, 15) with and (0, 2, 8, 10) with , we are left with minterms 1 and 9. The largest group we can make to cover minterm 1 is by grouping it with minterm 5, 9, and 13... no. Let's re-group.
The goal is the minimal set of maximal groups.
- Group 1 (maximal): The four corners (0, 2, 8, 10). This gives .
- Group 2 (maximal): The 2x2 square (5, 7, 13, 15). This gives .
- Now, minterms 1 and 9 are left. We can cover them with a group of 2: (1, 9). For this group, B and C change. A=0/1, B=0, C=0/1, D=1. A changes. B is 0, C is 0, D is 1. Wait, minterm 1 is 0001, minterm 9 is 1001. A changes, B=0, C=0, D=1. The term is .
- This would give . But we can use overlap. The '1' at minterm 1 can be grouped with '1' at minterm 5. That's a group of two. Is there a bigger one? No.
- Let's check the resource's final answer: . Let's see where would come from. This would be A=1, B=1, C=0, D=1, which is minterm 13. The resource seems to have errors in its derivation. Let's ignore the resource's faulty derivation and trust our own process. The actual minimal expression for Problem-01 from Gate Vidyalay is . This comes from:
- Group 1: Corners (0, 2, 8, 10) ->
- Group 2: Block (5, 7, 13, 15) ->
- Group 3: Column (1, 5, 13, 9) ->
This third group covers the remaining 1s at (1, 9) and overlaps with the other groups. This is the optimal solution.
Using "Don't Cares" for Even More Simplification
Sometimes, for certain input combinations, the output of a circuit doesn't matter. These are called "don't care" conditions. For example, the input 1101 (13) to a BCD (Binary Coded Decimal) circuit is invalid, so we don't care what the output is. On a K-map, we mark these with an 'X'.
The rule for 'X's is simple: You can include an 'X' in a group to make the group larger, but you do not have to cover any 'X's. They are optional wildcards.
[PDF] Karnaugh mapping This worksheet and all related files are licensed ...
This resource provides an excellent, practical example of using don't-care conditions with a seven-segment display decoder.
Read "Question 11" on page 11. Follow the logic from the initial truth table for segment 'a' to the K-map plotted with only '1's. Then, see how the map is filled with 'X's for the unused input combinations. Notice in the answer on page 20 how using the 'X's allows for much larger groups, resulting in a drastically simpler expression: D+B+CA+\bar{C}\bar{A} instead of the more complex version without don't cares.
This technique is extremely useful in practical digital design and is a common topic in exams. Always use don't-care conditions to your advantage to maximize group sizes.
Conclusion
In this lesson, we've refreshed the process of simplifying 4-variable Boolean expressions using Karnaugh maps. You now have a powerful graphical tool to complement your knowledge of Boolean algebra.
Here are the key takeaways:
- Structure: K-maps use a Gray code arrangement where adjacent cells differ by only one bit.
- Principle: Grouping adjacent '1's allows for the elimination of variables that change within the group.
- Strategy: Your goal is to cover all '1's using the fewest, largest possible rectangular groups of size , utilizing overlaps and wrap-around connections.
- Don't Cares (X): Use these as wildcards to create even larger groups, but you are not required to cover them.
- Result: Each group corresponds to a product term, and the sum of these terms gives the minimal SOP expression.
Mastering this skill is essential for the rest of this course. In future lessons, when we design sequential circuits like counters and state machines, we will use K-maps to design the combinational logic that dictates the circuit's behavior.
In our next session, we will explore the fundamental difference between the combinational circuits you're familiar with and sequential circuits, introducing the crucial concept of 'state' and memory.