Hello! Welcome back to our course on designing microservices.
In our first lesson, we identified the three core components of a web application: the client, the server, and the database. We saw how a three-tier architecture separates these concerns into distinct layers.
Today, we'll bring those static components to life. We will trace the complete journey of a single, practical action: creating a new task in our task manager application. This journey is known as the request-response cycle, and it is the fundamental communication pattern that powers the entire web. By the end of this lesson, you will be able to map out every step of this cycle, from a user's click in the browser to the data being saved in the database, and back again.
The High-Level View of the Cycle
Before diving into the details, let's look at the big picture. When a user interacts with a web application, a chain of events is triggered:
- Request: The user's action on the client (e.g., a web browser) initiates a request that is sent across the network to the server.
- Processing: The server receives this request, understands what needs to be done (the business logic), and often interacts with the database to read or write data.
- Response: The server then sends a response back across the network to the client, indicating the outcome of the action.
This flow is neatly illustrated in the following diagram, which builds upon the components we discussed in the last lesson.
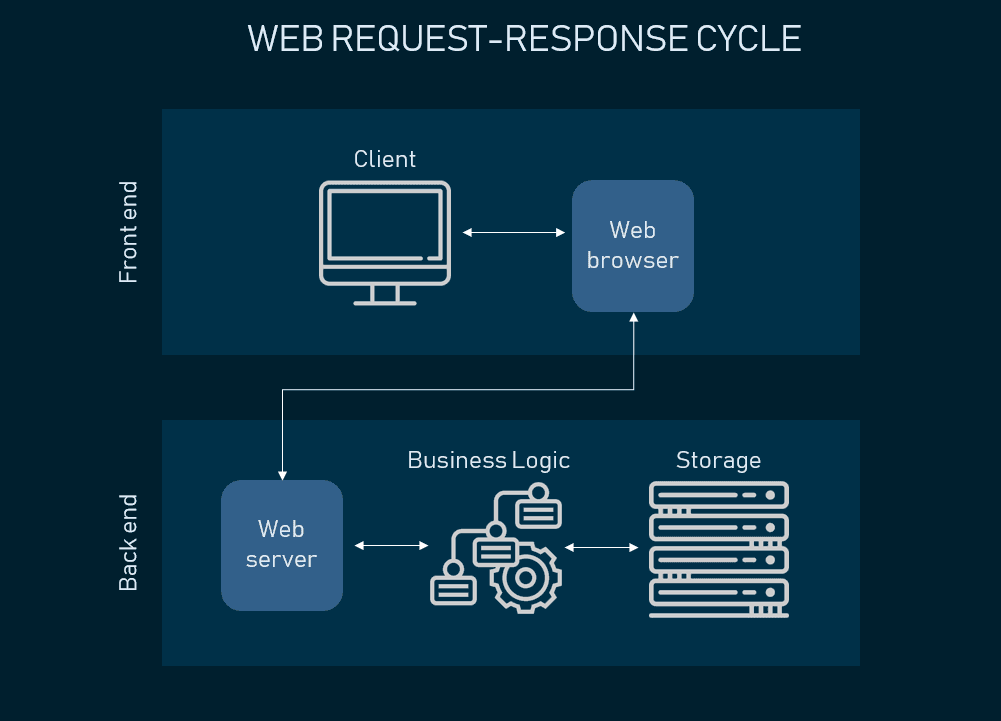
Now, let's break down what a "request" and a "response" actually are.
What is a Request? The Client's Message
A request is a formal message sent from the client to the server, constructed according to the rules of the Hypertext Transfer Protocol (HTTP). To create a new task, the client needs to send a specific type of request that tells the server to create a new piece of data.
To get a solid foundation on HTTP and the structure of these messages, please read the following article. It breaks down the anatomy of the request-response cycle in detail.
Understanding the HTTP Request-Response Cycle
This article from dev.to, 'Understanding the HTTP Request-Response Cycle', provides a detailed breakdown of what goes into an HTTP request and response. We will focus on the client's role first.
Please read the section titled 'Initiating the Request: The Client's Role'. Pay close attention to the three main parts of an HTTP request message: the Request Line, the Request Headers, and the Request Body.
As the article explains, a request to create a new task would be structured as follows:
-
Request Line: This specifies the intent of the request. For creating a resource, the standard HTTP method is
POST. The line would look something like this:POST /api/tasks HTTP/1.1.POST: The method, indicating the intent to create a new resource./api/tasks: The path, or Uniform Resource Identifier (URI), specifying which resource we're targeting.HTTP/1.1: The protocol version.
-
Request Headers: These provide metadata about the request. For our task creation, two important headers are:
Content-Type: application/json: This tells the server that the data in the request body is formatted as JSON.Authorization: Bearer <token>: This would carry the user's authentication token to prove they have permission to create a task.
-
Request Body: This contains the actual data for the new task. Since we specified
application/json, the body would be a JSON object.
Here is a concrete example of what the request to create a new task might look like, based on a design for a similar task management application.
[Backend Desing] Task Management Web application
This resource, 'Task Management Web application', provides a practical example of the request and response for creating a task.
Focus on the 'Request/Response Example' for POST /tasks. Examine the structure of the JSON request body. This is exactly the kind of data our client would send.
Putting it all together, the raw HTTP request sent from the browser would look like this:
POST /api/tasks HTTP/1.1
Host: our-task-app.com
Content-Type: application/json
Authorization: Bearer <some_jwt_token>
Content-Length: 135

{
  "title": "Design the microservices architecture",
  "description": "Decompose the system into bounded contexts and define service boundaries.",
  "dueDate": "2024-10-28T10:00:00Z",
  "priority": "HIGH"
}
The Journey to the Server and Back
The request doesn't just magically appear at the server. It travels through a series of network components. The following video provides an excellent, dynamic overview of this entire journey.
Web Application Architecture: Full Request-Response Lifecycle
This video from ByteMonk, 'Web Application Architecture: Full Request-Response Lifecycle', traces a request from the user's browser all the way to the database and back.
Watch the introduction (0:00-0:25), the section on the API Gateway and backend services (4:05-4:56), and the final section on the response path (6:04-7:12). This will give you a sense of the complete end-to-end flow.
As the video highlights, the request travels from the client, often through components like load balancers and an API Gateway, before reaching the correct backend service that contains our application logic.
Server-Side Processing: The Backend in Action
Once the request arrives, the server's job begins. This isn't one monolithic step; it's a sequence of processing within the server's layered architecture.
-
Parsing and Routing: The web server (e.g., Tomcat) receives the raw HTTP request and parses it into a format the application code can use. It then looks at the request line (
POST /api/tasks) and routes the request to the specific piece of code responsible for handling it—often called a Controller. -
Business Logic: The Controller passes the request to a Service layer. This layer contains the core business logic. For our task creation, it might:
- Validate the incoming data (e.g., ensure the
titleis not empty). - Check that the user is authorized to create tasks for a specific project.
- Prepare the data for storage.
- Validate the incoming data (e.g., ensure the
-
Database Interaction: The Service layer then uses a Repository layer to communicate with the database. The repository translates the task data into a database command (e.g., an SQL
INSERTstatement) and executes it. The database saves the new task and assigns it a unique ID.
The diagram in the "Task Management Web application" resource you looked at earlier perfectly illustrates this internal server flow from Controller to Service to Repository.
Crafting the Response: The Server's Reply
After the database confirms the task has been saved, the server constructs an HTTP response to send back to the client.
Let's return to our first reading to understand the structure of the response.
Understanding the HTTP Request-Response Cycle
Now, let's look at the other half of the cycle using the same article.
Please read the section 'Processing and Responding: The Server's Role'. Focus on the structure of the HTTP Response Message: the Status Line, Response Headers, and Response Body.
For our successful task creation, the response would include:
- Status Line:
HTTP/1.1 201 Created. The201 Createdstatus code is the standard way to confirm that a new resource has been successfully created. - Response Headers:
Content-Type: application/jsontells the client that the body contains JSON. - Response Body: The server typically sends back the newly created resource, including the ID assigned by the database.
Here is the example response from the "Task Management Web application" resource. This is what our server would send back to the client.
// Response (201 Created)
{
  "id": 122,
  "title": "Design the microservices architecture",
  "description": "Decompose the system into bounded contexts and define service boundaries.",
  "dueDate": "2024-10-28T10:00:00Z",
  "priority": "HIGH"
}
The client receives this response, and its JavaScript code can then update the UI to show the new task in the list and display a success message. The cycle is complete.
Test your understanding!
During a POST /tasks request, the server's business logic determines that the title field is missing from the request body.
- Which component is responsible for this validation: the Client, the Server's Service Layer, or the Database?
- What kind of HTTP status code should the server send back in its response? (Hint: Think about the categories: 2xx, 3xx, 4xx, 5xx).
Show answer
- The Server's Service Layer is responsible for enforcing business rules, such as validating that required data fields are present. While the client might also perform this validation to provide a better user experience, the server must enforce it as the authoritative source of logic.
- The server should send back a 4xx Client Error status code. Specifically,
400 Bad Requestis the most appropriate code to indicate that the request was malformed because it was missing a required field.
Conclusion
In this lesson, we have demystified the communication between the components of a web application by tracing the request-response cycle for creating a new task.
- Key Takeaways:
- The request-response cycle is an HTTP-based communication pattern between a client and a server.
- A request to create data uses the
POSTmethod and includes the data in its body, typically in JSON format. - The server processes requests in layers: routing (Controller), business logic (Service), and data access (Repository).
- A successful creation response uses a
201 Createdstatus code and often includes the newly created resource in its body.
Understanding this cycle is crucial because it's the foundation upon which all web APIs, including those in a microservices architecture, are built.
Next Up: So far, we've discussed the architecture of a single, self-contained application. In the next lesson, we will compare this monolithic architecture to a distributed architecture, exploring the trade-offs of each. This will set the stage for why and when you might choose to break a monolith down into microservices.