Hello! Welcome back to your foundational ethical hacking course.
In the last lesson, you learned how to perform UDP scans to find services that don't use TCP. You discovered that a simple UDP scan often returns ambiguous open|filtered results and that the key to clarifying them is using version detection (-sV).
Today, we will dive deep into that concept and expand on it. Finding open ports is just the first step; to assess a target, you need to know exactly what software is running on those ports and what operating system it's running on. This is where you move from simple scanning to detailed enumeration.
This lesson directly addresses the learning outcome: Interpret Nmap output to determine the target's operating system and service versions. Mastering this will enable you to build a detailed profile of a target machine, which is essential for identifying potential vulnerabilities.
1. Why Port Numbers Aren't Enough: The Need for Version Detection
When Nmap reports that port 21/tcp is open, it consults its internal database and guesses that the service is FTP. This is a good guess, but it's not a fact. An administrator could be running a different service on that port. More importantly, even if it is an FTP server, there are dozens of different FTP server applications (vsftpd, ProFTPD, Microsoft FTP, etc.), each with hundreds of versions.
A vulnerability is rarely tied to a protocol like "FTP"; it's tied to a specific version of a specific piece of software, like "vsftpd version 2.3.4". To find exploits, you must know the version.
Chapter 7. Service and Application Version Detection
The official Nmap documentation has a great introduction that explains why version detection is so critical in real-world security assessments. Please read the introductory section of this chapter.
Read the introduction section, which ends just before the 'Simple usage of version detection' example. Focus on the reasons given for why simply knowing the port number is insufficient for a proper security assessment.
Nmap solves this with version detection, using the -sV flag. When this is enabled, Nmap sends a series of probes to an open port. These probes are designed to elicit a response that reveals the software's identity and version number, often called a "banner."
2. Performing Service Version Detection (-sV)
Let's see this in action. The -sV flag tells Nmap to perform its version detection probes on all open ports found.
Nmap - OS And Service Version Scanning
This video from HackerSploit clearly demonstrates how to use the -sV flag and how the output gives you actionable intelligence for vulnerability analysis.
Watch the segment from 03:36 to 06:40. Pay close attention to how the output changes after adding -sV, revealing specific versions like 'OpenSSH 7.1' and 'GlassFish 4.0'. The presenter explains exactly why this information is so valuable.
As you saw, the VERSION column in the Nmap output becomes populated with rich detail. This is the information you would take to a vulnerability database or a tool like searchsploit to find known exploits.
3. Identifying the Operating System (-O)
Just as we can identify services, we can also identify the underlying operating system. Nmap does this through a process called TCP/IP stack fingerprinting. Every operating system implements the TCP/IP protocols with slight, subtle differences (e.g., initial TCP window sizes, support for specific TCP options, IP packet header fields). Nmap sends a series of unique and sometimes non-standard packets to the target and analyzes the responses. By comparing these responses to a database of known OS fingerprints, Nmap can make a highly accurate guess about the target's OS.
The command for this is -O (for OS), and it requires root privileges (sudo).
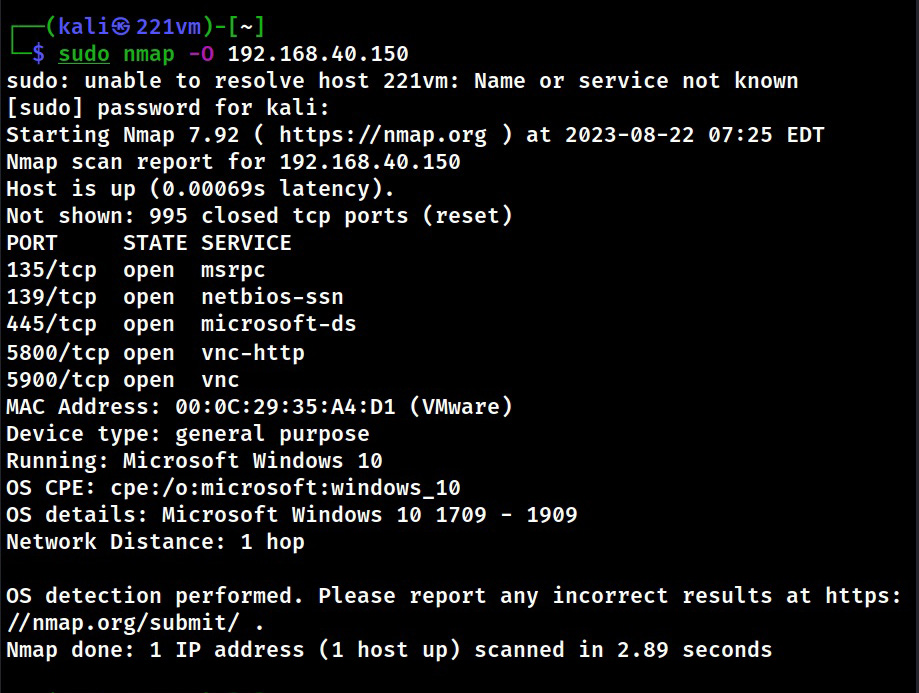
The output from an OS scan provides several key pieces of information.
Usage and Examples | Nmap Network Scanning
The official Nmap book breaks down the OS detection output line by line. Understanding these details will help you extract the maximum amount of information from your scans.
First, read the initial section 'Usage and Examples' to understand the main output fields like Device type, Running, and OS details. Then, read the section that starts with 'While TCP fingerprinting is a powerful method...' which explains how version detection (-sV) can help identify the OS when fingerprinting alone isn't enough.
Key takeaway from the reading: OS detection (-O) and version detection (-sV) are powerful on their own, but they are even better together. Sometimes the service banner (-sV) will reveal the OS (e.g., Microsoft-IIS httpd 10.0) when the TCP/IP fingerprint is ambiguous.
4. The Aggressive Scan (-A): Putting It All Together
Since OS and version detection are so often used together, Nmap provides a convenient and powerful option: -A for an "Aggressive" scan.
The -A flag enables:
- Version Detection (
-sV) - OS Detection (
-O) - Script Scanning (
-sC): Runs a default set of safe discovery scripts. (We'll cover this in depth in the next lesson). - Traceroute (
--traceroute): Traces the network path to the target.
This is often the go-to scan for general-purpose enumeration once you've identified a live host.
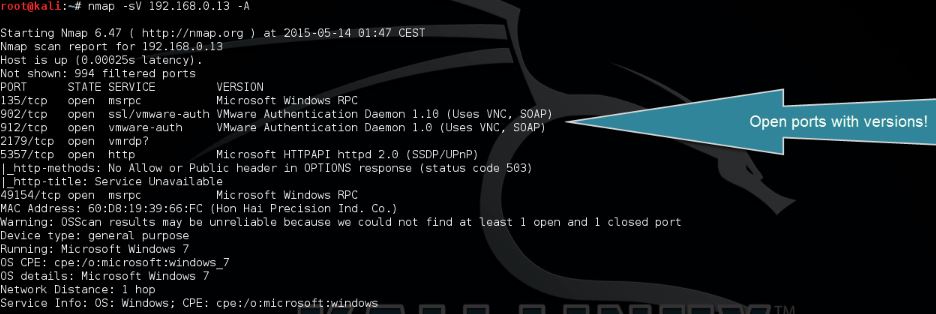
Now, let's watch a detailed walkthrough of an analyst running an aggressive scan and, more importantly, interpreting the results.
NMAP Basics Tutorial for Kali Linux Beginners - Cyber Security
This video from GetCyber provides an excellent demonstration of running a full -A scan and meticulously analyzing the text output to build a picture of the targets.
Watch the section from 15:53 to 22:07. The presenter runs a scan with the -A flag and saves the output to a file. Pay close attention to how they go through the file, identifying open ports, service names, version numbers (FTP, Telnet), and even the OS of a printer. This is exactly the process you will be following.
5. Hands-On Lab: Enumerating Metasploitable2
It's time to put this into practice in your own lab. Make sure your Kali and Metasploitable2 VMs are running and can communicate with each other.
-
Find your target's IP: If you don't have it handy, use
ip aon Metasploitable2 or run a ping scan from Kali (nmap -sn <your_network>/24). -
Run an Aggressive Scan: In your Kali terminal, run a comprehensive scan against your Metasploitable2 target. We will add
-T4to speed it up slightly. The command will save the output in all three major Nmap formats (.nmap,.xml, and the human-readable.gnmap) for future use.sudo nmap -A -T4 -oA metasploitable_scan <metasploitable_IP>This scan will take a few minutes. While it runs, Nmap will provide real-time status updates.
-
Interpret the Output: Once the scan is complete, the results will be on your screen. You can also view the saved file with
cat metasploitable_scan.nmap. Analyze the output to answer the following questions:- What operating system and kernel version did Nmap detect?
- Look at port 21. What FTP server software and version is running?
- Look at port 22. What SSH software and version is running?
- Look at port 80. What is the web server and its version?
- What is the exact version of the Samba
smbdservice running? (Hint: check ports 139 and 445).
This exercise is the core of this lesson. You are actively interpreting the data to build an intelligence profile of a target, a fundamental skill in penetration testing.
Conclusion
You have now moved beyond just finding open "doors" to peeking inside and identifying what's behind them. This level of detail is what separates a basic port scan from professional enumeration.
Key Takeaways:
- Version Detection (
-sV) is essential for identifying the specific software and version on a port, which is required for vulnerability matching. - OS Detection (
-O) uses TCP/IP stack fingerprinting to determine the target's operating system. - The Aggressive Scan (
-A) is your go-to command for comprehensive enumeration, combining OS detection, version detection, script scanning, and traceroute into one. - The ultimate goal is to interpret the output to build a detailed profile of the target machine, which informs your next steps in a penetration test.
Next Lesson Preview:
The -A scan you just ran also included -sC, which executes default Nmap scripts. In the next lesson, we will focus entirely on the Nmap Scripting Engine (NSE). You will learn how to find and use specific scripts to actively probe services for known vulnerabilities and misconfigurations, taking your enumeration skills to the next level.