Hello! Welcome back to our module on designing the central medallion.
In our last lesson, we established the crucial first step in creating a doily: choosing a foundation. You learned that for a dense, solid center—a hallmark of many mid-century designs—the magic ring is the superior choice because it can be pulled completely closed.
Today, we'll build directly on that foundation. Our goal is to design a complete, solid center medallion using clustered stitches. These stitches are the key to creating the rich texture and substance we're aiming for. We will explore different types of clustered stitches, understand the mathematics required to keep them flat as the circle grows, and consider the artistic choices you can make in their arrangement.
The Designer's Palette: Understanding Clustered Stitches
Clustered stitches are a family of techniques where multiple stitch components are worked together into the same space to create a single, voluminous, and highly textured stitch. They are perfect for adding dimension and density to a design.
The three most common types are the Puff, the Bobble, and the Popcorn stitch. While similar, they have distinct constructions and visual effects.
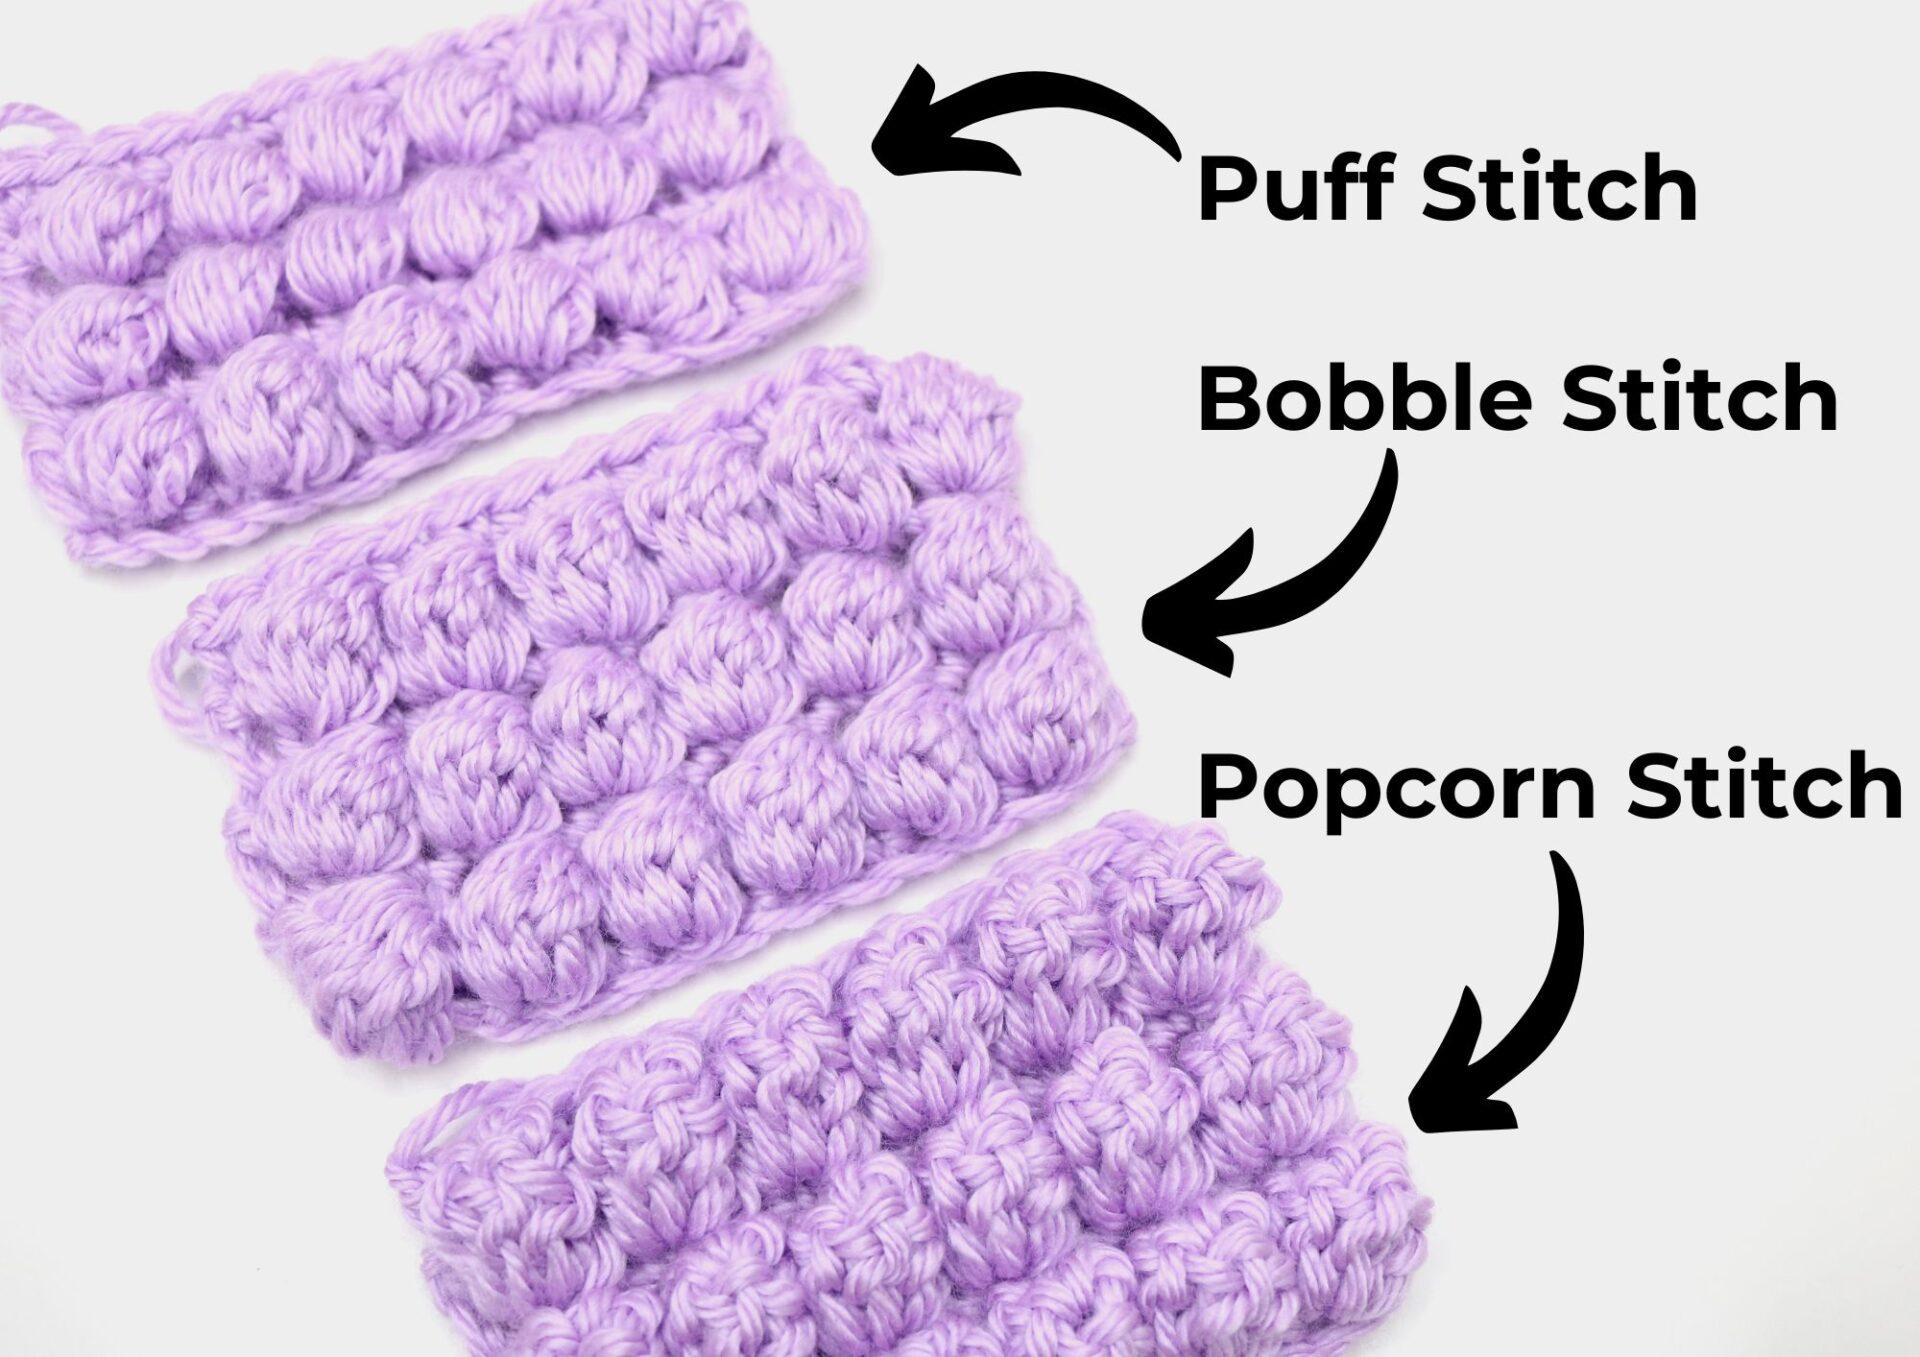
Let's quickly define them:
- Puff Stitch: Made by pulling up several loops (like half-finished half-double crochets) and then pulling a final loop through all of them at once. It's soft and rounded on both sides.
- Bobble Stitch: Made by working several incomplete double crochets and joining them only at the very top. This forces the body of the stitches to "pop" out to one side, creating a very prominent, bumpy texture.
- Popcorn Stitch: Made by working several complete double crochets into the same stitch, then dropping the live loop and pulling it through the first stitch to bunch them together. It creates the firmest and most defined cluster.
For doily design, Bobble and Puff stitches are particularly useful. Let's focus on how to design with them.
Designing with Bobble Stitches
The bobble stitch's ability to create a prominent, bead-like texture makes it a favorite in vintage patterns, like the classic "grape doily" design.

To design with bobbles, you need to understand not just how to make them, but how to control them.
How to Crochet Bobble Stitches in the Round
The video 'How to Crochet Bobble Stitches in the Round' by One Dog Woof provides an excellent demonstration of the key techniques you'll need.
Watch from 01:06 to 05:56. Pay close attention to two key points: How the bobble is constructed from four incomplete double crochets. The special technique used to 'push' the bobble to the front (right side) of the work. This is a critical design choice.
As you saw, a bobble naturally wants to pop to the back of the work. Forcing it to the front is a deliberate action that determines the final look of your medallion.
Arranging Your Bobbles
You also have control over how bobbles in subsequent rounds align with each other. This choice significantly changes the texture.
How to Crochet Bobble Stitches in the Round
Let's look at another clip from the same video that clearly illustrates this choice.
Watch from 11:53 to 13:00. The video demonstrates the difference between starting a round with a single crochet versus starting with a bobble. Notice how this small change creates either a staggered or stacked arrangement.
- Staggered Bobbles: Nestled between the bobbles of the previous round. This creates a dense, uniform, bumpy fabric.
- Stacked Bobbles: Aligned directly on top of each other, often with chain spaces between them. This creates more distinct lines or "rays" of texture.
This is your first purely aesthetic design decision for the medallion: what kind of texture do you want to create?
The Mathematics of a Flat Clustered Medallion
Now for the most important part of the design process. Clustered stitches are tall and wide. If you use the standard increase formula for single or double crochet, your medallion will either "cup" (curl up like a bowl) or "ruffle" (become wavy). We need a way to determine the correct increase rate for any stitch, including these bulky ones.
This is where we move beyond following patterns and into true design, using the principles of geometry you learned about in Module 2.
How to crochet a flat circle in any crochet stitch or pattern
The article 'How to crochet a flat circle in any crochet stitch or pattern' from DoraDoes provides a brilliant mathematical framework for this. It empowers you to calculate the exact increase formula for your specific yarn, hook, and stitch choice.
Please read two sections carefully: Start at 'The math of crocheting a flat circle' and read the 'Worked Example'. Follow the logic of using gauge (stitch height and width) to calculate the required number of stitches per round. Then, read the short but crucial section 'Crocheting a flat circle with more complex stitch patterns'. This confirms that the same mathematical process applies to bobbles, puffs, and shells.
Let's summarize that powerful design process:
- Swatch & Measure: Before you begin your doily, create a small, flat gauge swatch using your chosen clustered stitch (e.g., bobbles). Measure the average width and height of a single stitch.
- Calculate Diameter: For a target number of rounds (e.g., 5 rounds for your medallion), the diameter will be twice the number of rounds multiplied by your stitch height.
- Example: For a 5-round medallion with a stitch height of 1 cm, the diameter is
2 * 5 * 1cm = 10cm.
- Example: For a 5-round medallion with a stitch height of 1 cm, the diameter is
- Calculate Circumference: Use the formula .
- Example:
3.14 * 10cm = 31.4cm. This is the length of the outer edge of your 5-round medallion.
- Example:
- Calculate Total Stitches: Divide the circumference by your stitch width to find how many stitches you need in your final round.
- Example: If your stitch width is 1.2 cm, then
31.4cm / 1.2cm = 26.16 stitches. Let's say 26 stitches.
- Example: If your stitch width is 1.2 cm, then
- Calculate Your Increase Rate (Your 'X'): Divide the total stitches by the number of rounds. This tells you how many stitches to start with and how many to increase by in each subsequent round.
- Example:
26 stitches / 5 rounds = 5.2. You would round this to 5. - This means your formula would be: Start with 5 bobbles, and increase by 5 bobbles each round.
- Example:
This method gives you a precise, personalized formula for your crochet style.
The Practical Approach: Diagnose and Adjust
Math gives you a fantastic starting point, but tension can vary. If your medallion starts to misbehave, you can diagnose and fix it on the fly.
The Secret Crochet Circle Formula (and how to tweak it)
Let's read a short, practical guide from 'The Secret Crochet Circle Formula' by Shelley Husband on how to fix these common issues.
Read the section 'How to fix your circle when it isn’t flat'. Focus on the visual examples and simple solutions for ruffling and cupping.
- Ruffling/Wavy? You have too many stitches. Work a round with no increases to allow the fabric to flatten out.
- Cupping/Curling? You have too few stitches. Add an extra increase round by repeating the increase pattern of your last round.
Case Study: A Puff Stitch Medallion
Let's see this in action by analyzing a puff stitch medallion.
How to Crochet a Puff Stitch Circle - make your circles look like crochet flowers!
The video 'How to Crochet a Puff Stitch Circle' from Make & Do Crew demonstrates the creation and expansion of a puff stitch circle. As you watch, try to identify the increase formula being used.
Watch the following segments: Round 1 (01:37 - 03:48): How many puff stitches are in the first round? This establishes 'X'. Round 2 (05:13 - 07:47): What is the increase pattern here? Round 3 (07:47 - 09:22): What is the new increase pattern?
Let's break down the design:
- Round 1: The designer starts with 8 puff stitches. So, her increase number
Xis 8. (Total: 8 sts) - Round 2: She works
2 puff stitchesin each space between the puffs of the previous round. This is a standard doubling round, which adds 8 stitches. (Total: 16 sts) - Round 3: She works a repeating pattern of
*2 puffs in one space, 1 puff in the next space*. This is the standard increase pattern forX=8, and it adds another 8 stitches. (Total: 24 sts)
This video perfectly demonstrates the standard increase formula (Round N = (N-2) single stitches, then an increase) being applied to a clustered stitch. The designer determined, through swatching or experience, that a puff stitch requires an increase rate of 8 stitches per round to lie flat.
Test your understanding!
Now it's your turn to be the designer. You are going to design the first 3 rounds of a solid center medallion using bobble stitches, starting from a magic ring.
There is no single "right" answer. Your task is to make the design choices and state them.
- Choose your increase rate (
X): Based on the general rule that taller stitches need more increases, a bobble (based on a double crochet) might need more increases than a single crochet (which uses ~6). Choose a starting number between 8 and 12. - Define your increase pattern for Rounds 2 and 3: Based on your chosen
X, what will the repeat be? (e.g., For X=10, R2 is 2 bobbles in each st; R3 is 1 bobble, 2 bobbles in next st, repeated). - Choose your arrangement: Will you stack or stagger your bobbles?
- Chart it: On a piece of paper, use your radial grid drafting skills from the previous module to chart the first 3 rounds of your design. You don't need to crochet it, just create the pattern chart.
Describe your three design choices.
Show an example answer
Here is one possible design solution:
- Increase Rate (
X): I'll choose X=10. This is a common number for double-crochet based circles and should give a flat result with the bulky bobble stitches. - Increase Pattern:
- Round 1: 10 bobble stitches into a magic ring.
- Round 2: 2 bobble stitches in the top of each bobble from Round 1. (Total 20 sts)
- Round 3: A repeating pattern of
*1 bobble in the next stitch, 2 bobbles in the following stitch*. This will be repeated 10 times. (Total 30 sts)
- Arrangement: I will stagger the stitches to create a dense, pebbly texture. To do this, I will work the bobbles of R2 and R3 into the top of the stitches below, which naturally offsets them.
- Chart: My hand-drawn chart would show a magic ring, then 10 bobble symbols for R1. R2 would show two bobble symbols originating from each R1 stitch. R3 would show the
1, 2repeat pattern.
Conclusion
You've now moved from simply knowing what a bobble stitch is to understanding how to incorporate it into a flat, circular design. You have the tools to control texture, density, and flatness.
Key Takeaways:
- Clustered stitches like puffs, bobbles, and popcorns are used to create dense, textured medallions.
- The key to a flat design is using the correct number of increases per round (
X), which is determined by the stitch's height and width (gauge). - You can calculate a precise starting value for
Xusing geometry or use a guideline and adjust for ruffling or cupping as you work. - The placement of increases (staggering them to avoid corners) and the arrangement of stitches (stacked vs. staggered) are fundamental design choices that affect the final look.
In our next lesson, we will explore the opposite aesthetic. We will leave behind the world of dense, solid fabric and learn how to design an openwork center medallion using chain spaces and simple stitches to create light, airy, and lace-like beginnings for your doilies.