Hello! Welcome to the first lesson in your course on designing retro crochet doilies. I'm excited to guide you through this deep dive into creating your own beautiful, vintage-inspired patterns.
This first module is all about deconstructing the classics to see what makes them tick. In this lesson, we will focus on analyzing a vintage 1950s doily pattern to identify its three primary structural zones: the center, the body, and the border.
Think of it like architectural analysis. Before an architect designs a new building, they study the plans and structures of existing ones. By learning to see a finished doily not as a single intricate object, but as a composition of distinct parts, you'll gain the foundational vocabulary and framework needed to start designing your own.
The Anatomy of a Doily
At first glance, a vintage doily can look like an impossibly complex web of stitches. However, most circular doily designs from the mid-20th century follow a clear and logical three-part structure.
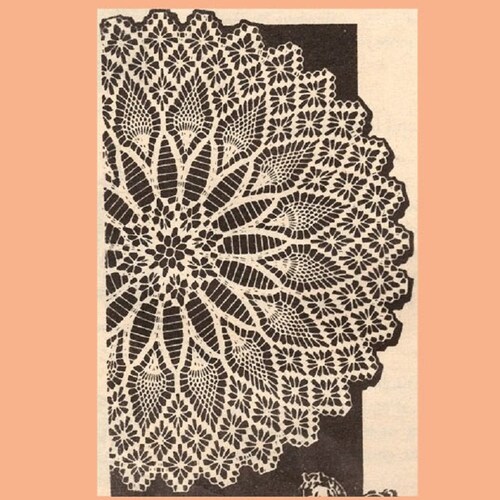
Let's break down these three zones:
-
The Center (or Medallion): This is where the doily begins. It's the anchor for the entire design, establishing the piece's initial symmetry. The center is often a small, relatively dense motif, like a star, a flower, or a simple solid circle. Its structure determines the number of repeating sections in the rest of the doily.
-
The Body: This is the main, expansive part of the doily. It grows out from the center and contains the primary decorative elements of the design. This is where you'll find repeating bands of different stitch patterns, intricate lacework, and iconic motifs like the pineapples, fans, and shells you're interested in. The body does the most work in increasing the doily's diameter.
-
The Border (or Edging): This is the grand finale. The border's purpose is to provide a beautiful, stable, and finished edge to the piece. It can range from a simple, delicate row of scallops or picots to a dramatic, heavily ruffled, or sharply pointed frame that defines the doily's final silhouette.
Case Study: A 1950s "Sheer Witchery" Doily
Now, let's move from theory to practice. We're going to analyze an authentic pattern from 1950 to see these zones in a real-world example. You already have experience reading patterns, so you're well-equipped to dissect this design.
My Vintage Crochet Projects | Free Vintage Crochet Doily ...
We'll examine the 'Sheer Witchery' doily from a 1950 Lily Mills pattern book. This will be our case study for identifying the structural zones in an authentic vintage design.
Please open the blog post and find the section for the 'Sheer Witchery' doily. First, look closely at the photographs of the finished piece. Then, skim the written instructions. You don't need to read every word, but try to get a feel for how the pattern's structure changes from the beginning rounds to the end. Your goal is to visually map out the center, body, and border.
Breaking Down "Sheer Witchery"
Now that you've had a look, let's walk through the structure of "Sheer Witchery" together, referencing its written pattern.
-
The Center (Rounds 1-6): The pattern begins with a chain loop and builds a small, six-pointed star wheel. Looking at the pattern text, you can see these early rounds use basic stitches (ch, sl st, sc, dc) to create a solid foundation. This small star is the central medallion.
-
The Body (Rounds 7-19): This is where the major expansion and decorative work happens.
- Round 7 marks a distinct transition, creating large "ch 11" loops. This immediately opens up the fabric from the solid center into lace.
- Rounds 8 through 19 work into these loops to form the six large, pointed "petal" sections that define the doily's character. The stitch counts are high, and the instructions are detailed, which is typical for the main body of a pattern.
-
The Border (Rounds 20-22): The pattern shifts again at Round 20 to create the finish.
- Round 20 uses a series of single crochets to prepare a neat foundation for the final edge.
- Rounds 21 and 22 build the final ruffled, picot-pointed edge. The instruction
5 dc in next scin Round 21 is a classic way to create a shell or ruffle, confirming this section's role as the border.
By breaking the pattern down like this, you can see it's not a single, monolithic set of instructions, but a sequence of distinct design phases.
Test your understanding!
Let's try this analysis on a different design. In the same blog post from Dazespast, scroll down to find the "Popcorn & Pineapples Doily". Look at the picture of the finished doily.
Based on the visual information, can you identify where the center ends, what constitutes the body, and where the border begins? Briefly describe the main feature of each zone.
Show answer
- Center: The very middle section, which appears to be a small, textured circle made of popcorn stitches. This creates a dense, floral-like starting point.
- Body: This is the largest section, visually dominated by the ring of eight large pineapple motifs that radiate outwards. This section begins where the pineapples start to form and ends where they are fully developed.
- Border: The final few rounds that create the pointed, shell-like edging around the entire piece. This border accentuates the points of the pineapples, giving the doily a distinct star-like finish.
Conclusion
In this lesson, we established a critical framework for analyzing circular crochet designs. You learned to identify the three core structural zones—the center, the body, and the border—and applied this analysis to an authentic 1950s pattern. Recognizing this underlying structure is the first and most important step toward demystifying complex doilies and beginning to design your own.
Key Takeaways:
- Most traditional circular doilies are built in three stages: Center, Body, and Border.
- The Center establishes the foundation and symmetry.
- The Body contains the main decorative patterns and handles most of the expansion.
- The Border provides a clean and decorative finish.
- Analyzing existing patterns zone-by-zone makes them easier to understand and learn from.
In our next lesson, we'll delve deeper into the geometry of the doily's body. We'll explore the two primary ways patterns expand outward: through radial (wedge-based) repeats and concentric (band-based) structures. Understanding this will be key to planning the mathematical and visual flow of your own designs.