Hello! Let's continue our exploration of optical instruments.
In our last lesson, we mastered the simple microscope, understanding how a single convex lens creates angular magnification. You learned the two critical formulas for magnification: one for a relaxed eye (image at infinity) and one for maximum magnification (image at the near point).
Today, we will build directly on that knowledge to analyze the compound microscope. This powerful instrument uses a combination of lenses to achieve much higher magnifications than a simple magnifier. Your learning outcome is to analyze its working principle and calculate its magnifying power. You'll discover that the eyepiece of a compound microscope is essentially the simple microscope we just studied, making your previous work a crucial foundation for today's lesson. This is a very important topic for your NEET preparation.
1. The Principle of the Compound Microscope
A simple microscope's magnification is limited by the practical constraints of making lenses with very short focal lengths. To achieve significantly higher magnification (e.g., 100x, 400x), we need to compound the effect of multiple lenses. A compound microscope does this with a two-lens system:
- The Objective Lens: A convex lens with a very short focal length () and small aperture, placed near the object.
- The Eyepiece (or Ocular): A convex lens with a slightly longer focal length () and larger aperture, placed near the observer's eye.
The magic happens in two stages:
- Stage 1: The object is placed just outside the focal point of the objective lens. The objective forms a real, inverted, and magnified intermediate image.
- Stage 2: This intermediate image then acts as the object for the eyepiece. The eyepiece is positioned so that this image falls inside its focal length, making the eyepiece function exactly like a simple microscope. It produces a final, highly magnified, virtual image.
Let's visualize this process. The following video explains the ray diagram construction step-by-step.
Compound Microscope || Ray Optics || class 12th || Physics handwritten notes
This video from 'PHYSICS with Umesh Rajoria' provides an excellent visual walkthrough of how an image is formed in a compound microscope. Even though the audio is in Hindi, the on-screen diagramming is universal and clearly illustrates the two-stage process.
Watch the video from the beginning up to 07:58. Focus on how: The small objective lens forms the first real, inverted image (A'B'). This image A'B' becomes the object for the larger eyepiece. The eyepiece is positioned so A'B' is inside its focal length, creating the final, large virtual image (A''B'').
Here is a clean, static ray diagram for the case where the final image is formed at the near point, D, for maximum magnification.
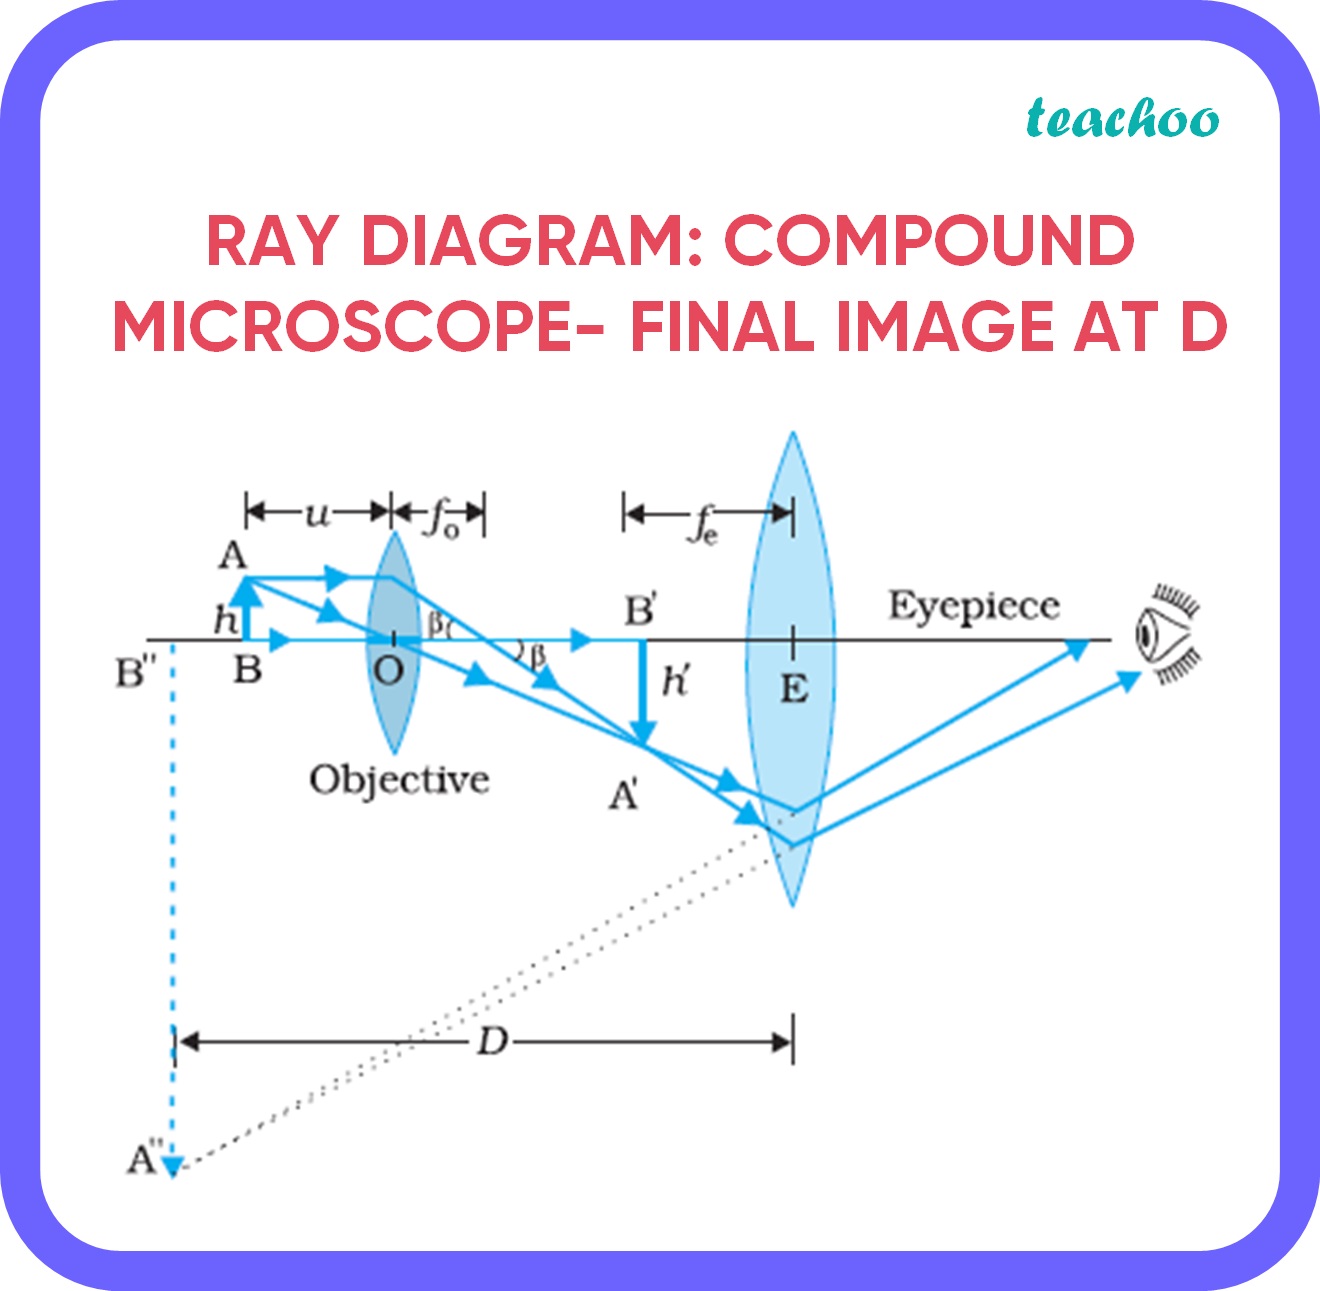
Notice that the final image (A''B'') is inverted with respect to the original object (AB). This is why when using a biological microscope, you have to move the slide in the opposite direction to how you want the image to move.
2. Magnifying Power and Tube Length
The total angular magnification (or magnifying power) of a compound microscope is the product of the magnification produced by each lens.
- Objective: It produces a real image, so we use the linear magnification, .
- Eyepiece: It acts as a simple microscope, so we use its angular magnification, .
Therefore, the total magnifying power is:
Let's break this down.
Magnification of the Objective ()
From the standard lens formula, the linear magnification is the ratio of image distance to object distance:
Here, is the image distance for the objective and is the object distance for the objective.
Magnification of the Eyepiece ()
This is exactly what we learned in the last lesson. We have two cases:
- Final Image at Near Point, D (Maximum Magnification): The eyepiece is a simple microscope forming an image at D.
- Final Image at Infinity (Normal Adjustment/Relaxed Eye): The eyepiece is a simple microscope with the object at its focus.
Total Magnifying Power ()
Combining these gives us the final formulas. We add a negative sign to account for the fact that the final image is inverted relative to the original object.
-
Image at Near Point (D):
-
Image at Infinity:
The following reading from the NCERT textbook provides a detailed derivation and introduces an important related concept: tube length.
Chapter Nine - RAY OPTICS AND OPTICAL INSTRUMENTS
Let's read the official derivation from your NCERT textbook, 'RAY OPTICS AND OPTICAL INSTRUMENTS'. This will solidify your understanding of the formulas and also define the tube length.
In the PDF, navigate to section 9.7.1, 'The microscope'. Start reading from the paragraph that begins 'A simple microscope has a limited maximum magnification...' and continue to the end of that subsection (before section 9.7.2). Focus on the derivation of the total magnification m = mo * me and how the formulas for me are applied.
Tube Length
In solving problems, you'll often need the separation between the two lenses, which is also referred to as the length of the microscope tube (). From the ray diagram, you can see this is simply the sum of the image distance from the objective and the object distance for the eyepiece.
Note on an approximation: The NCERT text also introduces an approximate formula for magnification: , where is defined as the distance between the focal points of the lenses. While useful for conceptual understanding (it clearly shows that short focal lengths give high magnification), for NEET problem-solving, it's more reliable to calculate and explicitly and use the full formulas.
Test your understanding!
Why must both the objective and eyepiece of a compound microscope have short focal lengths for high magnification?
Show answer
Looking at the approximate formula :
- Short : A shorter focal length for the objective allows the object to be placed very close to it, producing a more magnified intermediate image (a larger ).
- Short : A shorter focal length for the eyepiece provides greater angular magnification (), as we saw with the simple microscope formulas ().
Since both and are in the denominator, making them small makes the total magnification large.
3. NEET-Style Problem Solving
As you requested, let's focus on the mathematical application. Solving numericals is the best way to master this topic for your exam. The key is to correctly apply the lens formula and sign conventions for each lens, one step at a time.
Let's watch a solved example that shows this process in action.
Compound microscope Numerical | Class 12 (India) | Physics | Khan Academy
This Khan Academy video provides a clear, step-by-step solution to a typical compound microscope problem for the 'image at infinity' case. Pay close attention to how the sign convention is applied to the lens formula.
Watch the entire video. The goal is to see the methodology: Identify the given variables (f_o, f_e, u_o). Use the lens formula for the objective to find v_o. Calculate the objective magnification m_o = v_o / u_o. Calculate the eyepiece magnification m_e = D/f_e. Find the total magnification by multiplying them.
Now, let's tackle a problem for the other case: the final image at the near point, D. This is a classic NEET-style problem.
NEET-Style Problem (Image at D)
A compound microscope consists of an objective lens of focal length 2.0 cm and an eyepiece of focal length 6.25 cm, separated by a distance of 15 cm. How far from the objective should an object be placed to obtain the final image at the least distance of distinct vision (D = 25 cm)? What is the magnifying power of the microscope? (This is based on NCERT Exercise 9.11)
Show solution
Given:
- Focal length of objective, cm
- Focal length of eyepiece, cm
- Separation between lenses, cm
- Final image distance, cm (virtual image, same side as light enters)
- Near point, cm
Strategy: We need to find and then the magnifying power. The problem gives information about the final image, so we must work backward from the eyepiece to the objective.
Step 1: Analyze the Eyepiece
We know the image distance () and focal length (). We can find the object distance for the eyepiece ().
Using the lens formula:
The negative sign confirms the object for the eyepiece (the intermediate image) is to its left.
Step 2: Find the Image Distance for the Objective ()
We know the total separation is .
The intermediate image is formed 10 cm to the right of the objective (positive, as expected for a real image).
Step 3: Find the Object Distance for the Objective ()
Now we have and . We can find the original object position .
Using the lens formula:
Answer 1: The object should be placed 2.5 cm from the objective lens.
Step 4: Calculate the Magnifying Power ()
Now we have all the components for our formula:
Answer 2: The magnifying power of the microscope is -20. (The negative sign indicates an inverted image, so a power of 20x).
Conclusion
Today we dissected the compound microscope, a cornerstone of optical instruments. By combining an objective and an eyepiece, it achieves magnifications far beyond that of a simple lens.
Key Takeaways:
- Working Principle: An objective lens creates a magnified, real, inverted image, which is then viewed and further magnified by an eyepiece acting as a simple microscope.
- Total Magnification: It's the product of the objective's linear magnification and the eyepiece's angular magnification: .
- The Two Core Formulas:
- Final Image at D:
- Final Image at :
- Tube Length: The separation between the lenses is , a key relationship for solving problems where is given.
Preview of the Next Lesson:
We will move from the microscopic to the macroscopic by studying the astronomical telescope. You will find that it is also a two-lens system, but its design philosophy is different. While a microscope's objective is designed to magnify a tiny object placed nearby, a telescope's objective is designed to gather as much light as possible from a very distant object. We will explore how this changes the lens properties and the magnification formula.