Hello! Welcome to a new and exciting module in your Alteryx journey.
In our previous modules, we've covered advanced data preparation, API integration, and powerful spatial analytics to answer "where" questions. We concluded by learning how to visualize spatial data to make our analysis compelling.
Now, we shift gears from describing what is or was to predicting what will be. This module, Fundamentals of Predictive Analytics, introduces you to the tools and concepts that allow you to build models that forecast future outcomes. This is a cornerstone of modern data science and a key topic for the Alteryx Advanced Certification.
Learning Outcome: Describe the standard predictive modeling workflow in Alteryx.
In this first lesson, we'll map out the entire predictive process. You will learn the key stages every predictive project follows, from defining the problem and preparing the data to building, testing, and evaluating a model. We won't master every tool today, but you will gain a clear, high-level understanding of the end-to-end workflow, which will serve as our roadmap for the rest of this module.
1. The Predictive Modeling Lifecycle in Alteryx
At its core, predictive modeling is a structured, multi-step process. While the specific tools may change, the overall workflow remains consistent. Alteryx is designed to facilitate this process, with tools organized into palettes that align with each stage of the modeling lifecycle.
A completed predictive workflow in Alteryx often looks something like this, with distinct sections for each major phase:
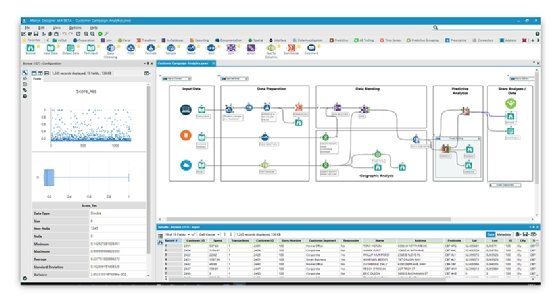
The tools you'll use are generally grouped into categories that match these stages. The "HOW ALTERYX CAN HELP" diagram provides a useful mental map of the toolsets available for each part of the process.

We can summarize the standard workflow into five key stages:
- Problem Definition & Data Investigation: Clearly define what you want to predict and explore your data to understand its structure, quality, and relationships.
- Data Preparation & Partitioning: Clean the data, create necessary features (like a target variable), and split your dataset into separate streams for training and testing the model.
- Model Building (Training): Select an appropriate algorithm and "train" it using your prepared training data.
- Model Evaluation (Scoring & Validation): Use the trained model to make predictions on your test data and evaluate its performance by comparing the predictions to the actual outcomes.
- Iteration & Deployment: Compare the performance of different models, select the best one, and use it to score new, unseen data.
Let's walk through these stages using a practical example.
2. Stage 1: Problem Definition & Data Investigation
Before you can build a model, you must know what question you're trying to answer. This question is defined by your target variable—the specific outcome you want to predict.
The article below introduces predictive analytics in Alteryx through a clear use case: a bank wants to predict which clients are most likely to subscribe to a term deposit. Here, subscribing to the deposit is the target variable.
Alteryx Designer: An Introduction to Predictive Analytics
Let's start by exploring the initial stages of a predictive project using the article 'Alteryx Designer: An Introduction to Predictive Analytics' from Billigence. This will help us understand the business problem and the initial data exploration phase.
Please read from the beginning of the article to the end of the 'Exploratory Data Analysis' section. Pay attention to: The business problem: predicting which clients will subscribe to a term deposit. The initial 'Data Preparation' steps used to clean the raw data. How 'Data Investigation tools' like the Frequency Table are used to spot outliers and understand the data before modeling.
As you saw, the first part of the workflow involves understanding and cleaning the data. This Exploratory Data Analysis (EDA) is critical for identifying issues like outliers or missing values that could negatively impact your model.
The most important decision you make at this stage is identifying your target variable. Its characteristics determine the type of predictive model you will build.
Predictive Process Step 1: Finding Your Target Variable
The Alteryx Community article 'Predictive Process Step 1: Finding Your Target Variable' provides an excellent explanation of what target and predictor variables are. Understanding this distinction is the foundation of any predictive project.
Please read the introduction and the section titled 'Choosing Your Algorithm'. Focus on the definitions of the target variable (what you are trying to predict) and the predictor variables (what you think will impact the target).
In summary, Stage 1 is about two things:
- Defining the problem: What is your target variable? (e.g., customer subscription).
- Investigating the data: What are your predictor variables? (e.g., age, job, marital status). Are there any data quality issues to fix?
3. Stage 2: Data Preparation & Partitioning
Once you understand your data, you need to prepare it for modeling. This often involves transforming fields, and most importantly, splitting your data into separate sets for training and testing.
A model learns patterns from data. If you test the model on the same data it learned from, you won't get a true measure of its predictive power. It's like giving a student the answers to a test before they take it.
To solve this, we partition the data. The Billigence article demonstrates this perfectly.
Alteryx Designer: An Introduction to Predictive Analytics
Let's return to the Billigence article to see how to prepare the data for modeling. This section covers two crucial steps: creating the target variable in a usable format and splitting the data for unbiased evaluation.
Please read the section that begins just after 'Exploratory Data Analysis'. Focus on: How the Formula tool is used to create a numeric target variable ('subscribed'). How the Create Samples tool is used to split the data into training, testing (validation), and holdout samples.
The three samples created by the Create Samples tool serve distinct purposes:
- Training Set (E for Estimation): The largest portion, used to train the model and teach it the patterns in the data.
- Validation Set (V for Validation): Used to test the model's performance and tune its parameters. This provides an unbiased check on how well the model generalizes to new data.
- Holdout Set (H for Holdout): Often omitted for simplicity, but it provides a final, truly unbiased assessment of the chosen model's performance after all training and tuning are complete.
4. Stage 3 & 4: Model Building, Scoring, and Evaluation
With prepared and partitioned data, you are ready for the core of the predictive workflow: building and evaluating a model.
- Build/Train: You feed the training data into a predictive algorithm (like Decision Tree or Logistic Regression). The algorithm analyzes this data and creates a model object.
- Score/Predict: You take the model object and combine it with your validation data using the
Scoretool. TheScoretool applies the model's logic to the validation data to generate a prediction for each record. - Evaluate: You compare the predictions from the
Scoretool to the known actual outcomes in the validation data. This allows you to calculate performance metrics (like accuracy) to see how good the model is.
The Billigence article demonstrates this process clearly.
Alteryx Designer: An Introduction to Predictive Analytics
Now for the main event: building and testing the model. The next section of the article shows how to use Alteryx's predictive tools to train a model and evaluate its output.
Please read the sections 'Predictive Possibilities with Alteryx' and 'Comparing Algorithm Outputs'. Focus on: The difference between Assisted Modelling and the manual Predictive Tools Palette. How a predictive tool (like Decision Tree) is configured with target and predictor variables. How the Score tool is used to validate the model against the validation set. The final step of comparing results from different algorithms to choose the best one. This highlights the iterative nature of modeling.
As the article highlights, predictive modeling is an iterative process. You don't just build one model. You typically try several different algorithms, compare their performance on the validation set, and select the one that best solves your business problem.
Conclusion
Congratulations on completing your introduction to the predictive modeling workflow! While we will dive much deeper into each component, you now have a solid framework for how a predictive project is structured in Alteryx.
Key Takeaways:
- The standard predictive modeling workflow is a structured process consisting of several key stages.
- Stage 1 (Problem & Data Investigation): Starts with defining a target variable and using Data Investigation tools for EDA.
- Stage 2 (Data Preparation & Partitioning): Involves cleaning data and using the Create Samples tool to create training and validation datasets for unbiased model evaluation.
- Stage 3 (Model Building): Uses a predictive tool (e.g.,
Decision Tree) on the training data to create a model object. - Stage 4 (Model Evaluation): Uses the Score tool to generate predictions on the validation data and then compares these predictions to actuals to measure performance.
- The entire process is iterative, involving testing multiple models to find the best one for the task.
Preview of the Next Lesson:
In this lesson, we briefly touched on how the type of target variable dictates the type of model you build. In our next session, we will explore this concept in detail. You will learn to differentiate between the three main types of predictive problems: regression, classification, and clustering. Understanding this is the first and most critical step in choosing the right tool for your analysis.