Hello! Welcome back to our module on Designing Analytic Applications.
In the previous lesson, we laid the groundwork by defining what an Analytic App is and identifying its core components: the base workflow, Interface tools, the Action tool, and the final .yxwz app file. You saw a simple demonstration of how a Text Box can be used to make a workflow interactive.
Today, we're going to get much more hands-on. This lesson is designed to meet your goal of combining theory with practical application. We will build a more sophisticated app step-by-step, and in doing so, you will learn to master the configuration of three of the most essential Interface tools:
- File Browse: To let users select their own data.
- Drop-Down: To give users a fixed set of choices.
- Text Box: For flexible, free-form text input.
This lesson directly addresses the learning outcome: Configure various interface tools for user input (e.g., Text Box, Drop-Down, File Browse).
The Project: A Dynamic Data Summarization App
Instead of looking at each tool in isolation, we will build a single, practical Analytic App. The goal is to create an application that allows a user to:
- Select their own transactional data file.
- Choose which field to group the data by (e.g., by Store or by Region).
- Choose which numeric field to sum (e.g., sum of Sales or sum of Profit).
- Provide a custom name for the output report.
This scenario requires multiple types of user input, making it a perfect exercise for learning different Interface tools.
Part 1: Dynamic Inputs with the File Browse Tool
The first and most fundamental requirement for our app is to allow the user to select their own input file. Hard-coding an input file path, as you would in a standard workflow, makes the app inflexible. The File Browse tool solves this.
The core concept is to connect a File Browse tool to an Input Data tool. The user's file selection at runtime will then dynamically update the file path in the Input Data tool.

Now, let's walk through the process of building the base workflow and implementing this dynamic input feature.
[PDF] a practitioner's guide to - alteryx - USEReady
We'll use a chapter from 'A Practitioner's Guide to Alteryx' as our hands-on guide. It provides a clear, step-by-step tutorial for building an app very similar to our goal.
Please open the PDF and navigate to the section '8.2 Let’s Build an App For That!' starting on page 276. Follow the instructions from the beginning through 'Step 5' on page 282. This will guide you through: Building the initial workflow with a Summarize tool. Adding a File Browse tool to your canvas. Configuring the Action tool that connects the File Browse tool to your Input Data tool.
After completing these steps, you will have a basic app that can accept a user-selected file. The key takeaway is how the Action tool is configured to Update Value (Default) and targets the file attribute within the Input Data tool's XML configuration.
Part 2: Offering Pre-defined Choices with the Drop-Down Tool
Forcing a user to type a field name (like "Region" or "Store_Number") is prone to typos and errors. A much better user experience is to provide a pre-defined list of valid options. This is the primary use case for the Drop-Down tool.
A critical concept for the Drop-Down tool is the Name:Value pair:
- Name: The user-friendly text the user sees in the list (e.g., "Group by Store").
- Value: The actual data that gets passed to the workflow tool (e.g., the field name
Store_Number).
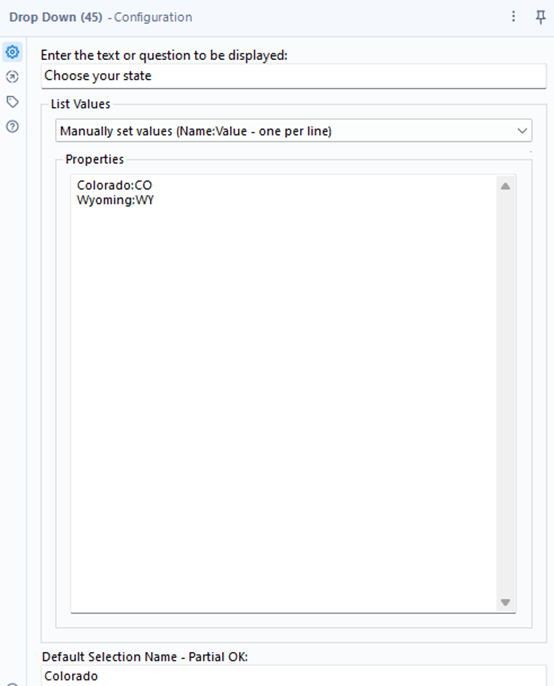
Let's continue our app build by adding Drop-Downs to control the Summarize tool.
[PDF] a practitioner's guide to - alteryx - USEReady
Continuing with our guide, we will now add controls to let the user choose how the data is grouped and aggregated.
Please continue reading the 'Let’s Build an App For That!' section, from 'Step 6' (page 283) to 'Step 8' (page 291). This will walk you through configuring Drop-Down tools to dynamically change the fields used in the Summarize tool. Pay close attention to how the Action tools are configured to update the specific 'Group By' and 'Sum' actions within the Summarize tool.
This section demonstrates a powerful capability: using an Action tool to update not just a simple value, but a specific part of a complex tool's configuration. You are now controlling which fields the Summarize tool operates on based on the user's selection.
Part 3: Free-form Input with the Text Box Tool
Finally, let's give the user the ability to name their output file. Since the name could be anything, a free-form Text Box is the perfect tool. In the last lesson, you saw it used to update a filter condition; here, you'll see it used to modify a file path.
[PDF] a practitioner's guide to - alteryx - USEReady
To complete our app's functionality, we will add a Text Box that allows the user to name the output Excel sheet.
Please read from 'Step 9' (page 292) to the end of the build on page 300. This part demonstrates how to use a Text Box tool and an Action tool to update the file path in an Output Data tool, effectively letting the user name a sheet within the output Excel file.
This final step reinforces that Interface tools are incredibly versatile. The value from a simple Text Box can be used to update any string-based configuration in a downstream tool, from filter values to parts of a file path.
Conclusion
Congratulations on building a complete, multi-faceted Analytic App! In this practical session, you've moved beyond theory and configured the three most common user input tools.
Key Takeaways:
- File Browse Tool: Essential for allowing users to select their own input files or define output locations. It works by updating the file path in an Input Data or Output Data tool.
- Drop-Down Tool: Ideal for providing a list of pre-defined options to prevent user error. Its power lies in the
Name:Valuepair, separating the user-facing label from the backend workflow value. - Text Box Tool: The go-to for any free-form text input, whether it's for a search term, a filter value, or part of an output file name.
- The Core Pattern: The fundamental logic remains the same for all these tools: an Interface Tool captures user input, which is then used by an Action Tool to update a specific configuration property in a Workflow Tool.
In our next lesson, we will explore the Action tool in much greater detail. You'll learn about its different update methods and how to use it to dynamically change almost any aspect of a workflow tool, unlocking a new level of power and control in your Analytic Apps.