Introduction
Welcome to the final lesson in our module on Workflow Optimization and Management. Over the past few lessons, we've explored how to identify performance bottlenecks, speed up development with caching, manage execution flow with containers, and ensure data integrity with the Test and Message tools. You've learned how to make your workflows faster, more efficient, and more reliable.
Today, we'll add the final layer of professionalism to your work. This lesson focuses on a skill that is critical for collaboration, maintenance, and your own future sanity: how to document a workflow effectively using annotations, containers, and metadata.
A workflow that produces the right answer is good, but a workflow that is also easy to understand, trust, and modify is great. By the end of this lesson, you will be able to transform a complex canvas into a clear, self-explanatory map of your analytical process, a crucial skill for any advanced Alteryx user.
1. The "Why": The Importance of Good Documentation
Before we dive into the "how," let's establish the "why." As your workflows grow in complexity, a clean, well-documented canvas is not a luxury; it's a necessity. It ensures that a colleague (or you, six months from now) can quickly understand the purpose, logic, and flow of the process without having to decipher every tool's configuration.
To get a feel for this, let's start with a brief article that outlines some best practices.
Alteryx Documentation: Best practices
This article from The Data School Down Under, titled 'Alteryx Documentation: Best practices', provides an excellent overview of why documentation is crucial and introduces several of the techniques we'll cover today.
Please read the introductory section of the article, down to 'Here we go!'. It sets the stage for thinking about documentation as an integral part of the workflow development process.
As the article suggests, good documentation makes your work transparent and trustworthy. Let's explore the three main pillars of documentation in Alteryx: Containers, Annotations, and Metadata.
2. Structuring Your Logic with Tool Containers
The Tool Container is your primary tool for imposing high-level structure on your workflow. It allows you to group related tools into a logical block, which you can then name, color, and collapse. This is the single most effective way to make a large, intimidating workflow immediately understandable.
Think of containers as chapters in a book. Instead of a hundred pages of unbroken text, you have clearly defined sections like "Chapter 1: Sourcing and Cleansing Data," "Chapter 2: Merging Customer and Sales Data," and "Chapter 3: Final Calculations."
Let's look at two excellent examples of well-structured workflows.
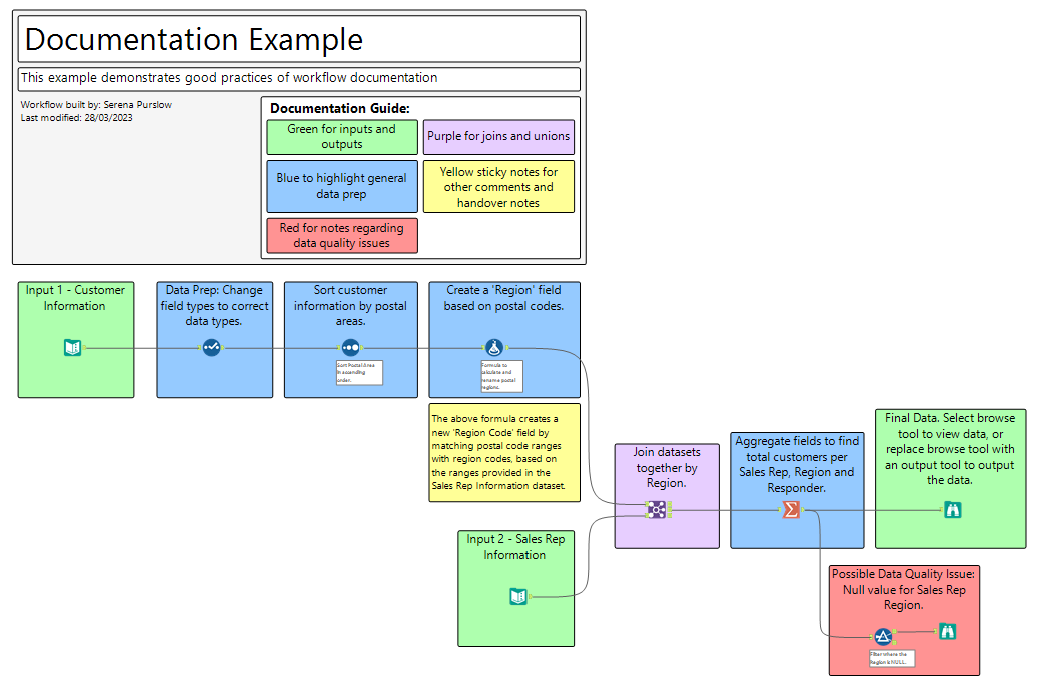
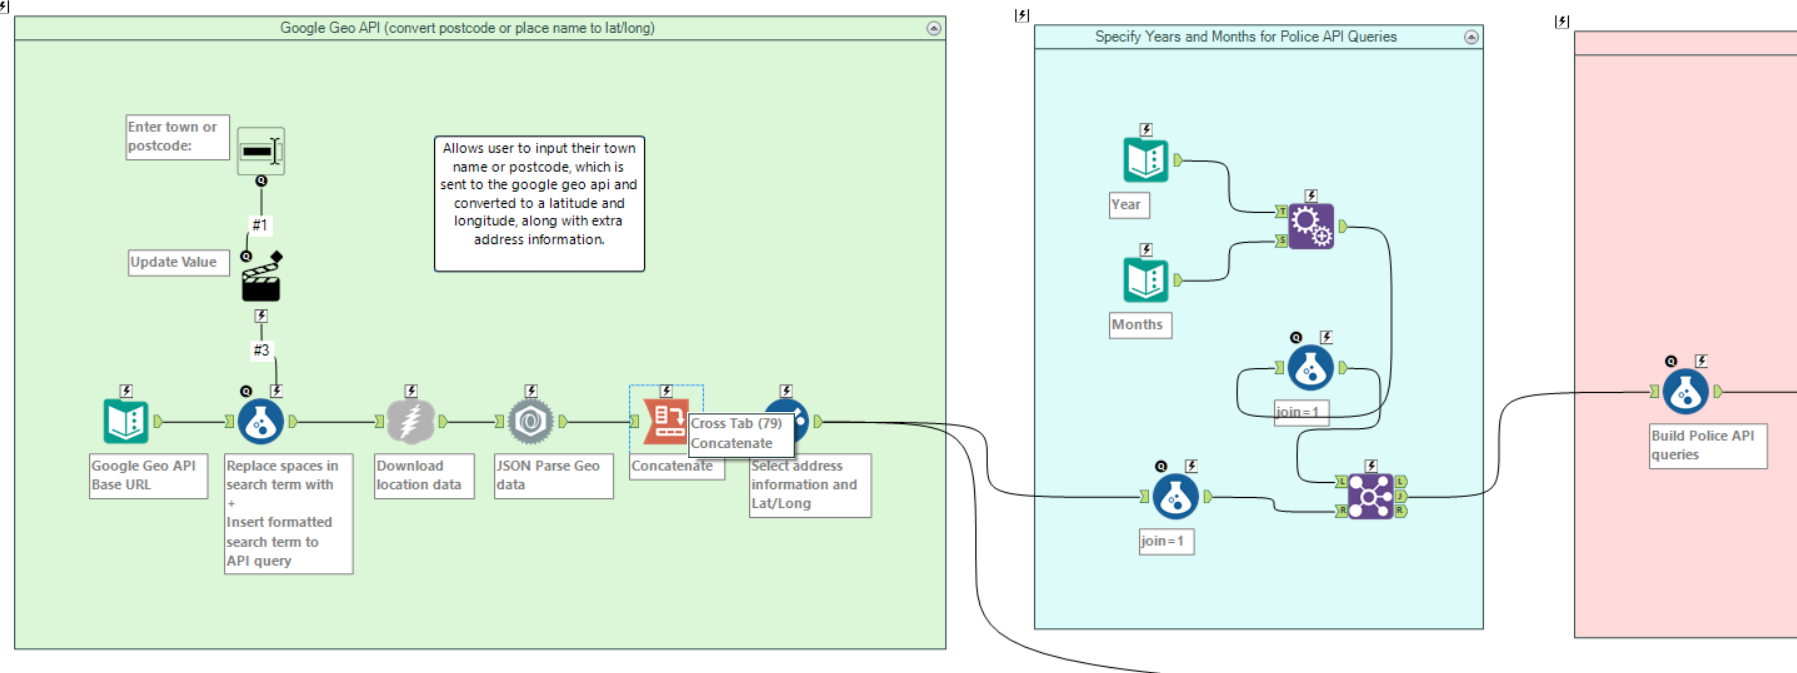
To learn the mechanics of using containers, please review the following guide.
[PDF] Workflow and Configuration Best Practices
The 'Workflow and Configuration Best Practices' PDF provides a concise summary of how to use containers.
In this document, find the section titled 'Contain It'. Read this section to understand how to organize your workflow into logical groups, name containers, and collapse/disable them.
By grouping tools into named containers, you guide the viewer through your analytical story, turning a complex canvas into a clear, high-level flowchart.
3. Adding Context with Annotations and Comments
While containers provide the structure, annotations provide the details. They are the notes and labels that explain the purpose and function of individual tools or sections. Alteryx provides several ways to add this context.
A. Tool Annotations
Every tool has a built-in annotation capability. You can give a tool a custom name and add a descriptive note that appears below it on the canvas. Instead of a generic "Filter" tool, you can have a "Filter: Remove Inactive Customers" tool. This is invaluable for clarity.
- How to use: Select a tool, click the Annotation icon (a small speech bubble) in the configuration pane, and enter your custom name or description.
The guide we just looked at provides a clear summary.
[PDF] Workflow and Configuration Best Practices
Let's refer back to the 'Workflow and Configuration Best Practices' PDF to see exactly how to modify tool annotations.
Find the section titled 'Noted: Tool Annotations'. This explains where to find the annotation icon. Then, look at the 'Demo' section at the end of the document. Step 3 provides a practical example: 'Edit to tool annotation for the filter to include a note about your global variable.' This shows a real-world application.
B. The Comment Tool
For more general documentation, like adding a title, a workflow legend (as seen in the first image), or a detailed explanation of a section, you use the Comment Tool. This tool places a resizable text box anywhere on your canvas. You can change its font, color, and background to organize your notes visually.
Alteryx Documentation: Best practices
The 'Alteryx Documentation: Best practices' article has a great section on using the Comment tool for visual organization, and the PDF provides the technical 'how-to'.
First, read section '2. Comment Tool' to see how you can use color-coding to organize sections. Then, read section '6. Final details' to see how it can be used for titles, logos, and other summary information.
C. Comments in Expressions
Finally, for documenting the most granular logic inside a tool (like a complex formula), you can add comments directly into the expression editor. This is essential for explaining complex calculations or business rules to anyone who needs to understand the details.
The 'Workflow and Configuration Best Practices' PDF (LINK) shows how to do this in the section "Noted: Expression Box Comments".
- Use
//for single-line comments. - Use
/* ... */for multi-line comments.
This practice is invaluable within the Formula, Filter, and Multi-Field Formula tools.
4. The Big Picture: Workflow Metadata
The final piece of documentation is the workflow's metadata. This is information about the workflow itself, such as its author, a detailed description of its purpose, inputs, and outputs. This information is stored within the workflow and is essential for managing your work on Alteryx Server or in a collaborative environment.
To access this, click on a blank part of your canvas to bring up the Workflow - Configuration window, and then click the Meta Info tab.
Alteryx Documentation: Best practices
Both of our resources explain how to edit the workflow's metadata.
Please read section '5. Meta Info' in this article. It shows you exactly where to find the Meta Info tab and add a description. The 'Workflow and Configuration Best Practices' PDF (resource LINK) also covers this in the 'That’s So Meta' section and includes a great tip: you can set your defaults in the Author box.
Filling out the metadata should be the final step before you consider a workflow complete. A good description can save someone hours of discovery work.
5. A Simple Documentation Checklist
Before you save and close a workflow, run through this quick mental checklist:
- Structure: Are logical sections of the workflow grouped into clearly named Tool Containers?
- Clarity: Have you used Tool Annotations to rename key tools (Inputs, Outputs, Filters, Joins, Formulas) with their specific purpose?
- Context: Is there a Comment tool at the top of the workflow with a title and a brief description? If you used color-coding, is there a legend?
- Complexity: Have you added comments (
//or/* */) inside any complex expressions? - Completeness: Is the Meta Info tab filled out with a description and author details?
If you can answer "yes" to these questions, you can be confident that your workflow is not only functional but also professional, maintainable, and ready for collaboration.
Conclusion
In this lesson, we completed our journey through workflow optimization and management by focusing on documentation. Creating a clean, well-documented workflow is a hallmark of an advanced Alteryx user. It demonstrates foresight and respect for your collaborators and your future self.
Key Takeaways:
- Tool Containers provide high-level structure, grouping logical steps of your process.
- Annotations add context at the tool level. Use Tool Annotations for specific tool functions, the Comment Tool for general explanations and titles, and expression comments for detailed formula logic.
- Metadata provides essential information about the workflow's purpose and ownership.
- Effective documentation makes your workflows easier to understand, maintain, debug, and share.
Preview of the Next Lesson:
This lesson concludes the module on building robust and efficient workflows. Now that you can confidently create a professional-grade analytical process, our next module, Dynamic Reporting and Visualization, will teach you how to present your findings. In the first lesson, we will start with a fundamental reporting building block: you will learn how to create and format tables using the Table tool.